> ## Documentation Index
> Fetch the complete documentation index at: https://docs.lettr.com/llms.txt
> Use this file to discover all available pages before exploring further.
# Azure DNS
> Add the DNS records Lettr needs in Microsoft Azure DNS to verify your sending, inbound, tracking, and storage domains with DKIM and DMARC.
This guide walks you through adding the required DNS records for Lettr using Microsoft Azure DNS. Azure DNS is a reliable, fast DNS service built on Microsoft's global network of name servers, managed through the [Azure Portal](https://portal.azure.com).
You will configure a **sending domain** (CNAME, DKIM TXT, and DMARC TXT records) and, optionally, an **inbound domain** (MX records), **tracking domain** (two CNAME records), and **storage domain** (CNAME and two TXT records).
***
## Sending Domain Setup
A sending domain authenticates your outgoing emails with DKIM and DMARC, ensuring they are delivered reliably and not marked as spam. This requires a CNAME record for domain verification, a TXT record for DKIM signing, and a TXT record for DMARC policy.
To create a sending domain in Lettr:
1. Select **Domains** in the navigation panel
2. Select **Sending Domains**
3. Click **Create Sending Domain**
4. Enter your desired sending subdomain (e.g. `mailing.company.com`)
5. Click **Create Domain**
Use a subdomain (e.g. `mailing.company.com`) instead of the root domain (`company.com`). A subdomain provides proper
reputation segmentation and is required if you also plan to receive emails with Lettr.
Click your new domain in the Sending Domains list. This will display a list of DNS records that need to be configured. Keep this page open — you will need these values soon.
### Configure Azure DNS
Log in to the [Azure Portal](https://portal.azure.com) and navigate to **All services** in the left-hand menu. Search for **DNS zones** to view your zones, and select the zone that matches your domain.
If your domain was purchased through Azure or your nameservers already point to Azure DNS, skip nameserver
configuration entirely. Your domain is already using Azure DNS's nameservers by default — proceed directly to adding
the DNS records below.
If you registered your domain elsewhere but want to manage DNS on Azure, you must first create a DNS zone in Azure DNS
and then **update the nameservers** at your registrar to Azure's nameservers shown in the zone overview.
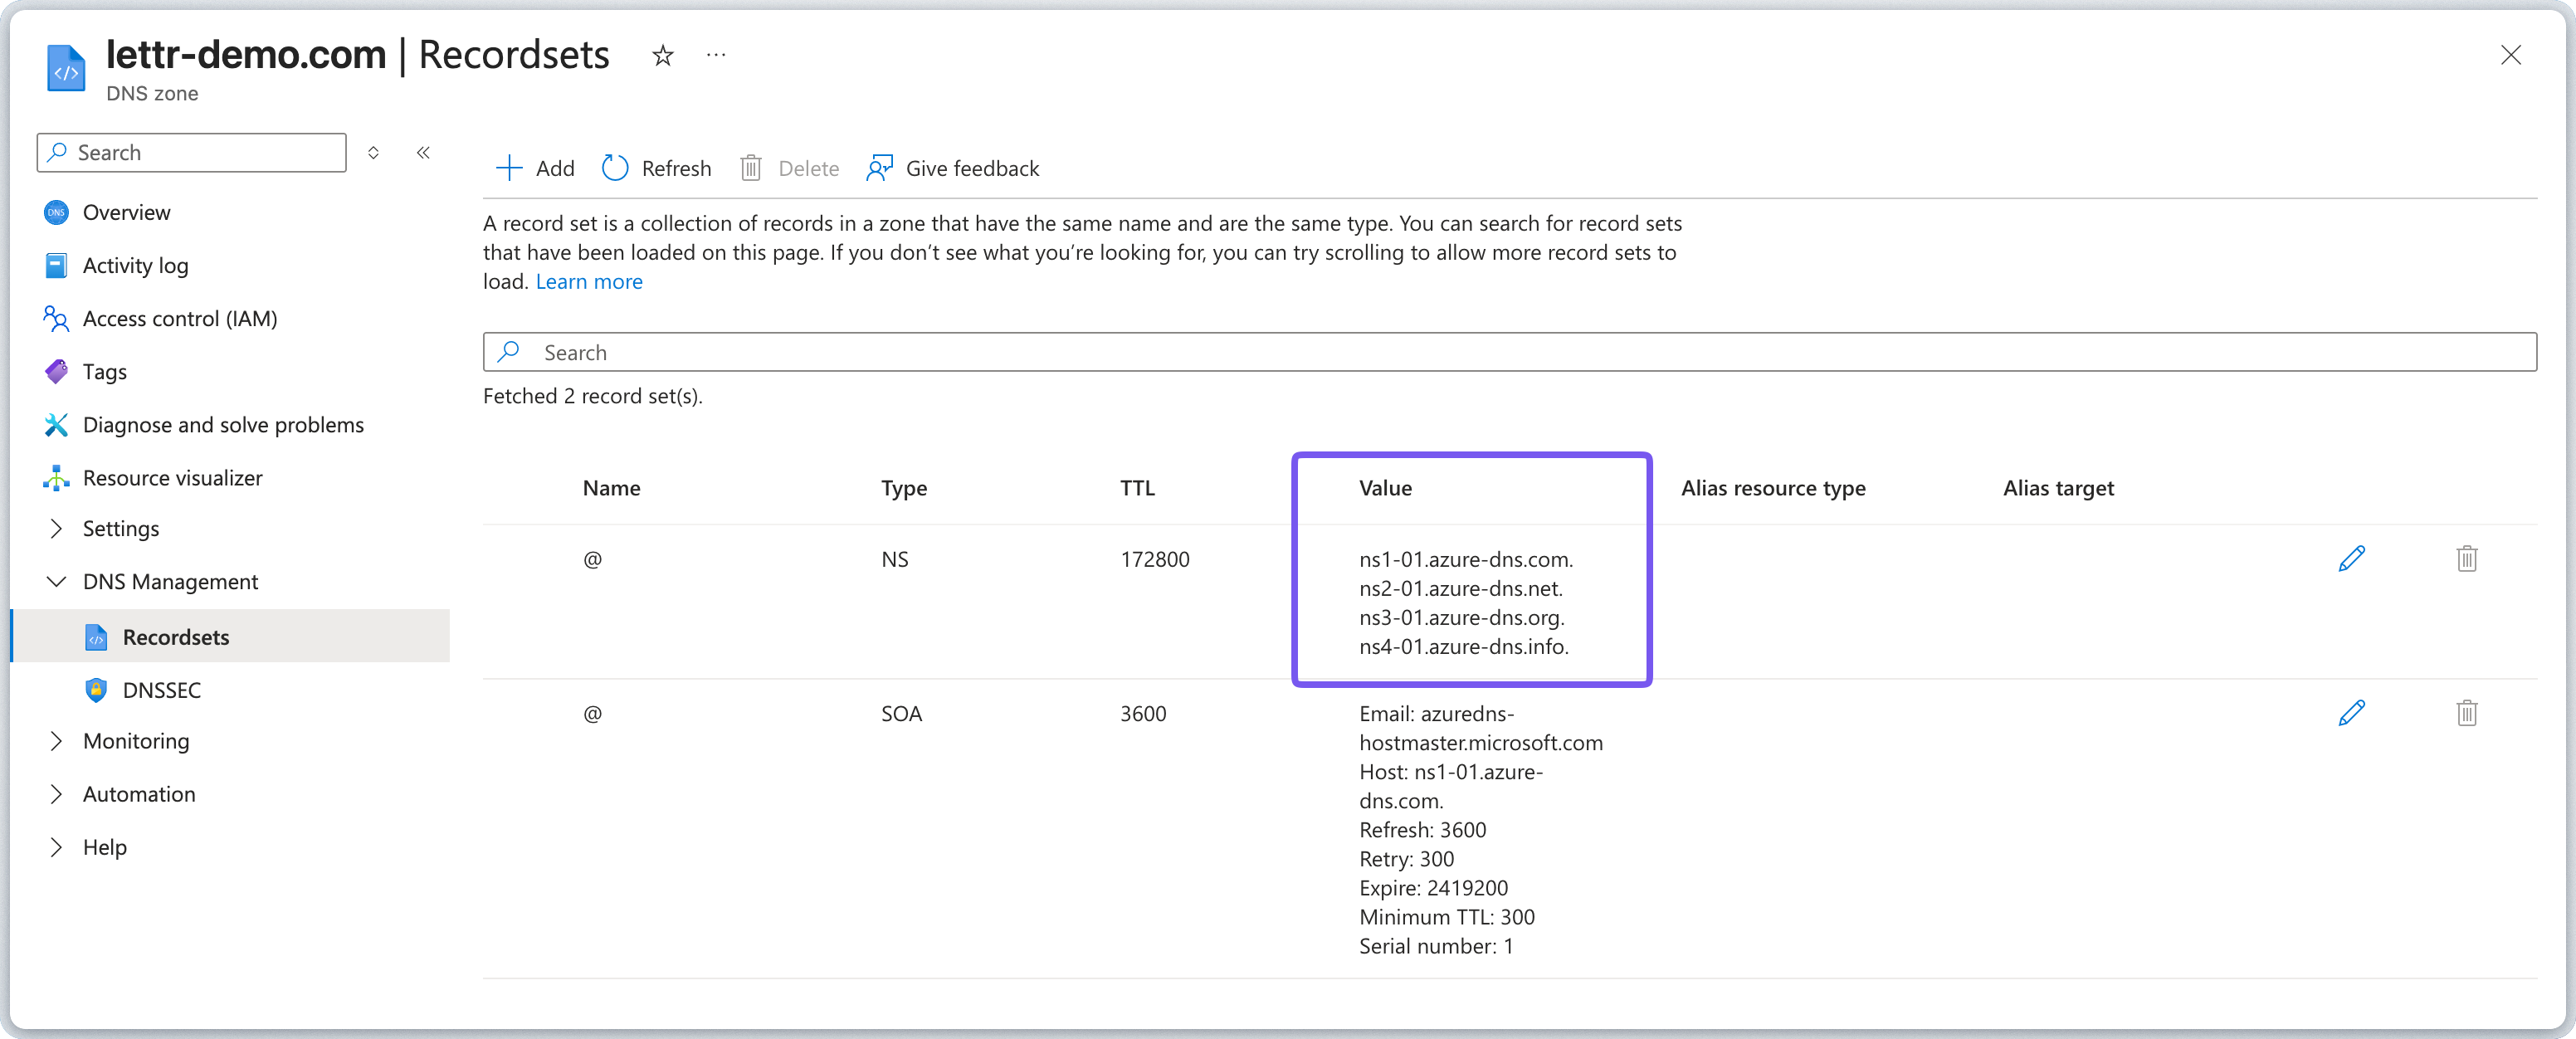 Until the nameservers are updated, any records you add in Azure DNS will not resolve.
### Add CNAME Record
The CNAME record verifies domain ownership with Lettr's email infrastructure.
Add the record in Azure DNS:
1. Click **+ Add** in your DNS zone.
2. Enter the **Hostname** from Lettr (without your domain suffix) into the **Name** field. For example, paste only `mailing`, not `mailing.company.com`.
3. Set **Type** to **CNAME**.
4. Leave **TTL** and **TTL unit** at their defaults (1 Hour).
5. Enter the **Value** from Lettr into the **Alias** field.
6. Click **Add**.
Until the nameservers are updated, any records you add in Azure DNS will not resolve.
### Add CNAME Record
The CNAME record verifies domain ownership with Lettr's email infrastructure.
Add the record in Azure DNS:
1. Click **+ Add** in your DNS zone.
2. Enter the **Hostname** from Lettr (without your domain suffix) into the **Name** field. For example, paste only `mailing`, not `mailing.company.com`.
3. Set **Type** to **CNAME**.
4. Leave **TTL** and **TTL unit** at their defaults (1 Hour).
5. Enter the **Value** from Lettr into the **Alias** field.
6. Click **Add**.
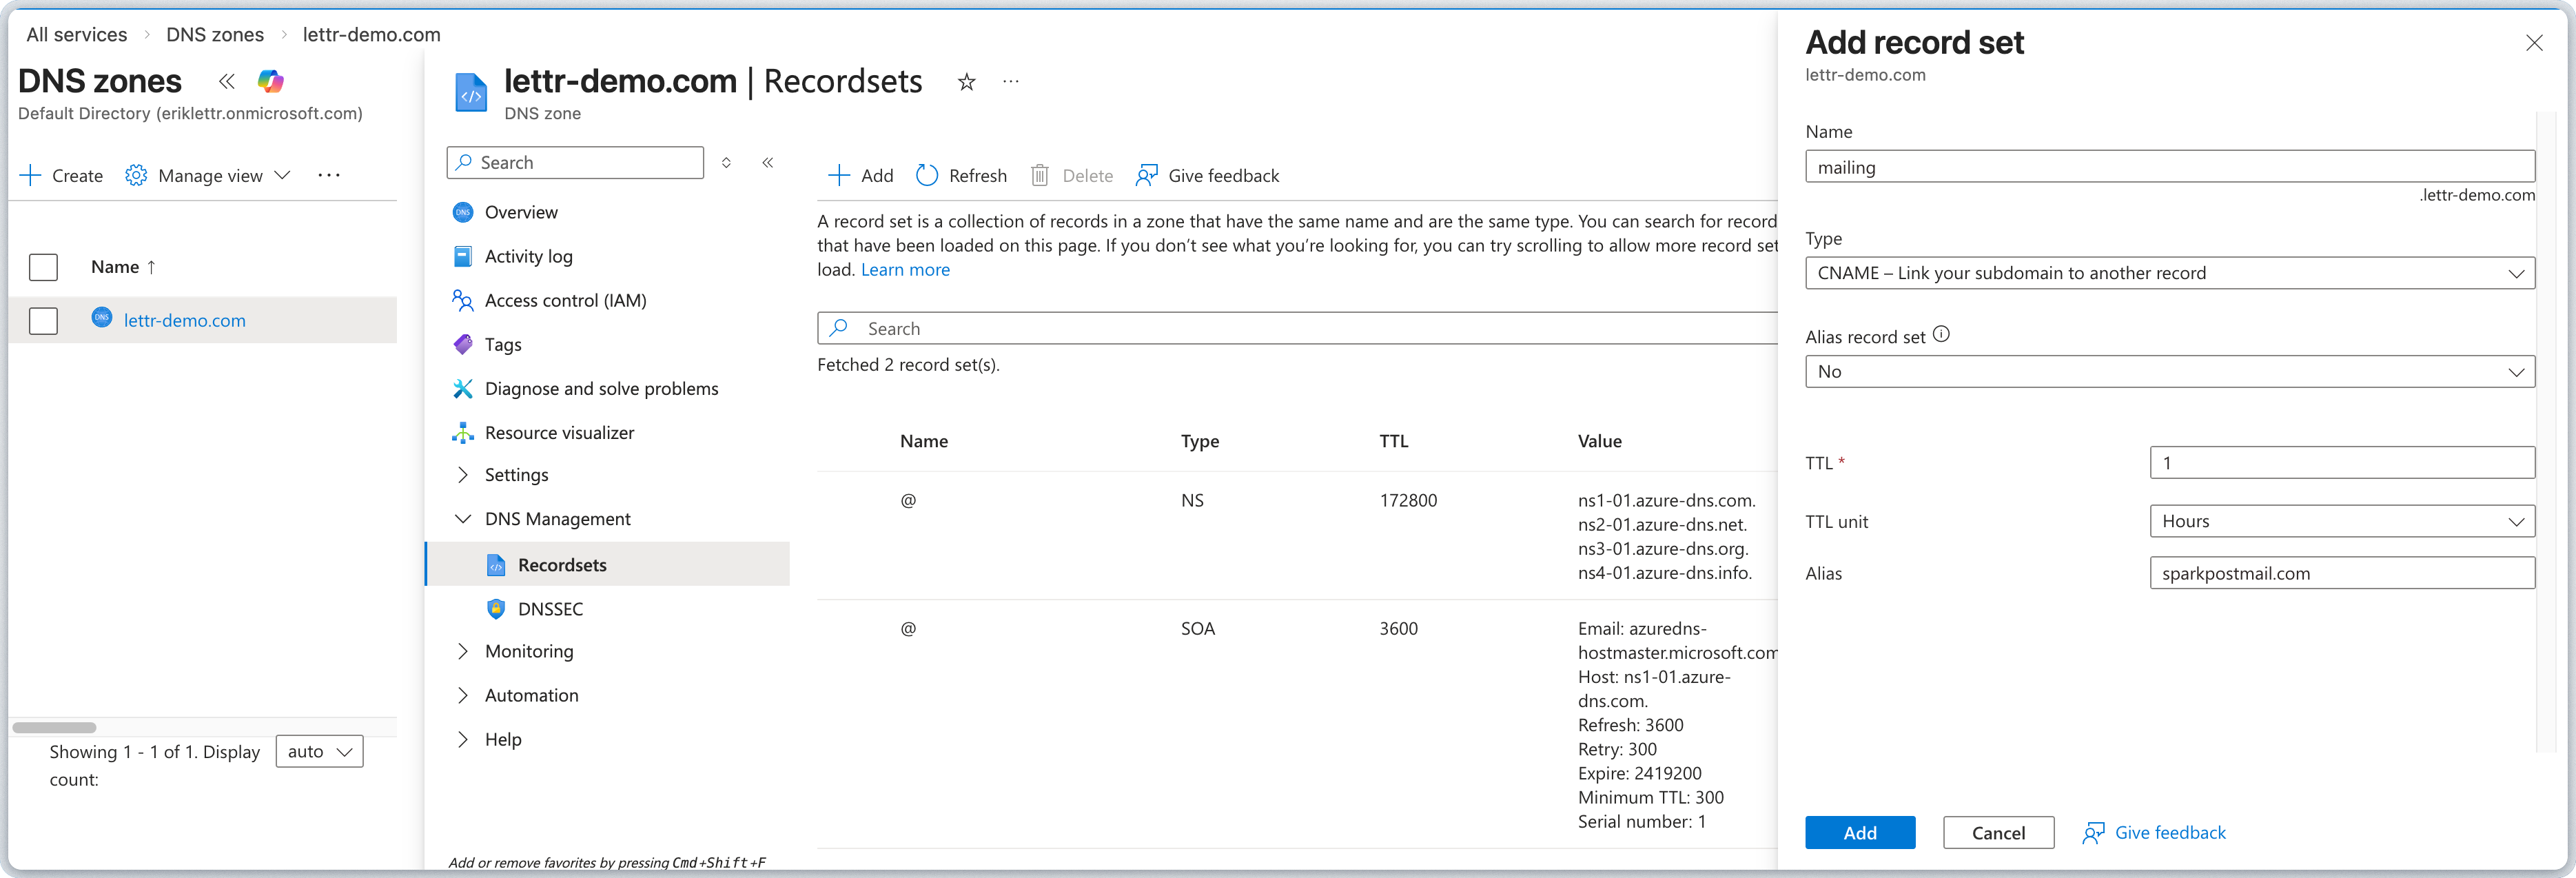 Azure DNS automatically appends your zone name to the record name. Always paste only the subdomain portion (e.g.
`mailing`, not `mailing.company.com`).
### Add TXT Record (DKIM)
The DKIM record adds a cryptographic signature to your outgoing emails, allowing recipients to verify they were sent by an authorized sender.
Add the record in Azure DNS:
1. Click **+ Add** in your DNS zone.
2. Enter the **Hostname** from Lettr (without your domain suffix) into the **Name** field. For example, paste only `scph0126._domainkey.mailing`.
3. Set **Type** to **TXT**.
4. Leave **TTL** and **TTL unit** at their defaults (1 Hour).
5. Enter the **Value** from Lettr into the **Value** field.
6. Click **Add**.
Azure DNS automatically appends your zone name to the record name. Always paste only the subdomain portion (e.g.
`mailing`, not `mailing.company.com`).
### Add TXT Record (DKIM)
The DKIM record adds a cryptographic signature to your outgoing emails, allowing recipients to verify they were sent by an authorized sender.
Add the record in Azure DNS:
1. Click **+ Add** in your DNS zone.
2. Enter the **Hostname** from Lettr (without your domain suffix) into the **Name** field. For example, paste only `scph0126._domainkey.mailing`.
3. Set **Type** to **TXT**.
4. Leave **TTL** and **TTL unit** at their defaults (1 Hour).
5. Enter the **Value** from Lettr into the **Value** field.
6. Click **Add**.
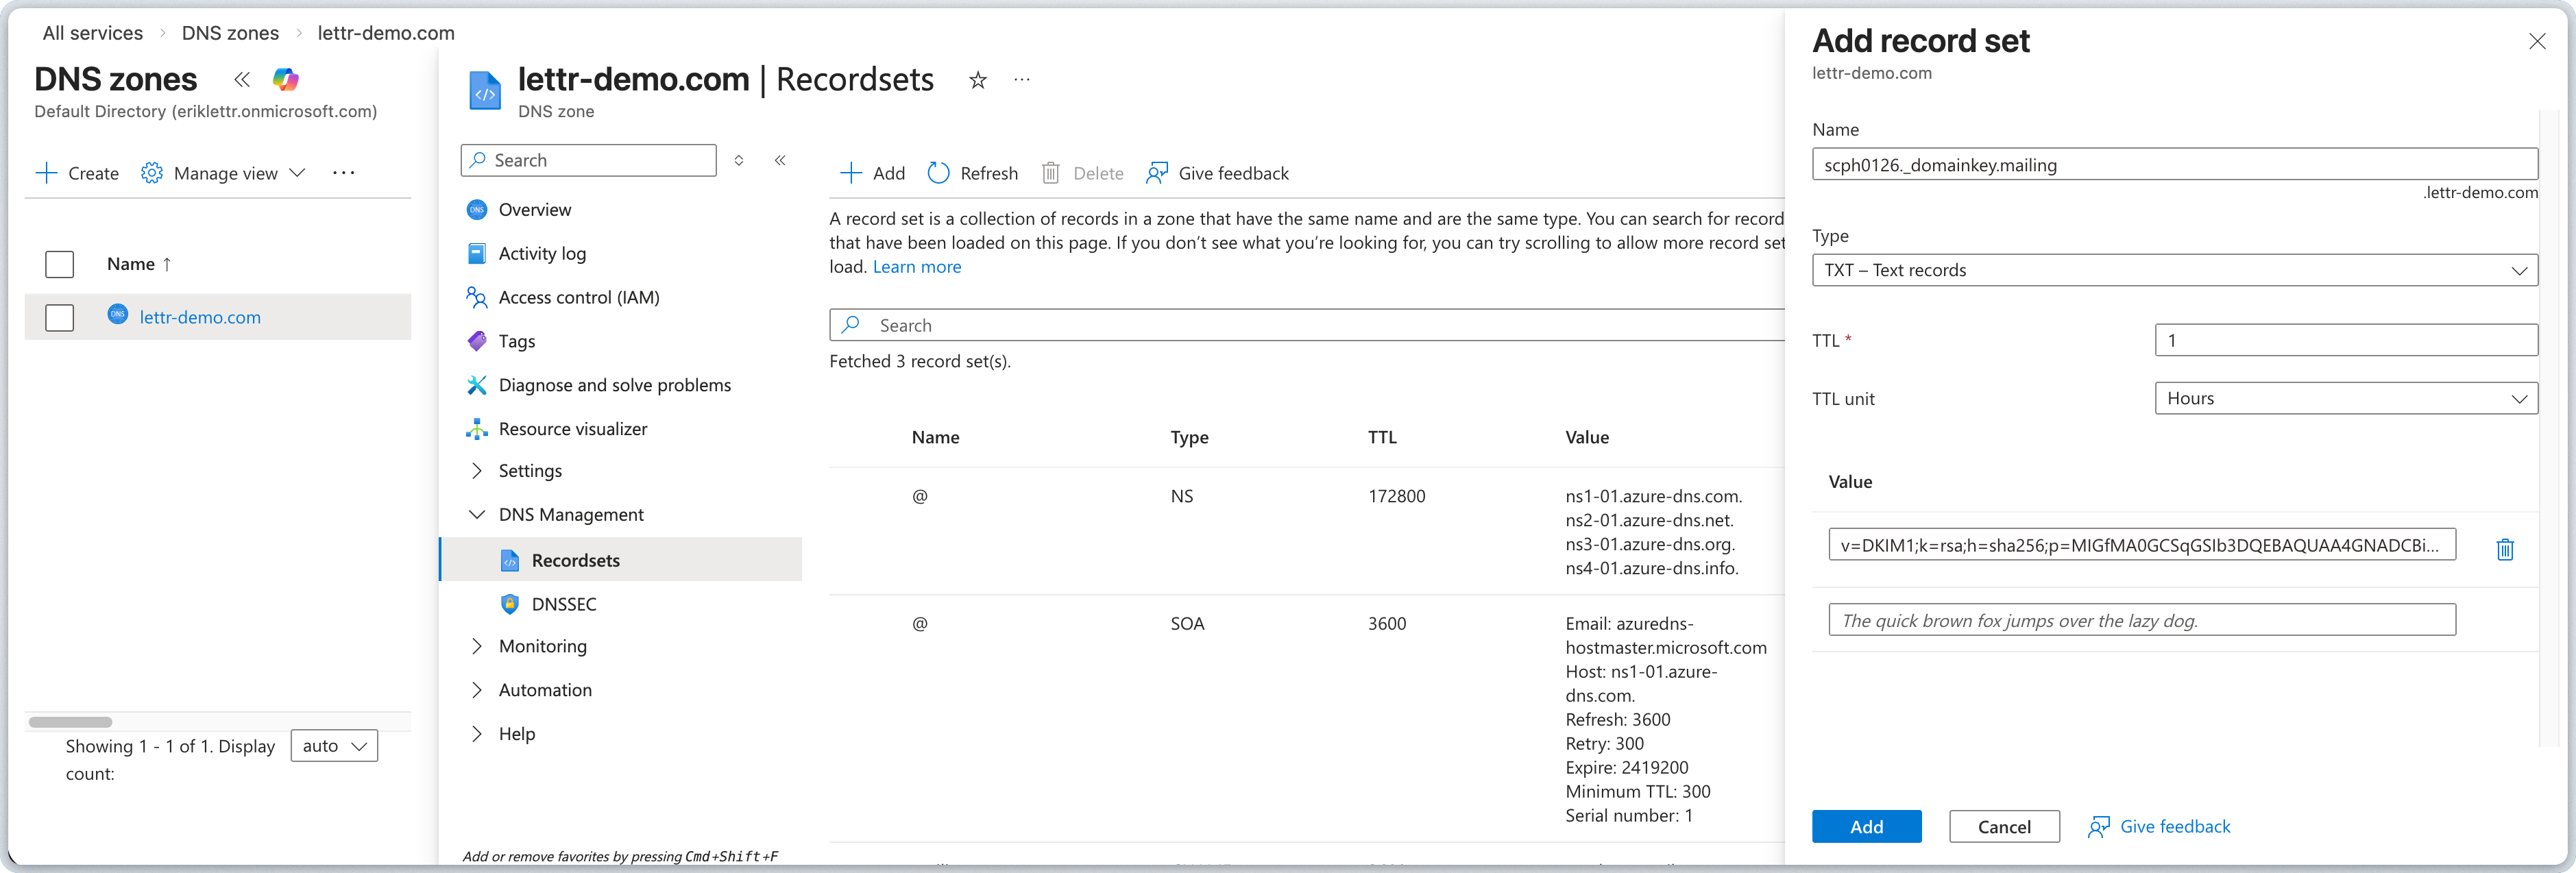 Azure DNS automatically appends your zone name to the record name. Always paste only the subdomain portion (e.g.
`scph0126._domainkey.mailing`, not `scph0126._domainkey.mailing.company.com`).
DKIM values are long strings. After saving, re-open the record set to confirm the full value was stored correctly. If
it appears truncated, delete and re-add the record.
### Add TXT Record (DMARC)
The DMARC record tells receiving mail servers how to handle emails that fail authentication checks, protecting your domain from spoofing.
Add the record in Azure DNS:
1. Click **+ Add** in your DNS zone.
2. Enter the **Hostname** from Lettr (without your domain suffix) into the **Name** field. For example, paste only `_dmarc.mailing`.
3. Set **Type** to **TXT**.
4. Leave **TTL** and **TTL unit** at their defaults (1 Hour).
5. Enter the **Value** from Lettr into the **Value** field.
6. Click **Add**.
Azure DNS automatically appends your zone name to the record name. Always paste only the subdomain portion (e.g.
`scph0126._domainkey.mailing`, not `scph0126._domainkey.mailing.company.com`).
DKIM values are long strings. After saving, re-open the record set to confirm the full value was stored correctly. If
it appears truncated, delete and re-add the record.
### Add TXT Record (DMARC)
The DMARC record tells receiving mail servers how to handle emails that fail authentication checks, protecting your domain from spoofing.
Add the record in Azure DNS:
1. Click **+ Add** in your DNS zone.
2. Enter the **Hostname** from Lettr (without your domain suffix) into the **Name** field. For example, paste only `_dmarc.mailing`.
3. Set **Type** to **TXT**.
4. Leave **TTL** and **TTL unit** at their defaults (1 Hour).
5. Enter the **Value** from Lettr into the **Value** field.
6. Click **Add**.
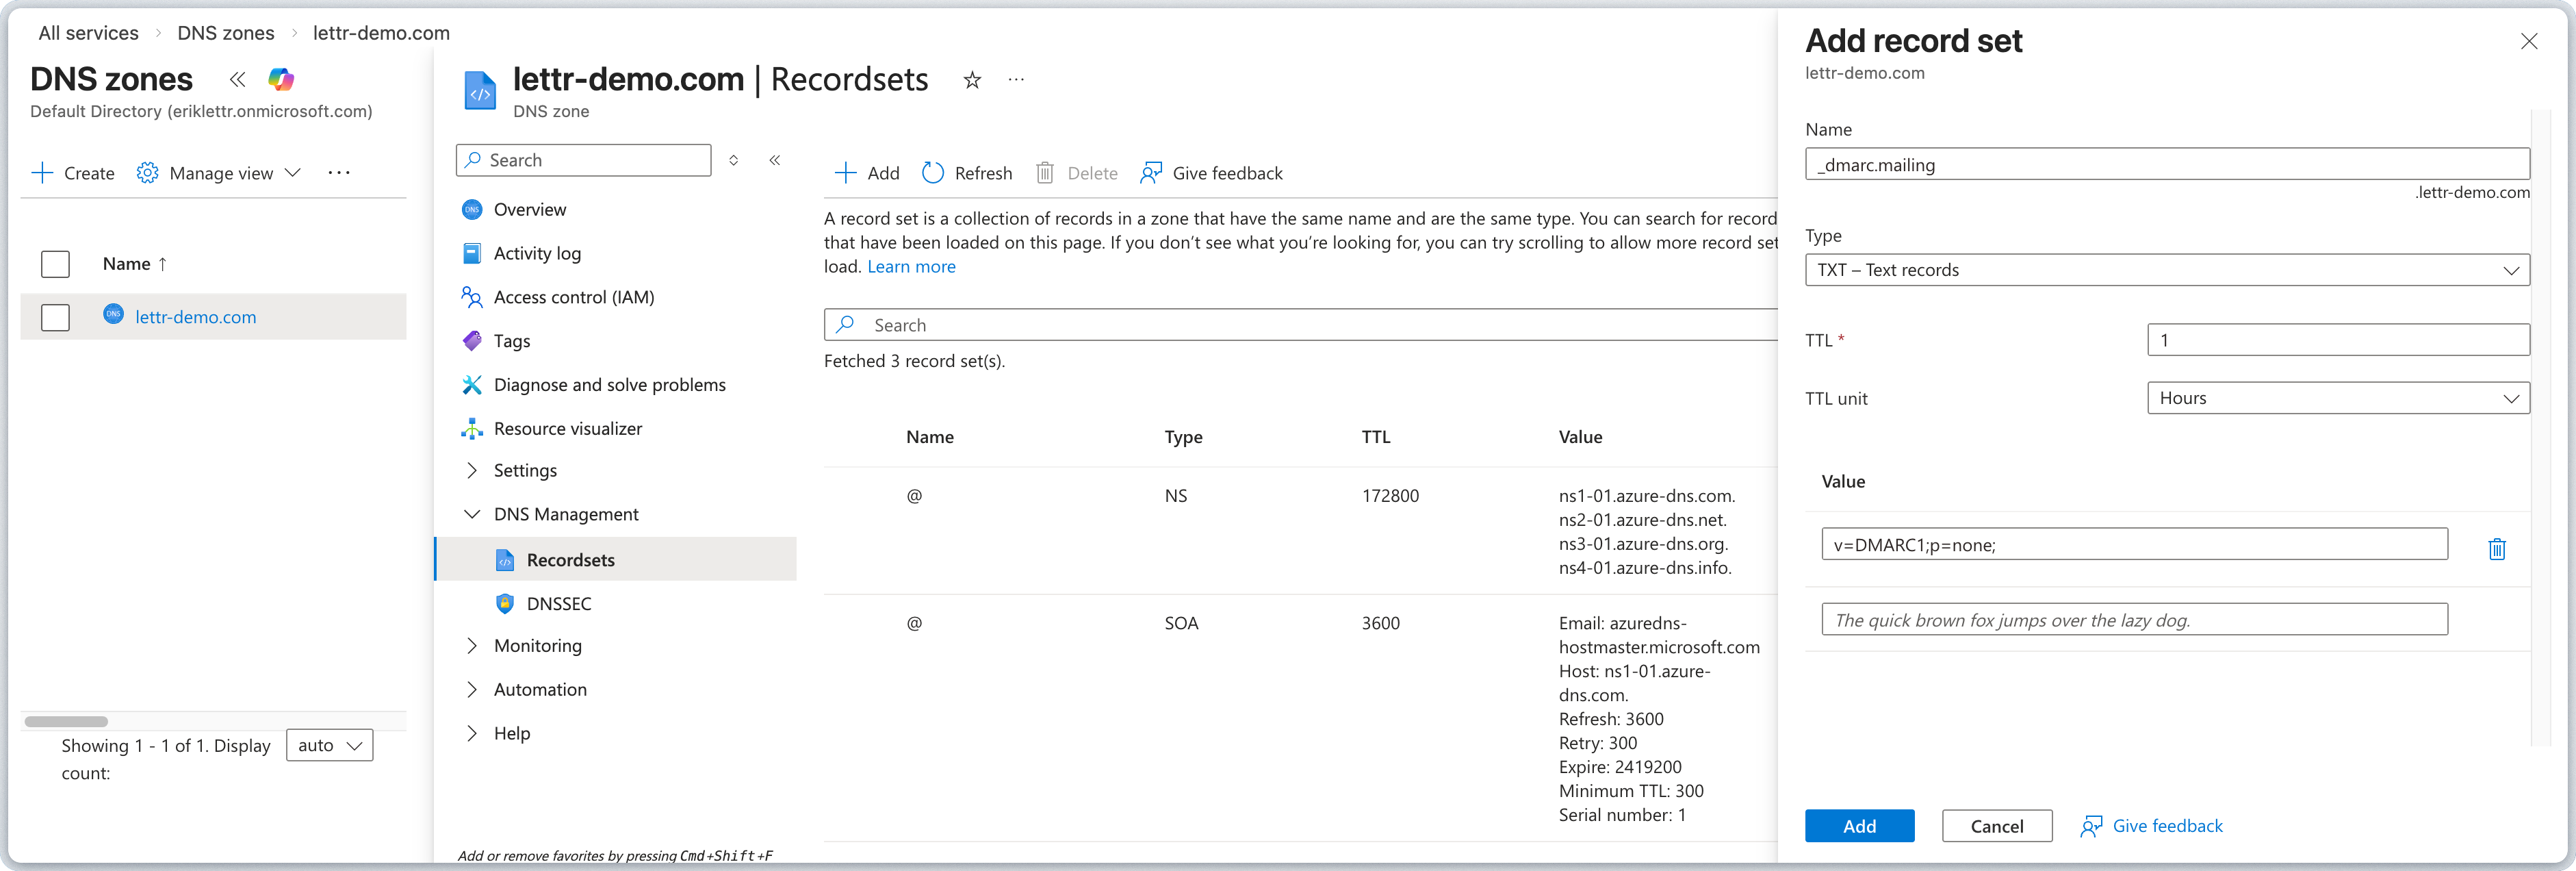 Azure DNS automatically appends your zone name to the record name. Always paste only the subdomain portion (e.g.
`_dmarc.mailing`, not `_dmarc.mailing.company.com`).
### Verify Your Sending Domain
After adding all three DNS records, go back to Lettr and click **Verify DNS Records**. DNS propagation can take up to 24–48 hours, though it typically completes within a few minutes.
***
## Inbound Domain Setup
An inbound domain allows Lettr to receive emails on your behalf. This requires three MX records that direct incoming mail to Lettr's mail servers.
### Add Inbound Domain to Lettr
To create an Inbound domain in Lettr:
1. Select **Domains** in the navigation panel
2. Select **Inbound Domains**
3. Click **Create Inbound Domain**
4. Enter your desired inbound subdomain (e.g. `inbound.company.com`)
5. Click **Create Domain**.
Click on your new domain in the Inbound Domains list. This will display the MX records that need to be configured.
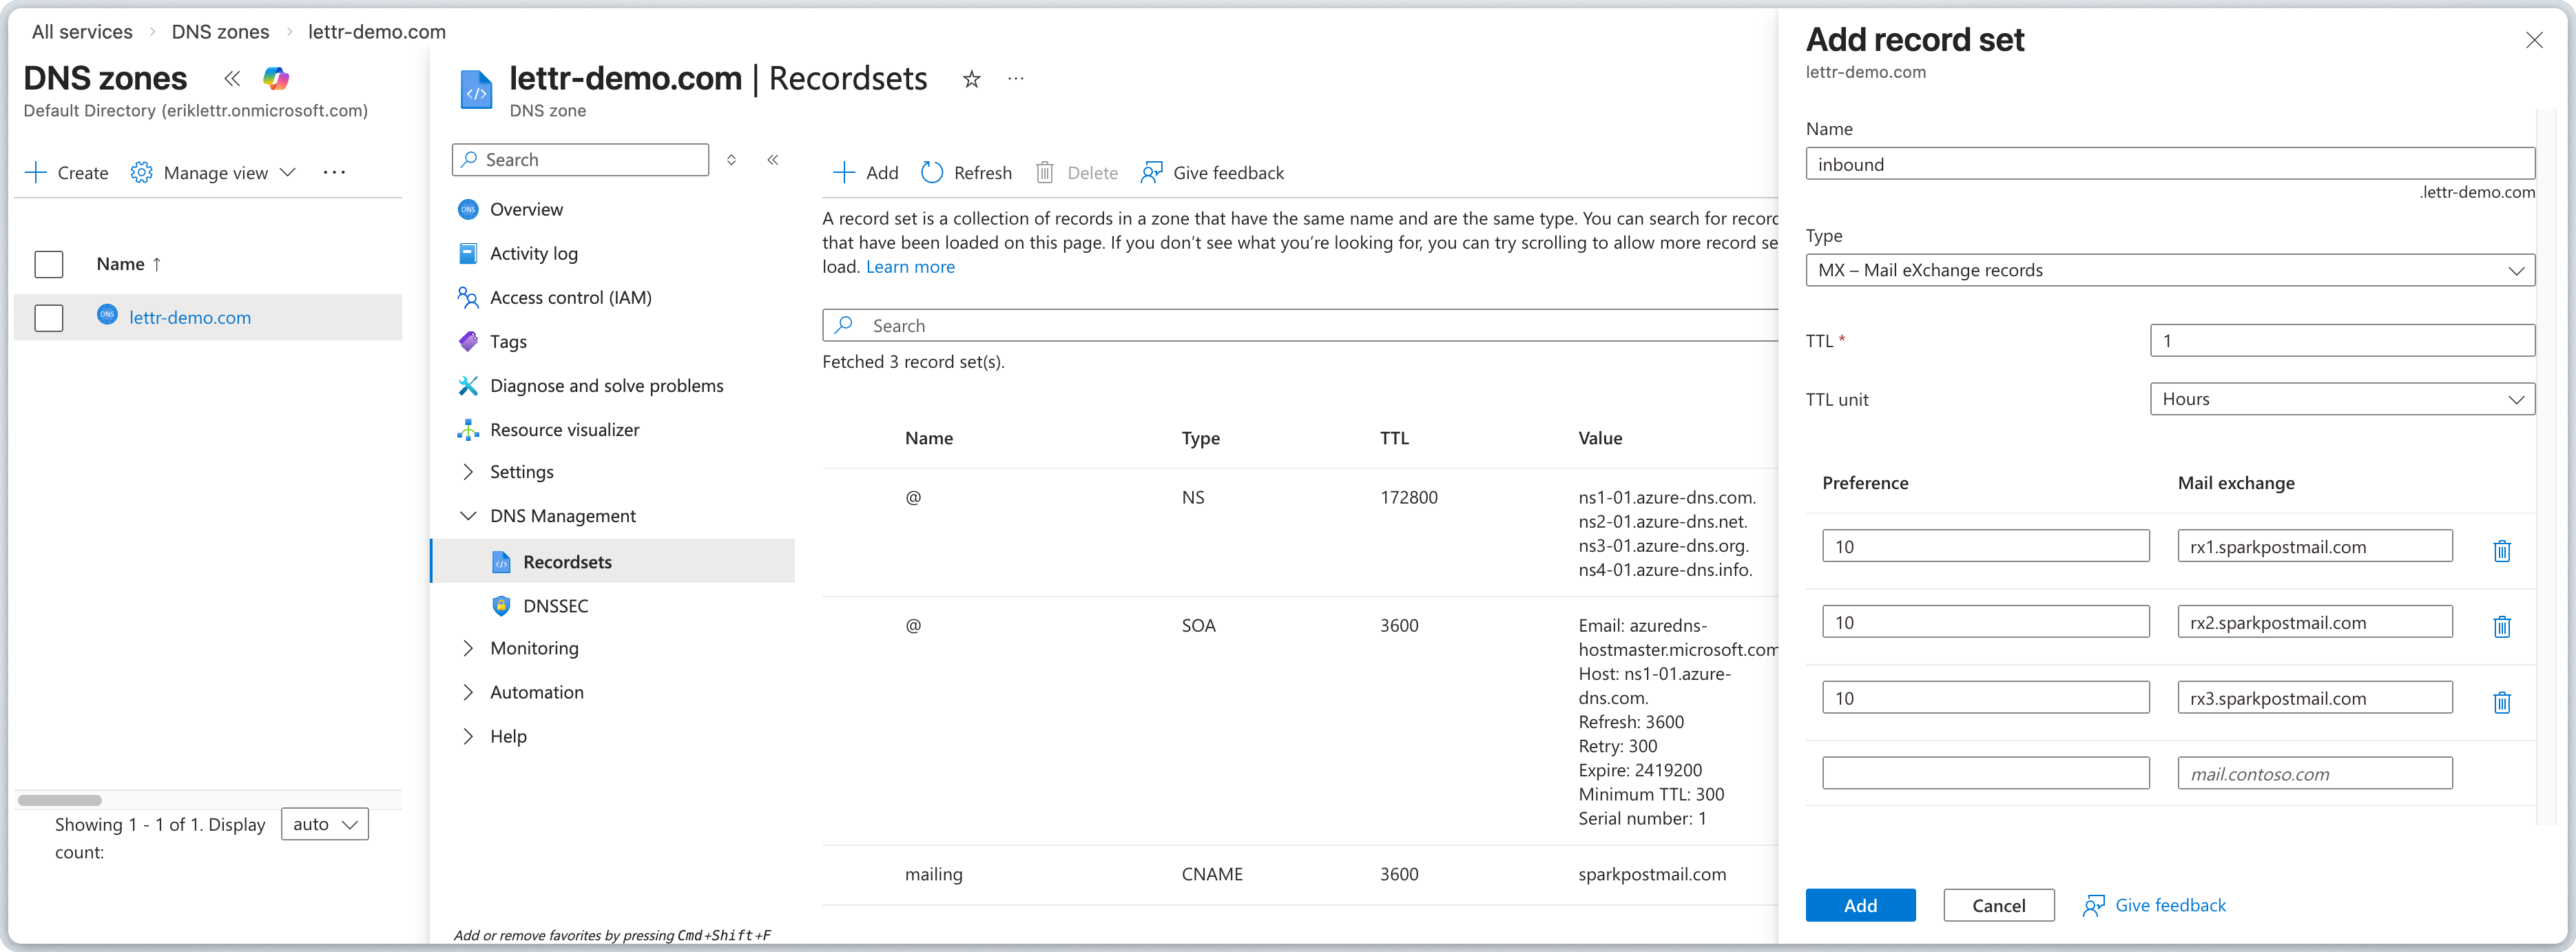
### Add MX Records
MX records tell other mail servers where to deliver emails addressed to your domain.
Add the MX record set in Azure DNS:
1. Click **+ Add** in your DNS zone.
2. Enter the **Hostname** from Lettr (without your domain suffix) into the **Name** field. For example, paste only `inbound`.
3. Set **Type** to **MX**.
4. Leave **TTL** and **TTL unit** at their defaults (1 Hour).
5. Under **MX Records**, enter `10` for **Preference** and `rx1.sparkpostmail.com` for **Mail exchange**.
6. Add two more rows: `10` / `rx2.sparkpostmail.com` and `10` / `rx3.sparkpostmail.com`.
7. Click **Add**.
Azure DNS automatically appends your zone name to the record name. Always paste only the subdomain portion (e.g.
`_dmarc.mailing`, not `_dmarc.mailing.company.com`).
### Verify Your Sending Domain
After adding all three DNS records, go back to Lettr and click **Verify DNS Records**. DNS propagation can take up to 24–48 hours, though it typically completes within a few minutes.
***
## Inbound Domain Setup
An inbound domain allows Lettr to receive emails on your behalf. This requires three MX records that direct incoming mail to Lettr's mail servers.
### Add Inbound Domain to Lettr
To create an Inbound domain in Lettr:
1. Select **Domains** in the navigation panel
2. Select **Inbound Domains**
3. Click **Create Inbound Domain**
4. Enter your desired inbound subdomain (e.g. `inbound.company.com`)
5. Click **Create Domain**.
Click on your new domain in the Inbound Domains list. This will display the MX records that need to be configured.
### Add MX Records
MX records tell other mail servers where to deliver emails addressed to your domain.
Add the MX record set in Azure DNS:
1. Click **+ Add** in your DNS zone.
2. Enter the **Hostname** from Lettr (without your domain suffix) into the **Name** field. For example, paste only `inbound`.
3. Set **Type** to **MX**.
4. Leave **TTL** and **TTL unit** at their defaults (1 Hour).
5. Under **MX Records**, enter `10` for **Preference** and `rx1.sparkpostmail.com` for **Mail exchange**.
6. Add two more rows: `10` / `rx2.sparkpostmail.com` and `10` / `rx3.sparkpostmail.com`.
7. Click **Add**.
 Azure DNS automatically appends your zone name to the record name. Always paste only the subdomain portion (e.g.
`inbound`, not `inbound.company.com`).
Adding MX records to a domain or subdomain will route all incoming email for that address to Lettr. Use a dedicated
subdomain (e.g. `inbound.company.com`) to avoid affecting your primary email.
### Verify Your Inbound Domain
After adding all three MX records, go back to Lettr and click **Verify DNS Records**. DNS propagation can take up to 24–48 hours, though it typically completes within a few minutes.
***
## Tracking Domain Setup
A tracking domain allows Lettr to track email opens and link clicks using your own custom domain instead of the default Lettr tracking domain. This requires two CNAME records: one for the SSL certificate and one for routing tracking traffic to Lettr's infrastructure.
### Add Tracking Domain to Lettr
To create a Tracking domain in Lettr:
1. Select **Domains** in the navigation panel
2. Select **Tracking Domains**
3. Click **Create Tracking Domain**
4. Enter your desired tracking subdomain (e.g. `tracking.company.com`)
5. Click **Create Domain**
Click on your new domain in the Tracking Domains list. This will display the CNAME records that need to be configured.
### Add SSL Certificate CNAME Record
The SSL Certificate CNAME record provisions an SSL certificate for your custom tracking domain, enabling secure HTTPS connections for tracked links.
Add the record in Azure DNS:
1. Click **+ Add** in your DNS zone.
2. Enter the **Hostname** from Lettr (without your domain suffix) into the **Name** field.
3. Set **Type** to **CNAME**.
4. Leave **TTL** and **TTL unit** at their defaults (1 Hour).
5. Enter the **Value** from Lettr into the **Alias** field.
6. Click **Add**.
Azure DNS automatically appends your zone name to the record name. Always paste only the subdomain portion (e.g.
`inbound`, not `inbound.company.com`).
Adding MX records to a domain or subdomain will route all incoming email for that address to Lettr. Use a dedicated
subdomain (e.g. `inbound.company.com`) to avoid affecting your primary email.
### Verify Your Inbound Domain
After adding all three MX records, go back to Lettr and click **Verify DNS Records**. DNS propagation can take up to 24–48 hours, though it typically completes within a few minutes.
***
## Tracking Domain Setup
A tracking domain allows Lettr to track email opens and link clicks using your own custom domain instead of the default Lettr tracking domain. This requires two CNAME records: one for the SSL certificate and one for routing tracking traffic to Lettr's infrastructure.
### Add Tracking Domain to Lettr
To create a Tracking domain in Lettr:
1. Select **Domains** in the navigation panel
2. Select **Tracking Domains**
3. Click **Create Tracking Domain**
4. Enter your desired tracking subdomain (e.g. `tracking.company.com`)
5. Click **Create Domain**
Click on your new domain in the Tracking Domains list. This will display the CNAME records that need to be configured.
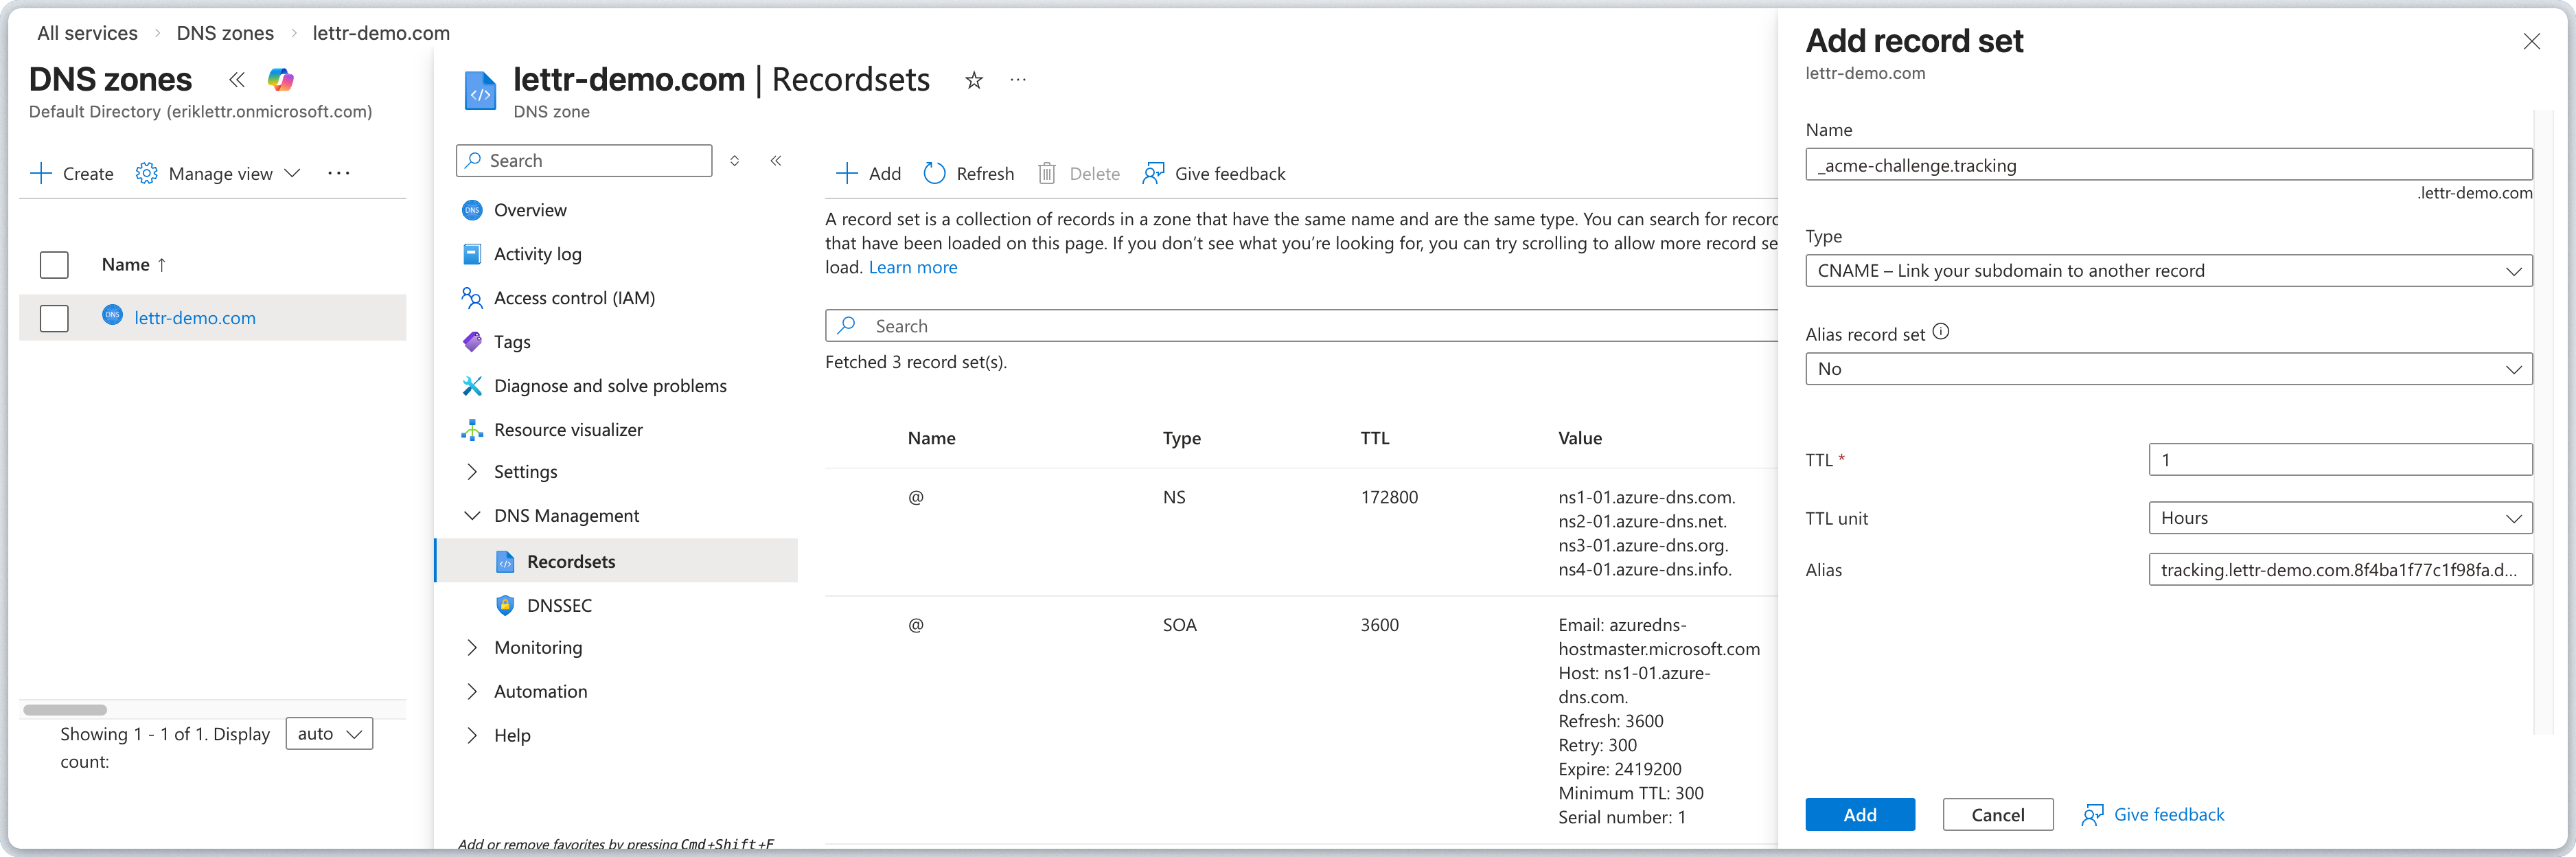
### Add SSL Certificate CNAME Record
The SSL Certificate CNAME record provisions an SSL certificate for your custom tracking domain, enabling secure HTTPS connections for tracked links.
Add the record in Azure DNS:
1. Click **+ Add** in your DNS zone.
2. Enter the **Hostname** from Lettr (without your domain suffix) into the **Name** field.
3. Set **Type** to **CNAME**.
4. Leave **TTL** and **TTL unit** at their defaults (1 Hour).
5. Enter the **Value** from Lettr into the **Alias** field.
6. Click **Add**.
 Azure DNS automatically appends your zone name to the record name. Always paste only the subdomain portion (e.g.
`tracking`, not `tracking.company.com`).
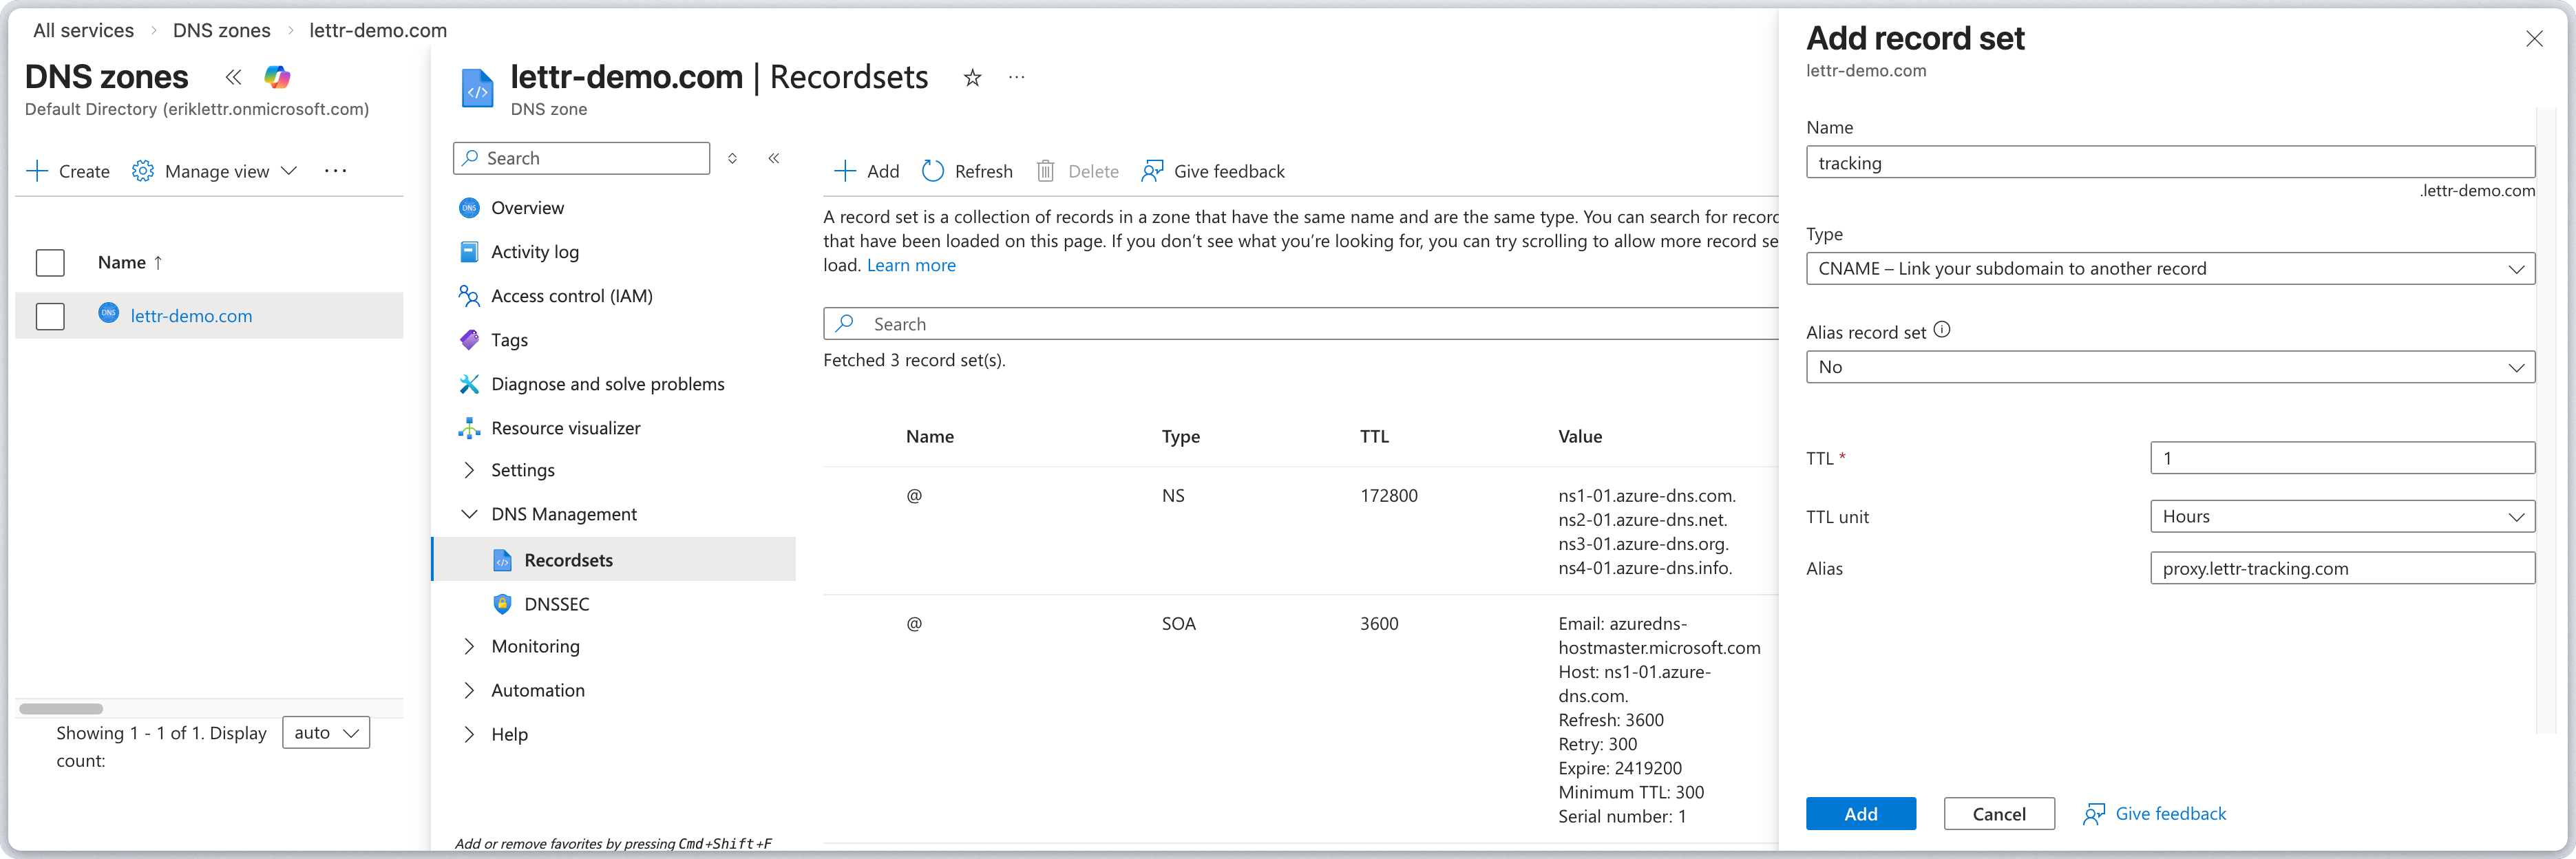
### Add Traffic CNAME Record
The Traffic CNAME record routes click and open tracking requests from your custom domain to Lettr's tracking servers.
Add the record in Azure DNS:
1. Click **+ Add** in your DNS zone.
2. Enter the **Hostname** from Lettr (without your domain suffix) into the **Name** field.
3. Set **Type** to **CNAME**.
4. Leave **TTL** and **TTL unit** at their defaults (1 Hour).
5. Enter the **Value** from Lettr into the **Alias** field.
6. Click **Add**.
Azure DNS automatically appends your zone name to the record name. Always paste only the subdomain portion (e.g.
`tracking`, not `tracking.company.com`).
### Add Traffic CNAME Record
The Traffic CNAME record routes click and open tracking requests from your custom domain to Lettr's tracking servers.
Add the record in Azure DNS:
1. Click **+ Add** in your DNS zone.
2. Enter the **Hostname** from Lettr (without your domain suffix) into the **Name** field.
3. Set **Type** to **CNAME**.
4. Leave **TTL** and **TTL unit** at their defaults (1 Hour).
5. Enter the **Value** from Lettr into the **Alias** field.
6. Click **Add**.
 Azure DNS automatically appends your zone name to the record name. Always paste only the subdomain portion (e.g.
`tracking`, not `tracking.company.com`).
### Verify Your Tracking Domain
After adding both CNAME records, go back to Lettr and click **Verify DNS Records**. DNS propagation can take up to 24–48 hours, though it typically completes within a few minutes.
***
## Storage Domain Setup
A storage domain lets you serve email assets (images, attachments) from your own custom domain instead of the default Lettr storage URL. This requires two TXT records for certificate validation and ownership verification, and a CNAME record for routing asset requests to Lettr's storage infrastructure.
### Add Storage Domain to Lettr
To create a Storage domain in Lettr:
1. Select **Domains** in the navigation panel
2. Select **Storage Domains**
3. Click **Create Storage Domain**
4. Enter your desired storage subdomain (e.g. `assets.company.com`)
5. Click **Create Domain**
Click on your new domain in the Storage Domains list. This will display the TXT and CNAME records that need to be configured.
### Add TXT Record (Certificate Validation)
The Certificate Validation TXT record provisions an SSL certificate for your custom storage domain, enabling secure HTTPS delivery of email assets.
Add the record in Azure DNS:
1. Click **+ Add** in your DNS zone.
2. Enter the **Hostname** from Lettr (without your domain suffix) into the **Name** field.
3. Set **Type** to **TXT**.
4. Leave **TTL** and **TTL unit** at their defaults (1 Hour).
5. Enter the **Value** from Lettr into the **Value** field.
6. Click **Add**.
Azure DNS automatically appends your zone name to the record name. Always paste only the subdomain portion (e.g.
`tracking`, not `tracking.company.com`).
### Verify Your Tracking Domain
After adding both CNAME records, go back to Lettr and click **Verify DNS Records**. DNS propagation can take up to 24–48 hours, though it typically completes within a few minutes.
***
## Storage Domain Setup
A storage domain lets you serve email assets (images, attachments) from your own custom domain instead of the default Lettr storage URL. This requires two TXT records for certificate validation and ownership verification, and a CNAME record for routing asset requests to Lettr's storage infrastructure.
### Add Storage Domain to Lettr
To create a Storage domain in Lettr:
1. Select **Domains** in the navigation panel
2. Select **Storage Domains**
3. Click **Create Storage Domain**
4. Enter your desired storage subdomain (e.g. `assets.company.com`)
5. Click **Create Domain**
Click on your new domain in the Storage Domains list. This will display the TXT and CNAME records that need to be configured.
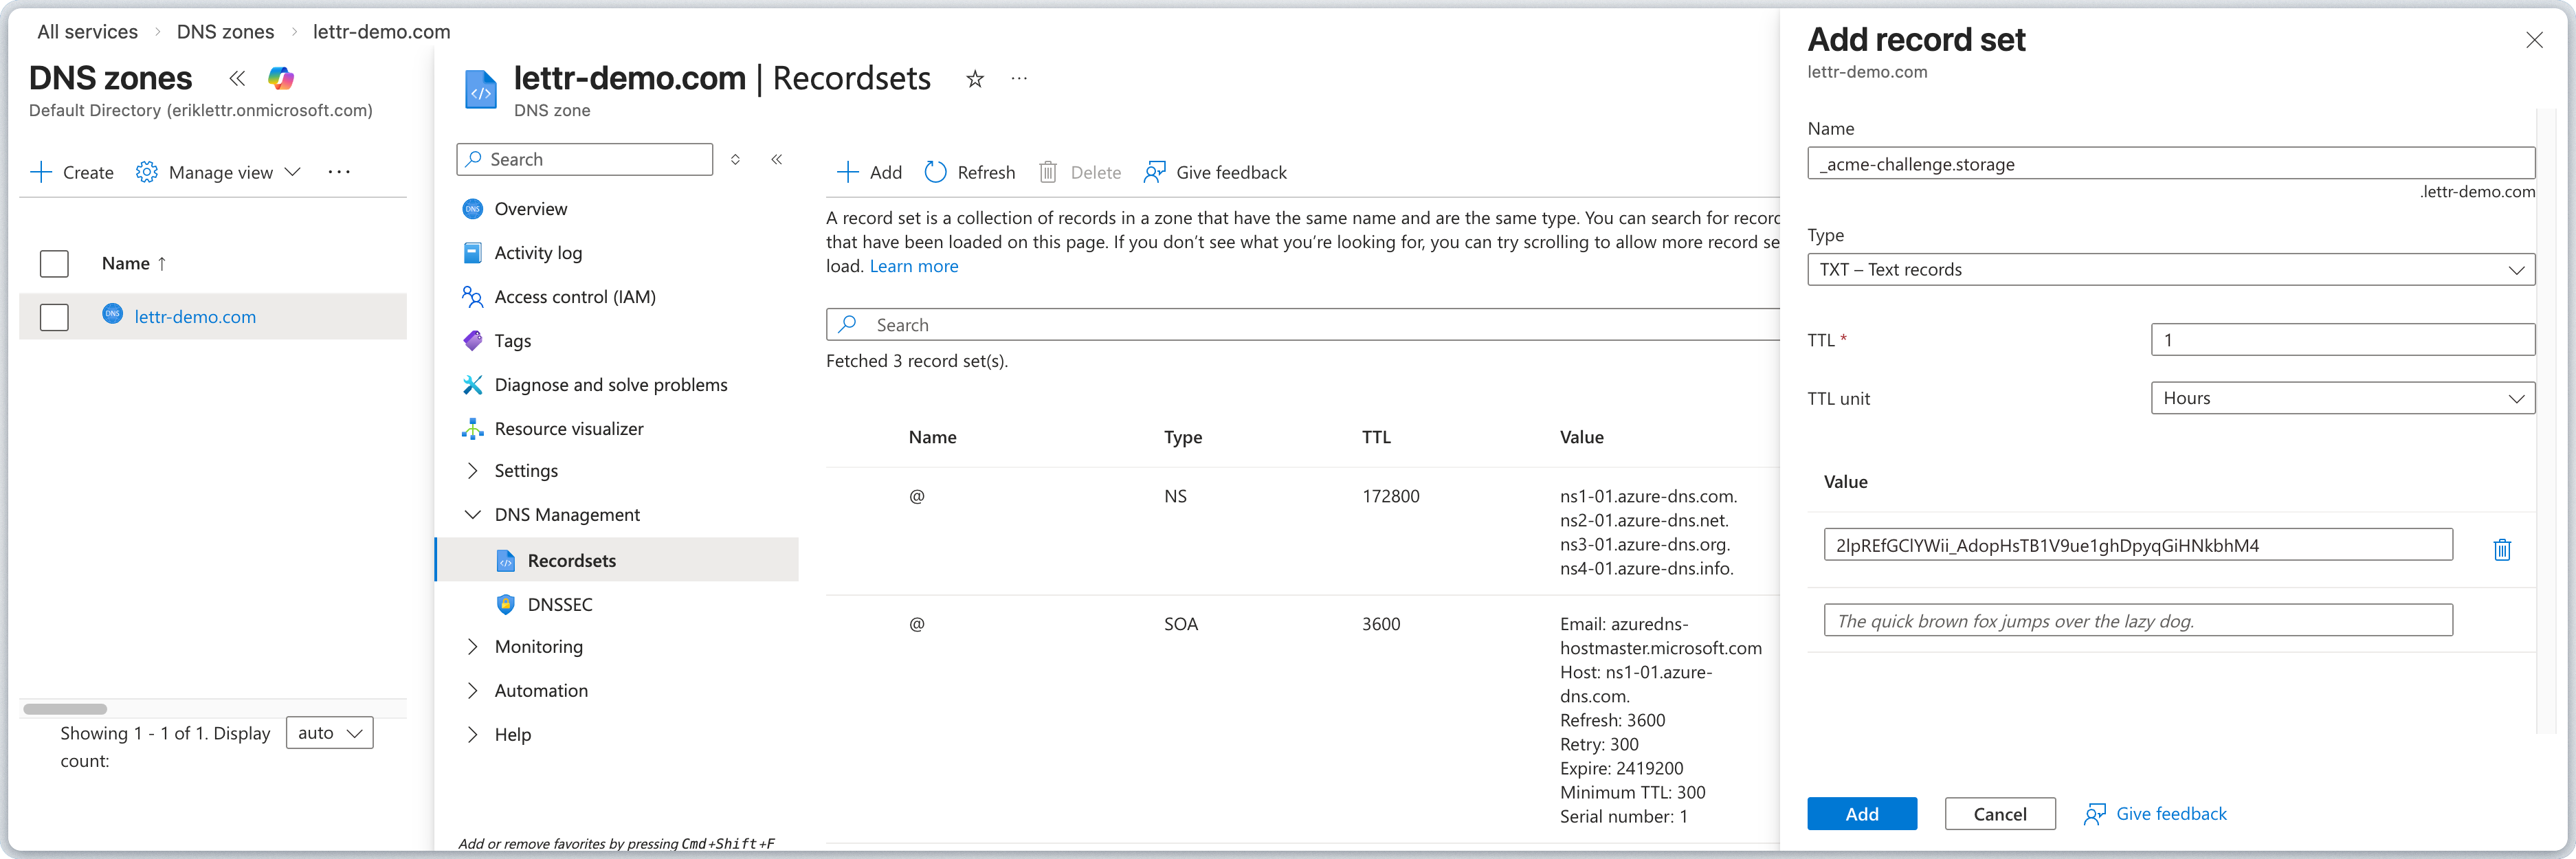
### Add TXT Record (Certificate Validation)
The Certificate Validation TXT record provisions an SSL certificate for your custom storage domain, enabling secure HTTPS delivery of email assets.
Add the record in Azure DNS:
1. Click **+ Add** in your DNS zone.
2. Enter the **Hostname** from Lettr (without your domain suffix) into the **Name** field.
3. Set **Type** to **TXT**.
4. Leave **TTL** and **TTL unit** at their defaults (1 Hour).
5. Enter the **Value** from Lettr into the **Value** field.
6. Click **Add**.
 Azure DNS automatically appends your zone name to the record name. Always paste only the subdomain portion (e.g.
`storage`, not `storage.company.com`).
### Add TXT Record (Hostname Pre-validation)
The Hostname Pre-validation TXT record verifies ownership of the storage domain before Lettr provisions a custom hostname for it.
Add the record in Azure DNS:
1. Click **+ Add** in your DNS zone.
2. Enter the **Hostname** from Lettr (without your domain suffix) into the **Name** field.
3. Set **Type** to **TXT**.
4. Leave **TTL** and **TTL unit** at their defaults (1 Hour).
5. Enter the **Value** from Lettr into the **Value** field.
6. Click **Add**.
Azure DNS automatically appends your zone name to the record name. Always paste only the subdomain portion (e.g.
`storage`, not `storage.company.com`).
### Add TXT Record (Hostname Pre-validation)
The Hostname Pre-validation TXT record verifies ownership of the storage domain before Lettr provisions a custom hostname for it.
Add the record in Azure DNS:
1. Click **+ Add** in your DNS zone.
2. Enter the **Hostname** from Lettr (without your domain suffix) into the **Name** field.
3. Set **Type** to **TXT**.
4. Leave **TTL** and **TTL unit** at their defaults (1 Hour).
5. Enter the **Value** from Lettr into the **Value** field.
6. Click **Add**.
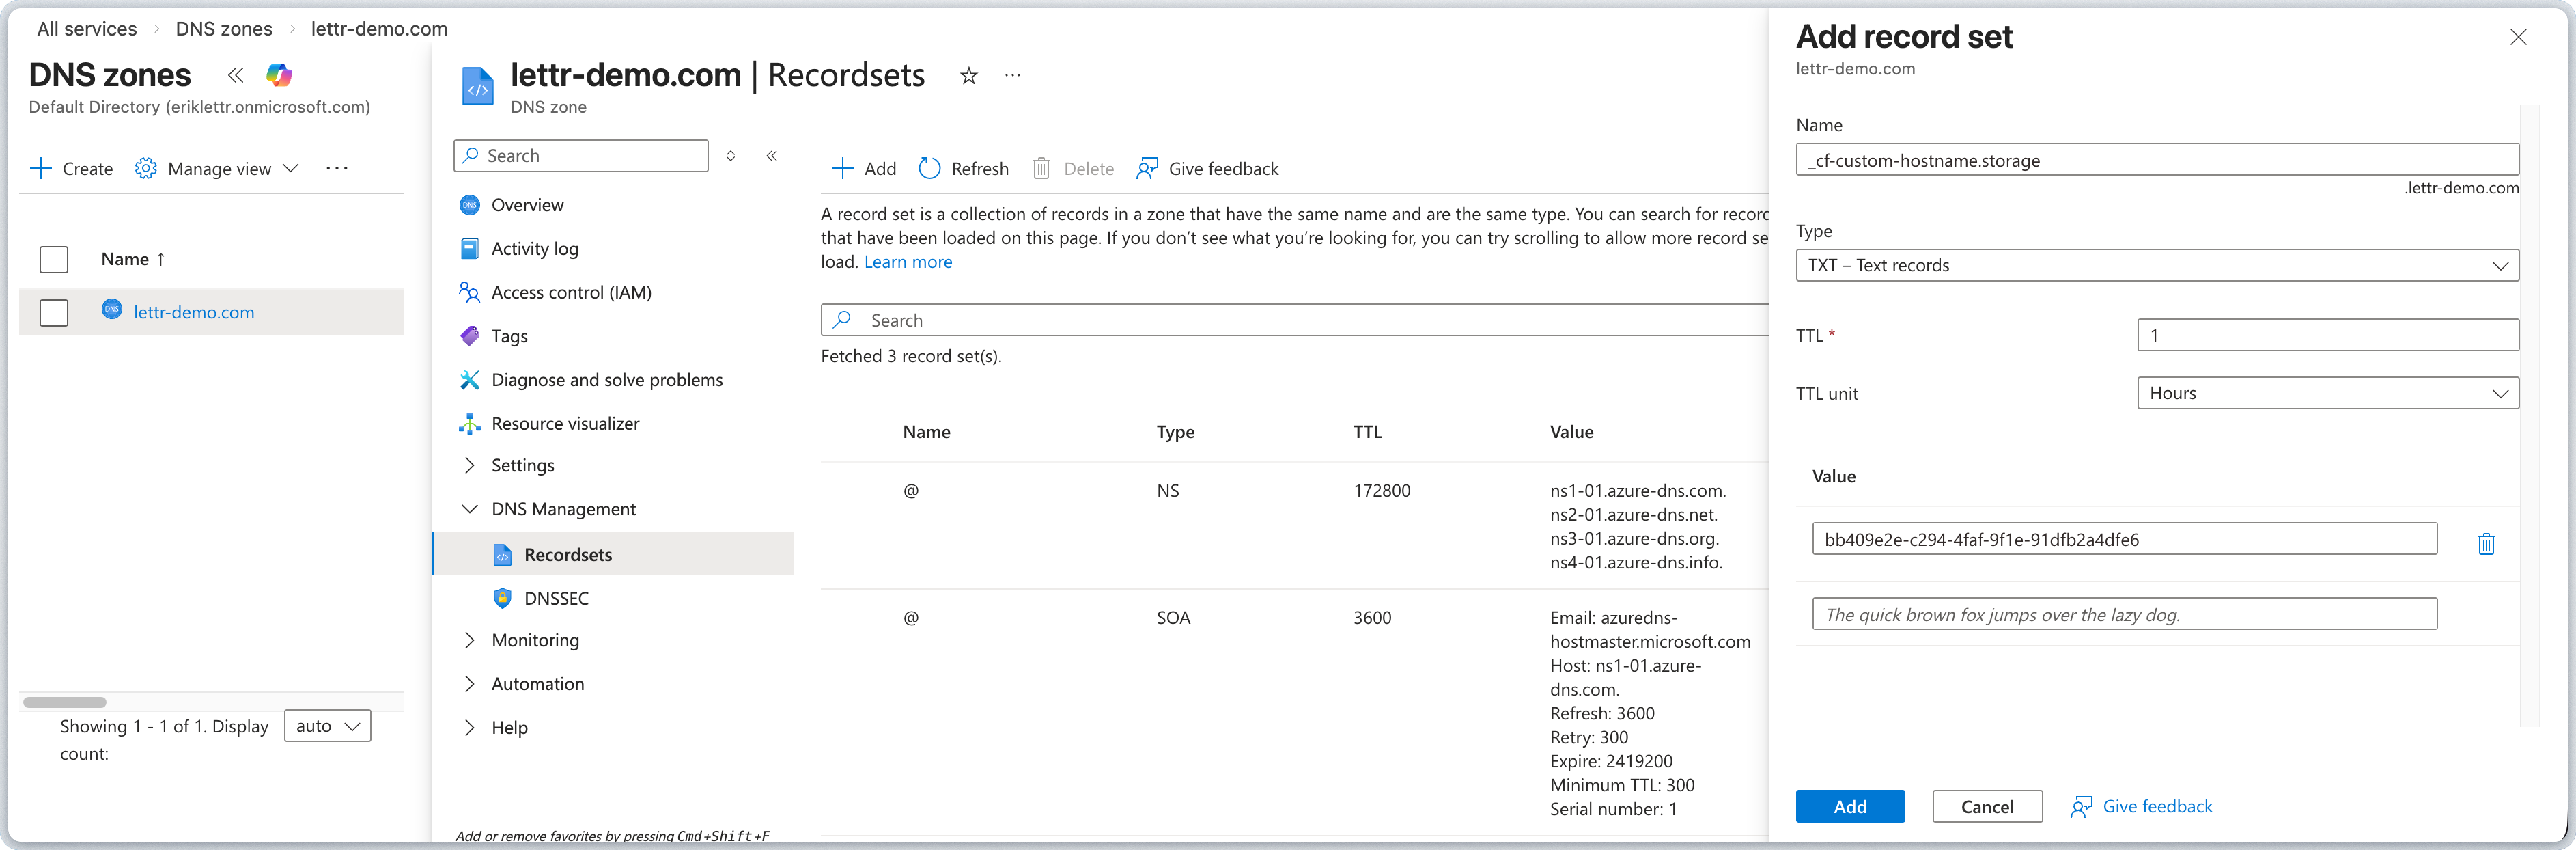 Azure DNS automatically appends your zone name to the record name. Always paste only the subdomain portion (e.g.
`storage`, not `storage.company.com`).
### Add CNAME Record (Domain Routing)
The Domain Routing CNAME record routes asset requests from your custom domain to Lettr's storage infrastructure.
Add the record in Azure DNS:
1. Click **+ Add** in your DNS zone.
2. Enter the **Hostname** from Lettr (without your domain suffix) into the **Name** field.
3. Set **Type** to **CNAME**.
4. Leave **TTL** and **TTL unit** at their defaults (1 Hour).
5. Enter the **Value** from Lettr into the **Alias** field.
6. Click **Add**.
Azure DNS automatically appends your zone name to the record name. Always paste only the subdomain portion (e.g.
`storage`, not `storage.company.com`).
### Add CNAME Record (Domain Routing)
The Domain Routing CNAME record routes asset requests from your custom domain to Lettr's storage infrastructure.
Add the record in Azure DNS:
1. Click **+ Add** in your DNS zone.
2. Enter the **Hostname** from Lettr (without your domain suffix) into the **Name** field.
3. Set **Type** to **CNAME**.
4. Leave **TTL** and **TTL unit** at their defaults (1 Hour).
5. Enter the **Value** from Lettr into the **Alias** field.
6. Click **Add**.
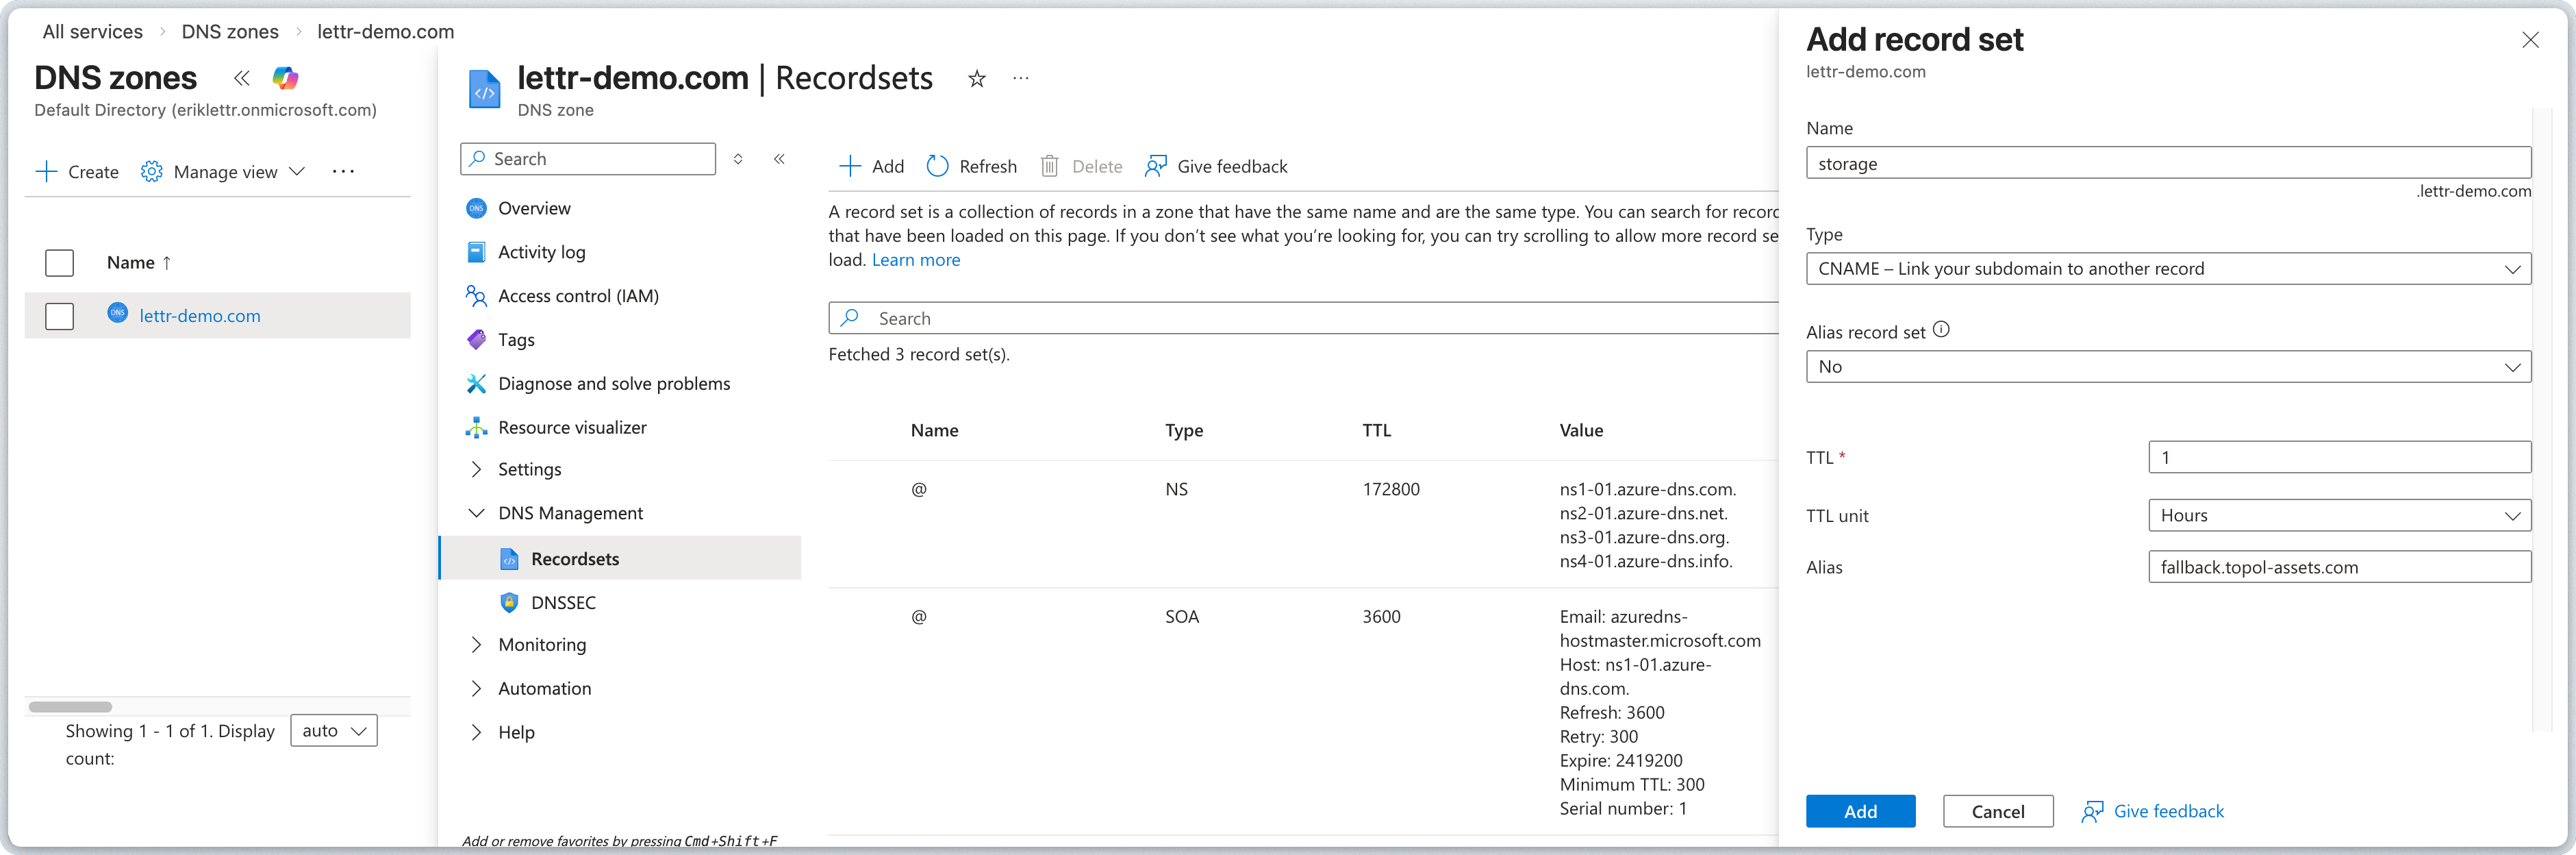 Azure DNS automatically appends your zone name to the record name. Always paste only the subdomain portion (e.g.
`storage`, not `storage.company.com`).
### Verify Your Storage Domain
After adding all three records, go back to Lettr and click **Verify DNS Records**. DNS propagation can take up to 24–48 hours, though it typically completes within a few minutes.
***
## Using Azure CLI
You can also add records using the Azure CLI. Replace `` and `` with your own values.
```bash theme={null}
# Add CNAME record for sending domain verification
az network dns record-set cname set-record \
--resource-group \
--zone-name example.com \
--record-set-name mailing \
--ttl 3600 \
--cname
# Add TXT record for DKIM
az network dns record-set txt add-record \
--resource-group \
--zone-name example.com \
--record-set-name "scph0126._domainkey.mailing" \
--value "v=DKIM1;k=rsa;h=sha256;p=MIGf..."
# Add TXT record for DMARC
az network dns record-set txt add-record \
--resource-group \
--zone-name example.com \
--record-set-name "_dmarc.mailing" \
--value "v=DMARC1;p=none;"
# Add MX records for inbound (run once per exchange)
az network dns record-set mx add-record \
--resource-group \
--zone-name example.com \
--record-set-name inbound \
--exchange rx1.sparkpostmail.com \
--preference 10
az network dns record-set mx add-record \
--resource-group \
--zone-name example.com \
--record-set-name inbound \
--exchange rx2.sparkpostmail.com \
--preference 10
az network dns record-set mx add-record \
--resource-group \
--zone-name example.com \
--record-set-name inbound \
--exchange rx3.sparkpostmail.com \
--preference 10
# Add CNAME records for tracking domain
az network dns record-set cname set-record \
--resource-group \
--zone-name example.com \
--record-set-name \
--ttl 3600 \
--cname
az network dns record-set cname set-record \
--resource-group \
--zone-name example.com \
--record-set-name tracking \
--ttl 3600 \
--cname
# Add TXT and CNAME records for storage domain
az network dns record-set txt add-record \
--resource-group \
--zone-name example.com \
--record-set-name \
--value ""
az network dns record-set txt add-record \
--resource-group \
--zone-name example.com \
--record-set-name \
--value ""
az network dns record-set cname set-record \
--resource-group \
--zone-name example.com \
--record-set-name assets \
--ttl 3600 \
--cname
```
***
## Troubleshooting
Ensure you have the **DNS Zone Contributor** role or equivalent permissions on the DNS zone resource in Azure.
Azure DNS typically propagates within minutes, but in some cases it can take longer. If verification fails after adding
records, check the following:
* **Wait at least 30 minutes** before your first verification attempt.
* **Confirm the records exist** using command-line tools:
```bash theme={null}
# Check CNAME record
dig CNAME mailing.yourdomain.com +short
# Check DKIM record
dig TXT scph0126._domainkey.mailing.yourdomain.com +short
# Check DMARC record
dig TXT _dmarc.mailing.yourdomain.com +short
# Check MX records (inbound)
dig MX inbound.yourdomain.com +short
# Check tracking domain CNAME
dig CNAME track.yourdomain.com +short
# Check storage domain CNAME
dig CNAME assets.yourdomain.com +short
```
* **Use a web tool** like [dnschecker.org](https://dnschecker.org) to verify propagation across multiple DNS servers worldwide.
Alternatively, you can use the Azure CLI to verify records directly:
```bash theme={null}
az network dns record-set list \
--resource-group \
--zone-name yourdomain.com \
--output table
```
If your records are saved in Azure DNS but not resolving, confirm that your domain registrar is pointing to Azure's
nameservers. You can check this with:
```bash theme={null}
dig NS yourdomain.com +short
```
The output should include the four Azure nameservers shown in your DNS zone overview (e.g. `ns1-xx.azuredns.com`). If it
shows a different provider's nameservers, update them at your domain registrar.
A common mistake is selecting the wrong type when creating the record set:
| Record | Correct Type |
| ------------------------------- | ------------ |
| Sending verification | CNAME |
| DKIM | TXT |
| DMARC | TXT |
| Inbound mail | MX |
| Tracking SSL certificate | CNAME |
| Tracking traffic | CNAME |
| Storage certificate validation | TXT |
| Storage hostname pre-validation | TXT |
| Storage domain routing | CNAME |
The DKIM TXT value is a long string. After saving the record set in Azure, re-open it to confirm the full value was
stored. If it appears truncated, delete the record and re-add it, pasting the full value carefully.
If your DNS records are correctly configured (confirmed with `dig` or dnschecker.org) and verification still fails after
48 hours, contact Lettr support at **[support@lettr.com](mailto:support@lettr.com)** or through the in-app chat. Include your domain name and the
output of the `dig` commands above.
***
## Related Topics
Learn about sending domain setup, SPF, DKIM, and DMARC.
Configure MX records to receive emails with Lettr.
Set up a custom tracking domain for click and open tracking.
Serve email assets from your own custom domain.
Understand domain types and how they work in Lettr.
Troubleshoot common DNS configuration and propagation issues.
Azure DNS automatically appends your zone name to the record name. Always paste only the subdomain portion (e.g.
`storage`, not `storage.company.com`).
### Verify Your Storage Domain
After adding all three records, go back to Lettr and click **Verify DNS Records**. DNS propagation can take up to 24–48 hours, though it typically completes within a few minutes.
***
## Using Azure CLI
You can also add records using the Azure CLI. Replace `` and `` with your own values.
```bash theme={null}
# Add CNAME record for sending domain verification
az network dns record-set cname set-record \
--resource-group \
--zone-name example.com \
--record-set-name mailing \
--ttl 3600 \
--cname
# Add TXT record for DKIM
az network dns record-set txt add-record \
--resource-group \
--zone-name example.com \
--record-set-name "scph0126._domainkey.mailing" \
--value "v=DKIM1;k=rsa;h=sha256;p=MIGf..."
# Add TXT record for DMARC
az network dns record-set txt add-record \
--resource-group \
--zone-name example.com \
--record-set-name "_dmarc.mailing" \
--value "v=DMARC1;p=none;"
# Add MX records for inbound (run once per exchange)
az network dns record-set mx add-record \
--resource-group \
--zone-name example.com \
--record-set-name inbound \
--exchange rx1.sparkpostmail.com \
--preference 10
az network dns record-set mx add-record \
--resource-group \
--zone-name example.com \
--record-set-name inbound \
--exchange rx2.sparkpostmail.com \
--preference 10
az network dns record-set mx add-record \
--resource-group \
--zone-name example.com \
--record-set-name inbound \
--exchange rx3.sparkpostmail.com \
--preference 10
# Add CNAME records for tracking domain
az network dns record-set cname set-record \
--resource-group \
--zone-name example.com \
--record-set-name \
--ttl 3600 \
--cname
az network dns record-set cname set-record \
--resource-group \
--zone-name example.com \
--record-set-name tracking \
--ttl 3600 \
--cname
# Add TXT and CNAME records for storage domain
az network dns record-set txt add-record \
--resource-group \
--zone-name example.com \
--record-set-name \
--value ""
az network dns record-set txt add-record \
--resource-group \
--zone-name example.com \
--record-set-name \
--value ""
az network dns record-set cname set-record \
--resource-group \
--zone-name example.com \
--record-set-name assets \
--ttl 3600 \
--cname
```
***
## Troubleshooting
Ensure you have the **DNS Zone Contributor** role or equivalent permissions on the DNS zone resource in Azure.
Azure DNS typically propagates within minutes, but in some cases it can take longer. If verification fails after adding
records, check the following:
* **Wait at least 30 minutes** before your first verification attempt.
* **Confirm the records exist** using command-line tools:
```bash theme={null}
# Check CNAME record
dig CNAME mailing.yourdomain.com +short
# Check DKIM record
dig TXT scph0126._domainkey.mailing.yourdomain.com +short
# Check DMARC record
dig TXT _dmarc.mailing.yourdomain.com +short
# Check MX records (inbound)
dig MX inbound.yourdomain.com +short
# Check tracking domain CNAME
dig CNAME track.yourdomain.com +short
# Check storage domain CNAME
dig CNAME assets.yourdomain.com +short
```
* **Use a web tool** like [dnschecker.org](https://dnschecker.org) to verify propagation across multiple DNS servers worldwide.
Alternatively, you can use the Azure CLI to verify records directly:
```bash theme={null}
az network dns record-set list \
--resource-group \
--zone-name yourdomain.com \
--output table
```
If your records are saved in Azure DNS but not resolving, confirm that your domain registrar is pointing to Azure's
nameservers. You can check this with:
```bash theme={null}
dig NS yourdomain.com +short
```
The output should include the four Azure nameservers shown in your DNS zone overview (e.g. `ns1-xx.azuredns.com`). If it
shows a different provider's nameservers, update them at your domain registrar.
A common mistake is selecting the wrong type when creating the record set:
| Record | Correct Type |
| ------------------------------- | ------------ |
| Sending verification | CNAME |
| DKIM | TXT |
| DMARC | TXT |
| Inbound mail | MX |
| Tracking SSL certificate | CNAME |
| Tracking traffic | CNAME |
| Storage certificate validation | TXT |
| Storage hostname pre-validation | TXT |
| Storage domain routing | CNAME |
The DKIM TXT value is a long string. After saving the record set in Azure, re-open it to confirm the full value was
stored. If it appears truncated, delete the record and re-add it, pasting the full value carefully.
If your DNS records are correctly configured (confirmed with `dig` or dnschecker.org) and verification still fails after
48 hours, contact Lettr support at **[support@lettr.com](mailto:support@lettr.com)** or through the in-app chat. Include your domain name and the
output of the `dig` commands above.
***
## Related Topics
Learn about sending domain setup, SPF, DKIM, and DMARC.
Configure MX records to receive emails with Lettr.
Set up a custom tracking domain for click and open tracking.
Serve email assets from your own custom domain.
Understand domain types and how they work in Lettr.
Troubleshoot common DNS configuration and propagation issues.