> ## Documentation Index
> Fetch the complete documentation index at: https://docs.lettr.com/llms.txt
> Use this file to discover all available pages before exploring further.
# Cloudflare
> Configure the DNS records Lettr needs in Cloudflare, using automatic Domain Connect setup or manual records for your sending and other domains.
This guide walks you through adding the required DNS records for Lettr using Cloudflare's DNS management. Cloudflare is a web infrastructure and security company that provides DNS hosting, CDN, and DDoS protection for domains managed through its dashboard at [dash.cloudflare.com](https://dash.cloudflare.com).
Because Cloudflare supports the Domain Connect protocol, you have two ways to set up your DNS records: **automatic setup**, which configures everything in one click directly from the Lettr dashboard, or **manual setup**, where you copy each record value into Cloudflare yourself. Automatic setup is the recommended approach — it's faster, eliminates copy-paste errors, and handles all the Cloudflare-specific details (like disabling proxy mode on CNAME records) for you.
***
## Automatic Setup with Domain Connect (Recommended)
Cloudflare is the first DNS provider to support Lettr's Domain Connect integration, which means you can configure all required DNS records without leaving the Lettr dashboard or touching Cloudflare's DNS settings directly. Instead of manually creating each CNAME, TXT, and MX record, Lettr generates a signed link that tells Cloudflare exactly which records to add. You review the proposed changes on Cloudflare's end, click **Apply**, and the records appear in your DNS zone within seconds.
This works for all domain types — sending, tracking, and inbound. The specific records configured depend on the domain type:
| Domain Type | Records Configured Automatically |
| ------------------------- | -------------------------------------------------------------------------- |
| **Sending** (subdomain) | CNAME for domain verification, TXT for DKIM signing, TXT for DMARC policy |
| **Sending** (root domain) | TXT for SPF authorization, TXT for DKIM signing, TXT for DMARC policy |
| **Tracking** | CNAME for SSL certificate provisioning, CNAME for tracking traffic routing |
| **Inbound** | 3 MX records directing incoming mail to Lettr's servers |
### How to Use Automatic Setup
The process is the same regardless of which domain type you're configuring. The example below uses a sending domain, but the steps are identical for tracking and inbound domains — only the button location and the records shown on Cloudflare's review page will differ.
Navigate to **Domains** in the sidebar, then select the appropriate domain section — **Sending Domains**, **Tracking Domains**, or **Inbound Domains**. Click the **Create** button, enter your domain name, and create the domain. This is the same step you'd take for manual setup.
On the domain's detail page, you'll see a **Configure with Cloudflare** button alongside the usual DNS record table. Click it. Lettr generates a cryptographically signed URL that encodes every DNS record your domain needs, then redirects you to Cloudflare.
Cloudflare's Domain Connect page displays a summary of the DNS records that will be added to your zone. Take a moment to review them — you'll see the record types, names, and values that match what Lettr's detail page shows. Nothing is applied until you explicitly approve.
Click **Apply** to have Cloudflare add all the records to your DNS zone. This happens instantly through Cloudflare's API. CNAME records are automatically created in **DNS only** mode (grey cloud), so you don't need to worry about proxy mode causing verification failures.
After applying, Cloudflare redirects you back to your domain's detail page in Lettr. Click **Verify DNS Records** to confirm that the records are resolving. Propagation typically completes within a few seconds for Cloudflare-hosted domains, though in rare cases it may take a minute or two.
Domain Connect checks your existing DNS configuration before applying records. If you already have a valid DMARC or SPF record in place, it skips those records to avoid creating conflicts or duplicates. This means you can safely use automatic setup even if you've already partially configured your domain by hand.
Domain Connect handles all the complexity of DNS configuration automatically, making it the fastest way to set up Lettr domains on Cloudflare.
### When to Use Manual Setup Instead
Automatic setup covers the most common configurations, but there are situations where manual setup is the better choice:
* **DNS not hosted on Cloudflare** — If your domain's nameservers point to a different provider (even if you have a Cloudflare account), Domain Connect won't be available. Follow the manual steps below, or consult the [DNS guides](/knowledge-base/introduction) for your provider.
* **Storage domains** — Domain Connect currently supports sending, tracking, and inbound domains. Storage domain records need to be added manually.
* **Authorization issues** — If clicking **Configure with Cloudflare** results in an error or you can't authorize the changes on Cloudflare's side, you can always fall back to copying the records manually. The domain detail page in Lettr shows every record you need.
* **Preference for manual control** — Some teams prefer to review and add each record individually, especially if they maintain strict change control over their DNS zones.
If any of these apply, the manual setup sections below walk you through adding each record type step by step.
***
## Manual Sending Domain Setup
A sending domain authenticates your outgoing emails with DKIM and DMARC, ensuring they are delivered reliably and not marked as spam. This requires a CNAME record for domain verification, a TXT record for DKIM signing, and a TXT record for DMARC policy.
To create a sending domain in Lettr:
1. Select **Domains** in the navigation panel
2. Select **Sending Domains**
3. Click **Create Sending Domain**
4. Enter your desired sending subdomain (e.g. `mailing.company.com`)
5. Click **Create Domain**
Use a subdomain (e.g. `mailing.company.com`) instead of the root domain (`company.com`). A subdomain provides proper
reputation segmentation and is required if you also plan to receive emails with Lettr.
Click your new domain in the Sending Domains list.
This will display a list of DNS records that need to be configured. Keep this page open — you will need these values soon.
### Configure Cloudflare DNS
Log in to the [Cloudflare dashboard](https://dash.cloudflare.com), click **Domains** in the left-hand sidebar to view a list of your domains. Select the domain you want to configure, or create a new one.
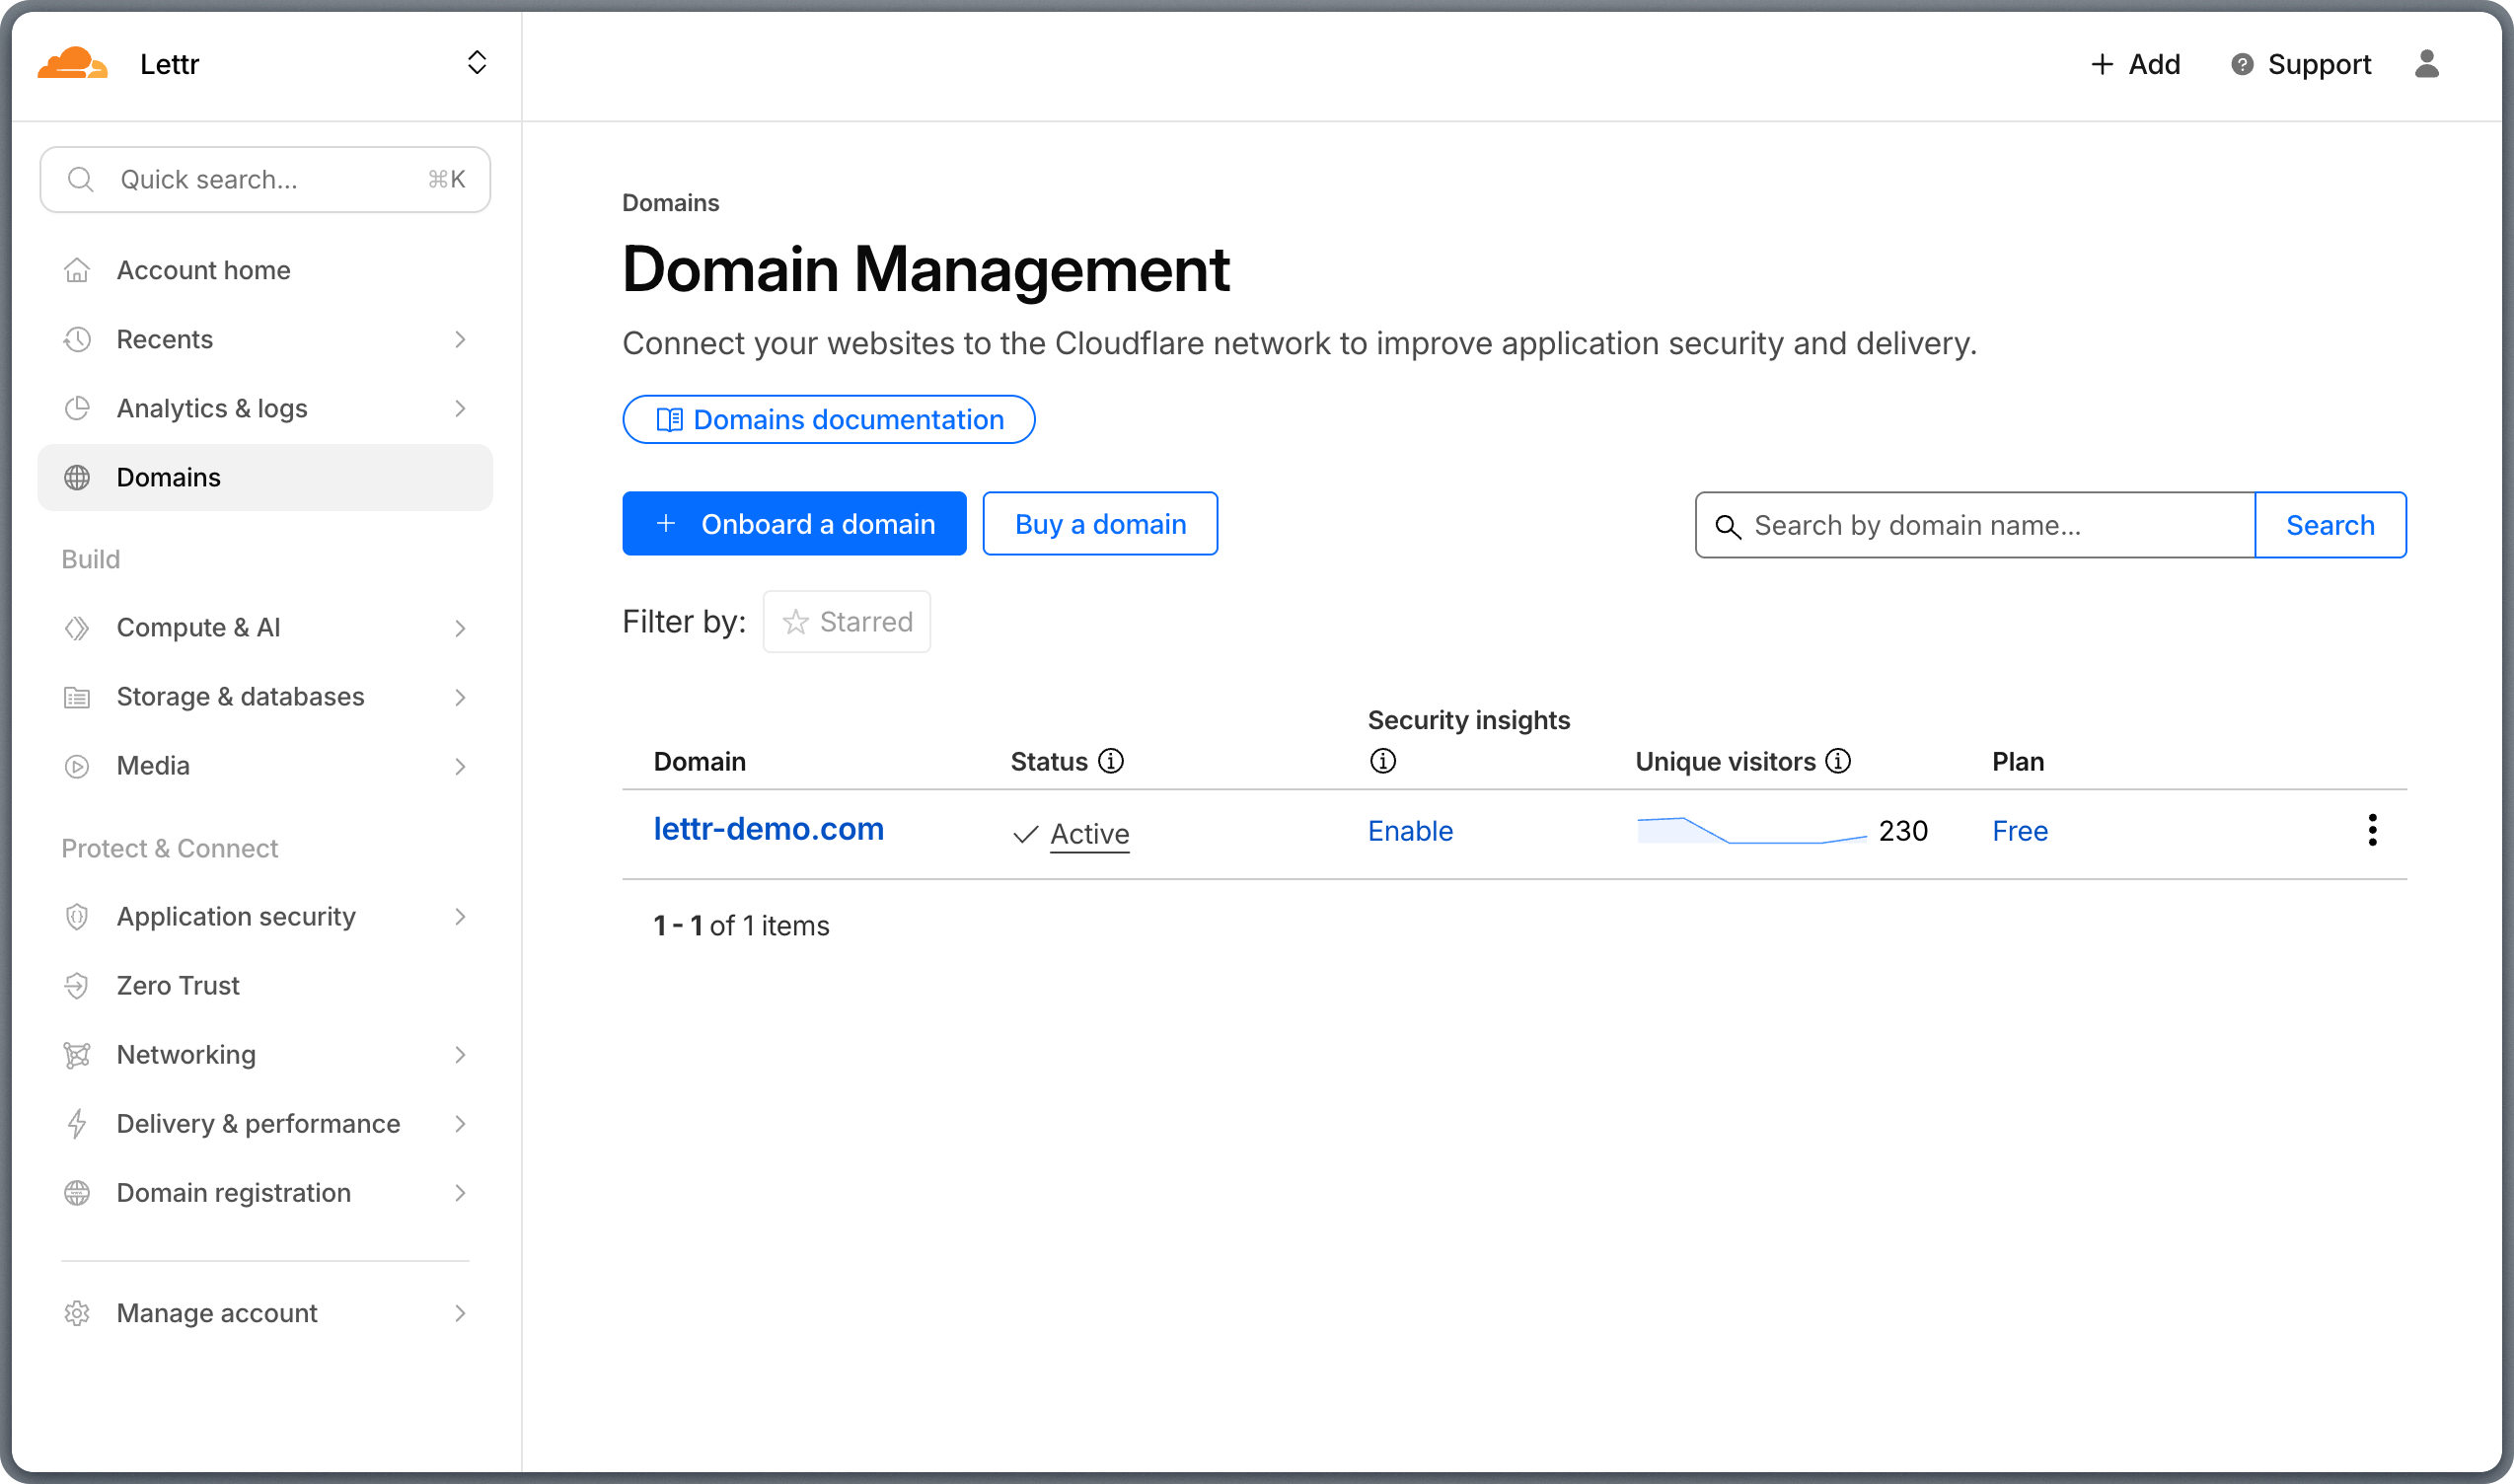 This will open the domain details page, where you can manage your DNS records.
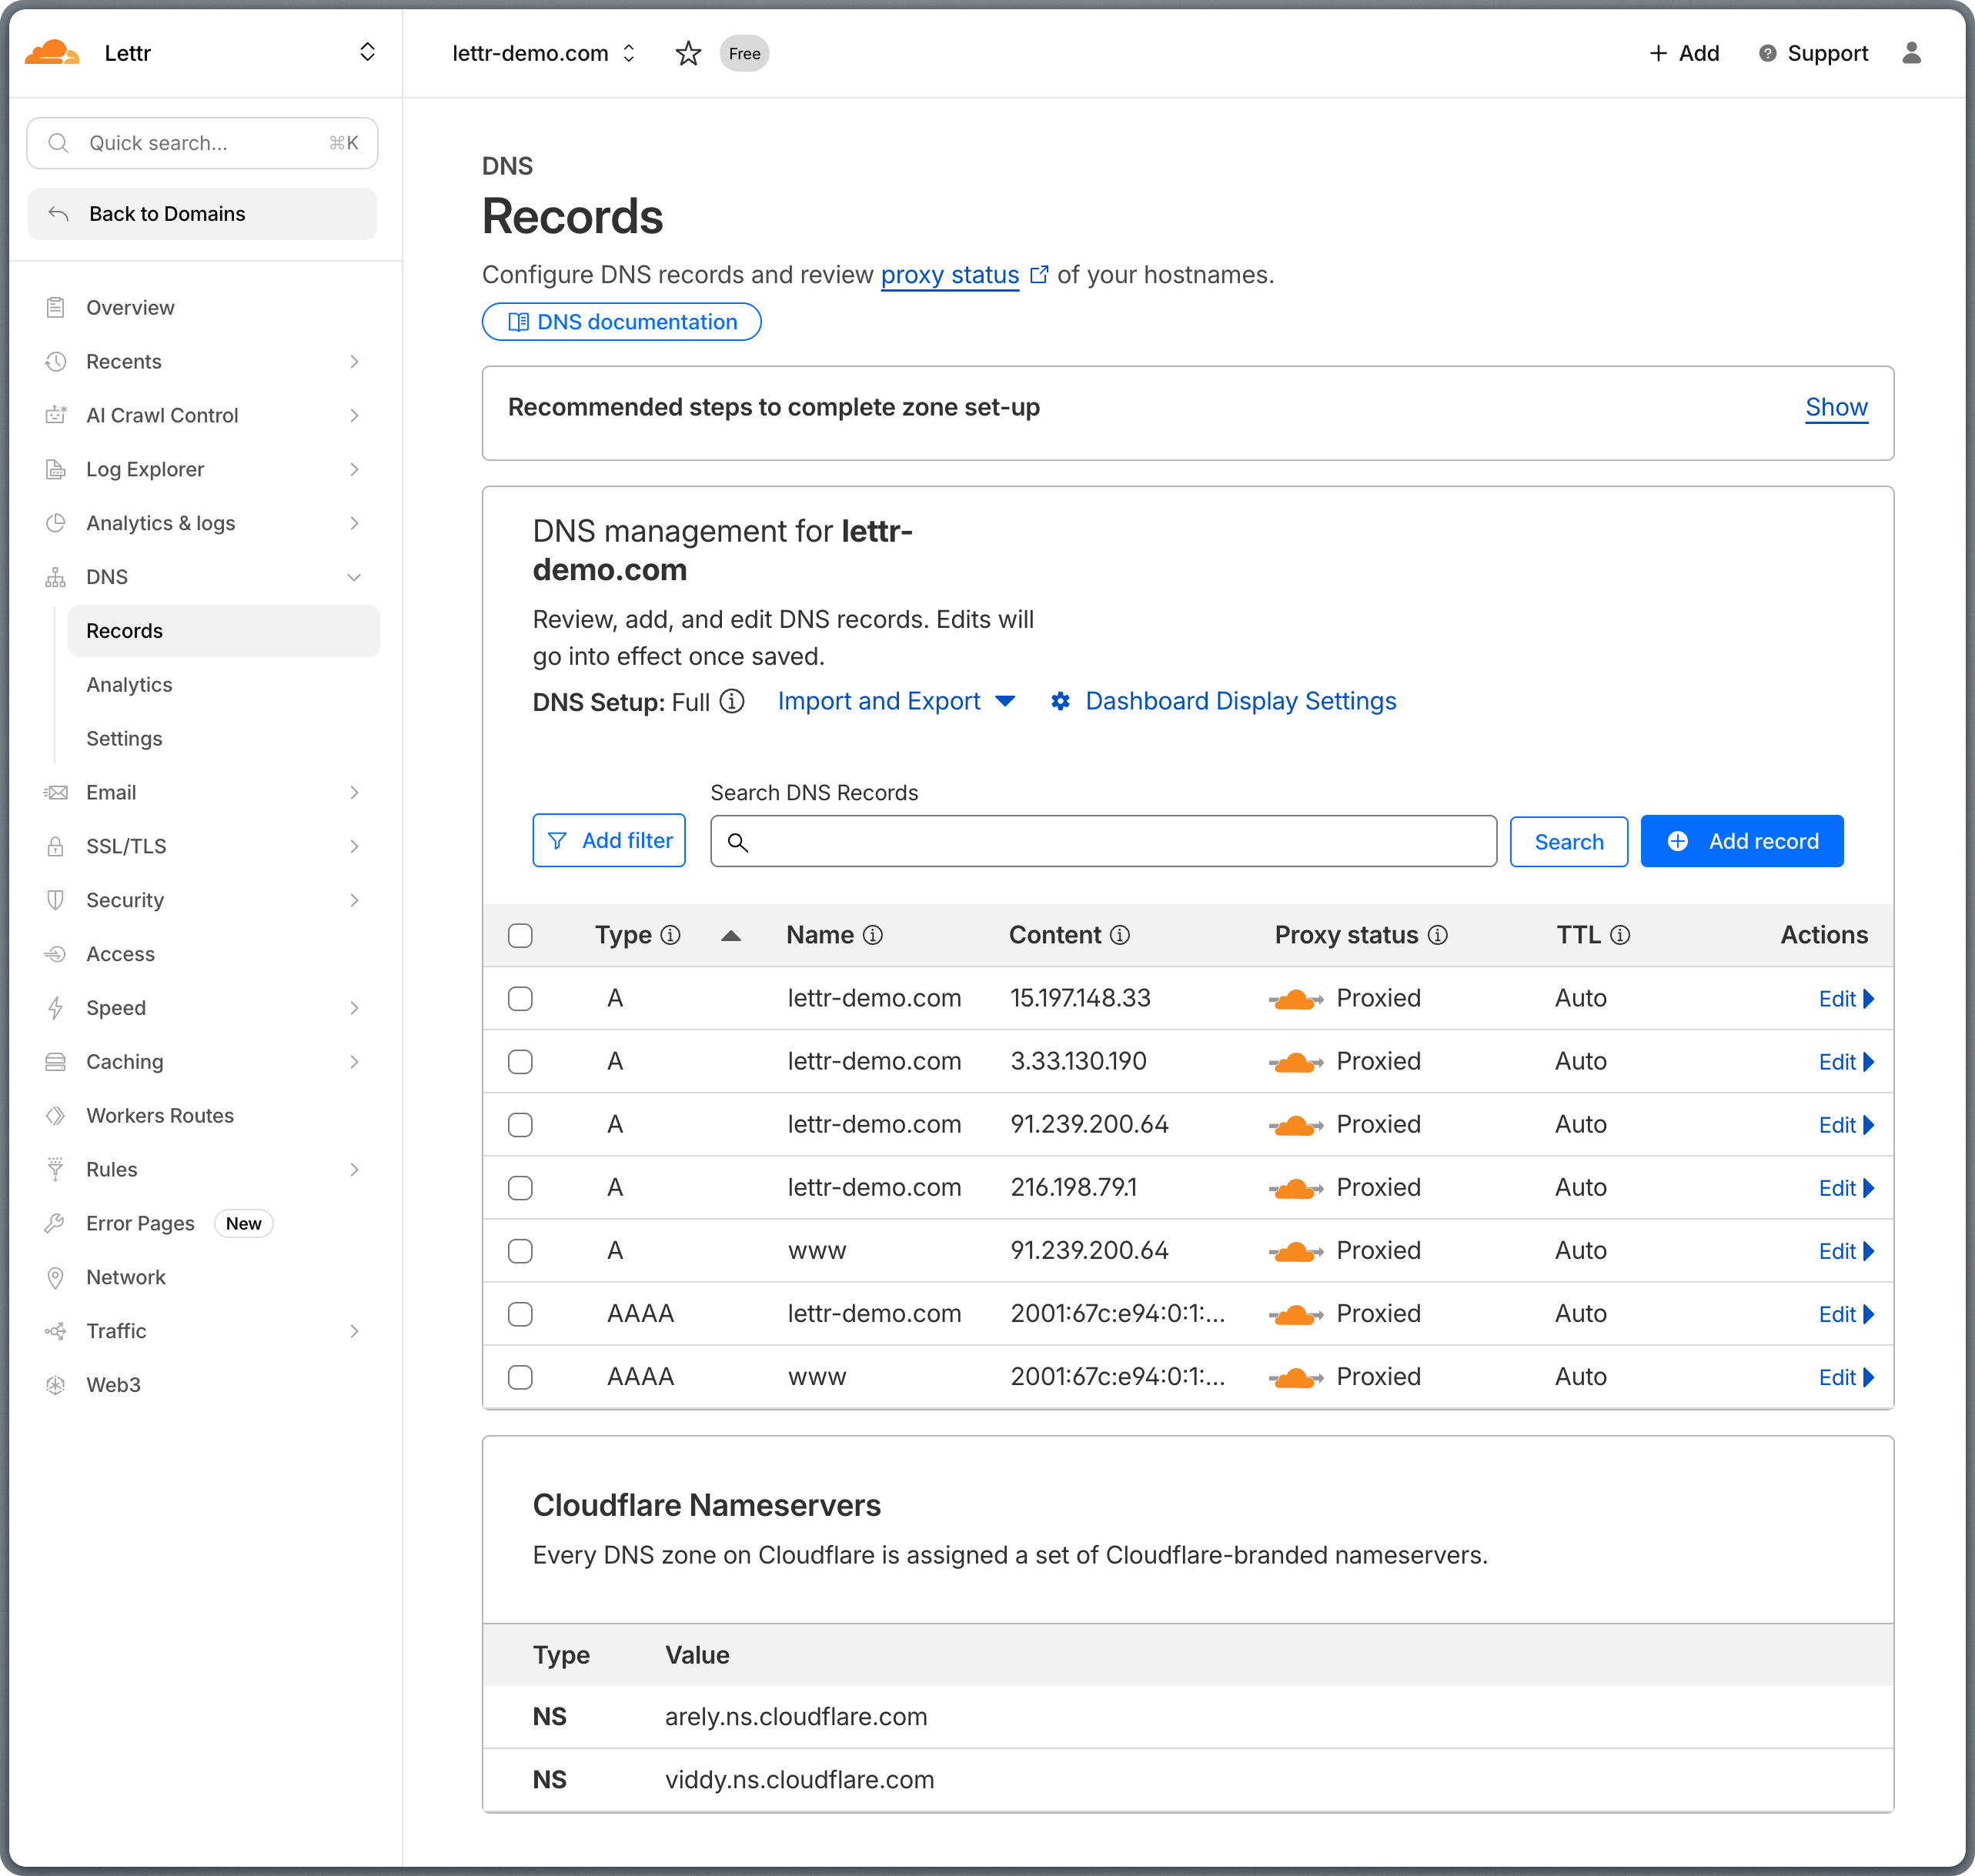 If your domain was purchased through Cloudflare or your nameservers already point to Cloudflare, skip nameserver
configuration entirely. Your domain is already using Cloudflare's nameservers by default — proceed directly to adding the
DNS records below.
If you registered your domain elsewhere but want to manage DNS on Cloudflare, you must first **update the nameservers**
at your registrar to Cloudflare's nameservers shown in the domain configuration. Click on your domain in the list, then follow the instructions.
If your domain was purchased through Cloudflare or your nameservers already point to Cloudflare, skip nameserver
configuration entirely. Your domain is already using Cloudflare's nameservers by default — proceed directly to adding the
DNS records below.
If you registered your domain elsewhere but want to manage DNS on Cloudflare, you must first **update the nameservers**
at your registrar to Cloudflare's nameservers shown in the domain configuration. Click on your domain in the list, then follow the instructions.
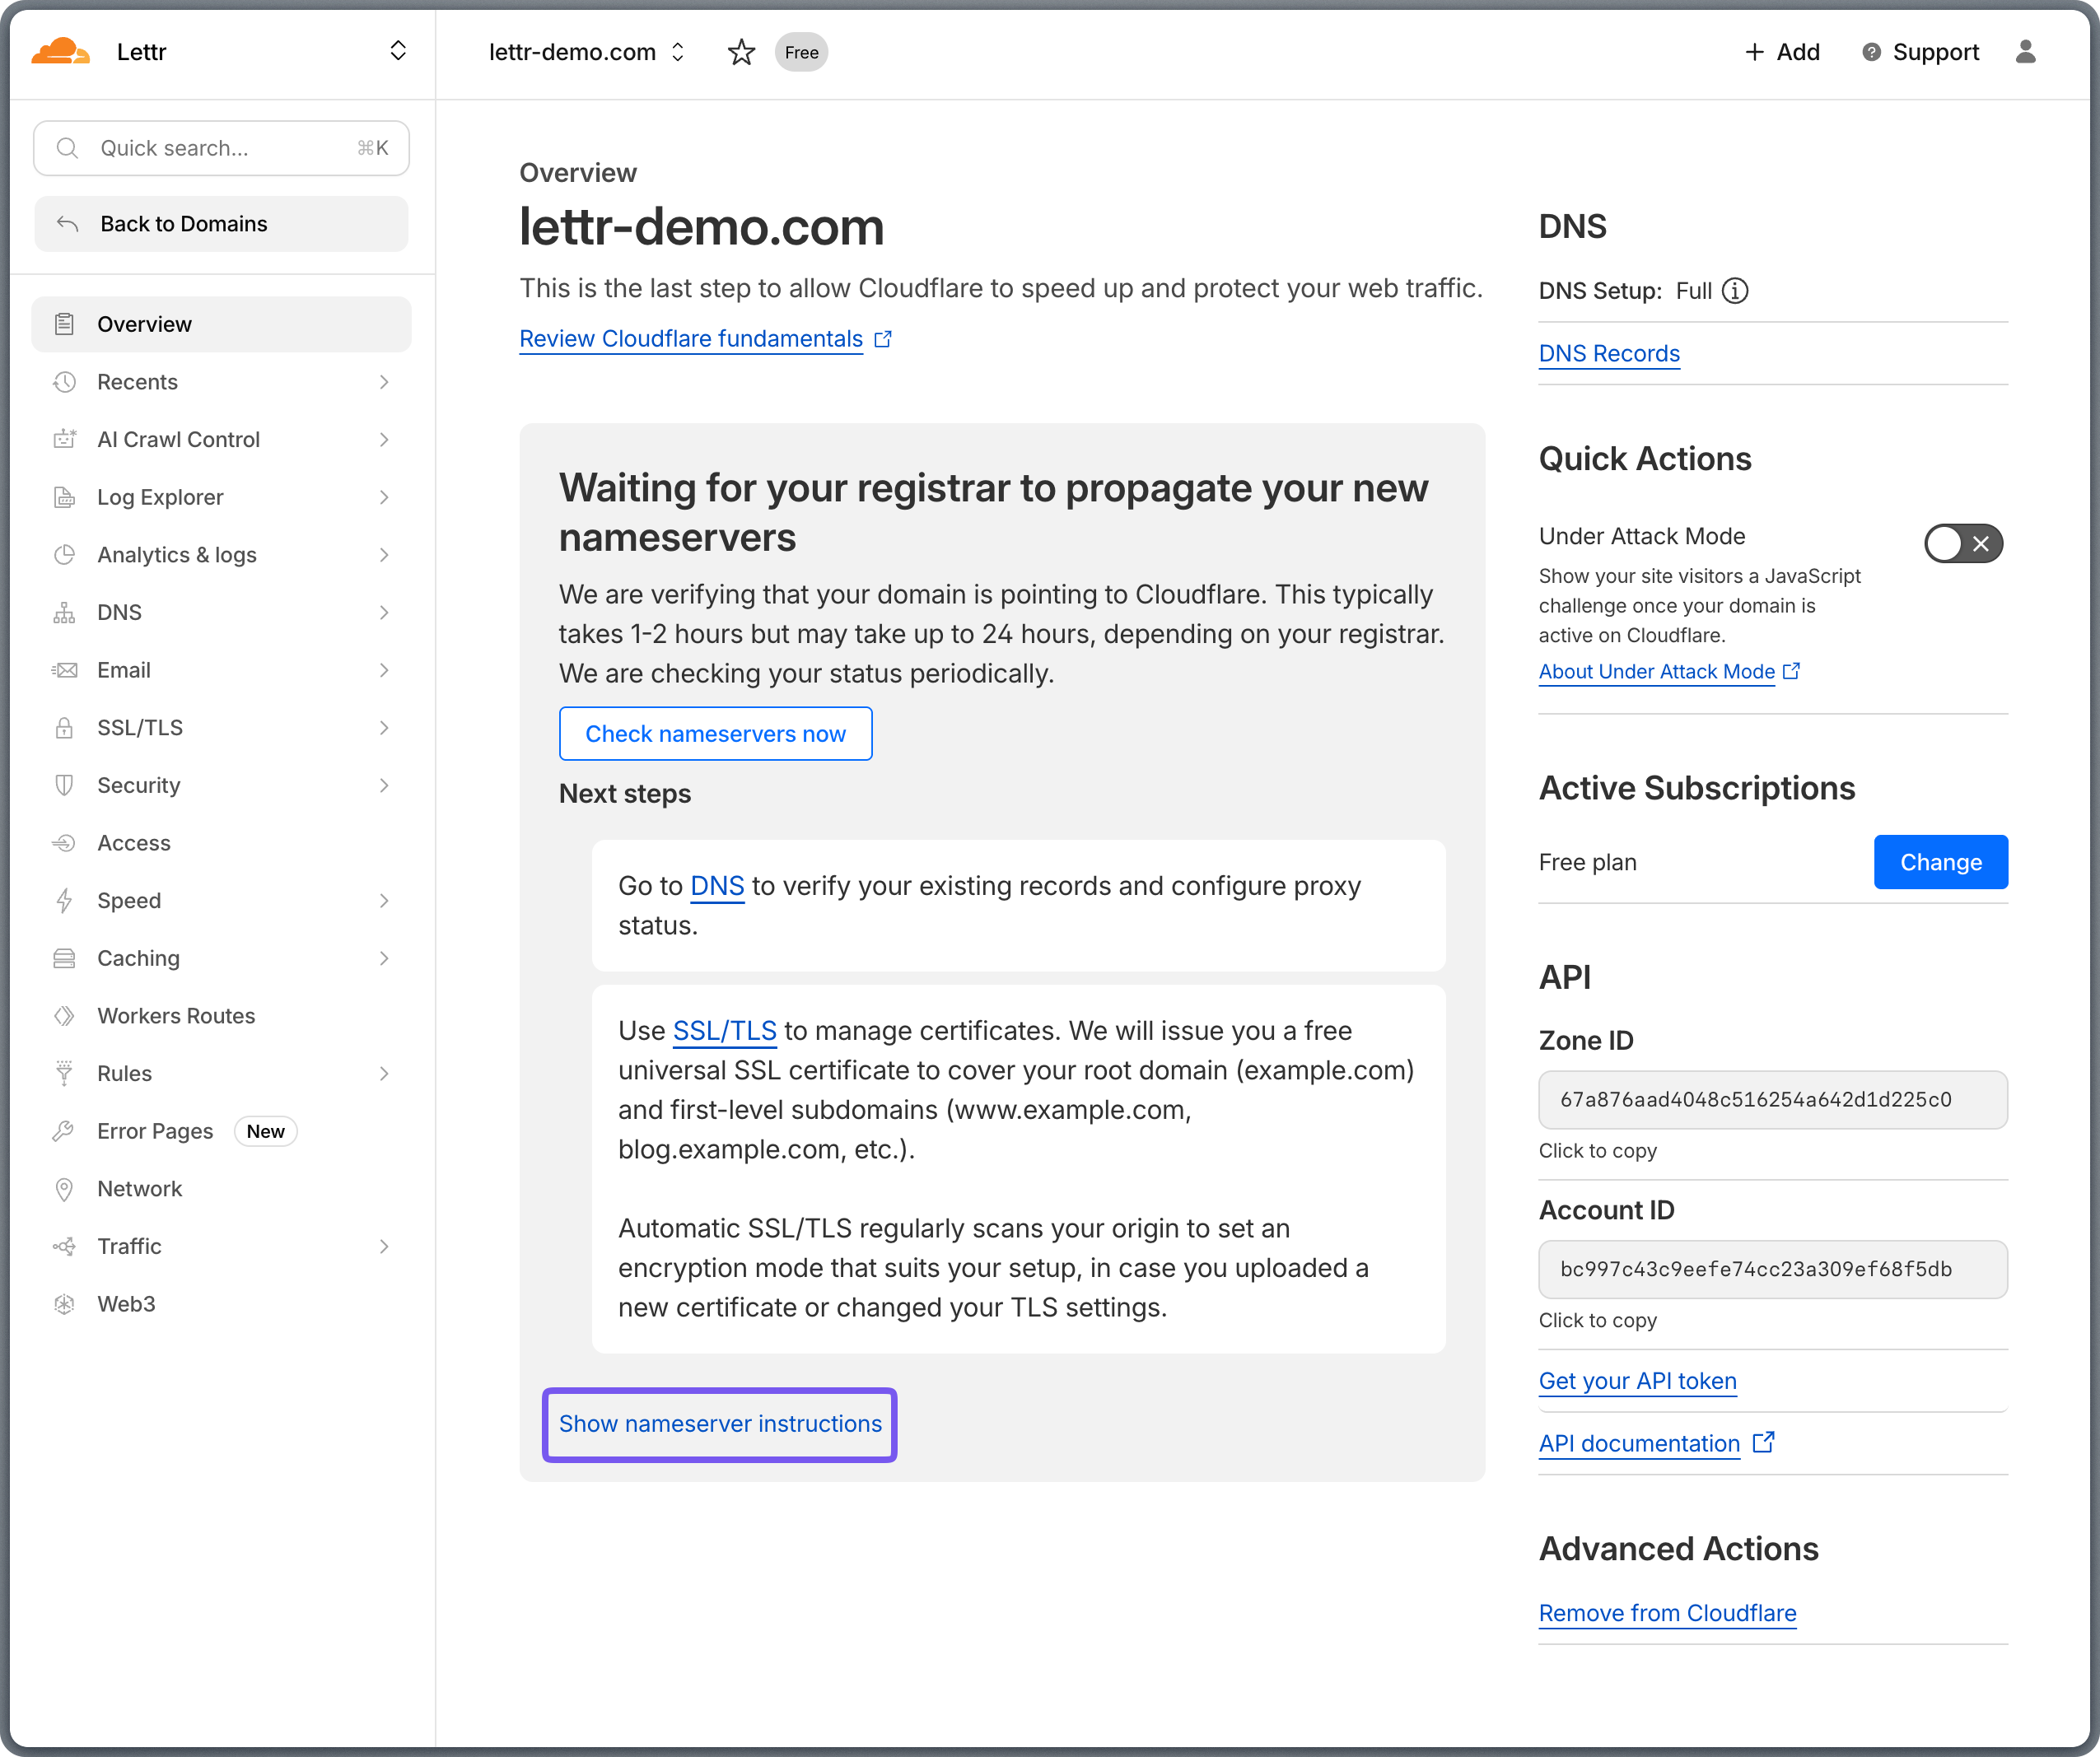 Until the nameservers are updated, any records you add in Cloudflare will not resolve.
### Add CNAME Record
The CNAME record verifies domain ownership with Lettr's email infrastructure.
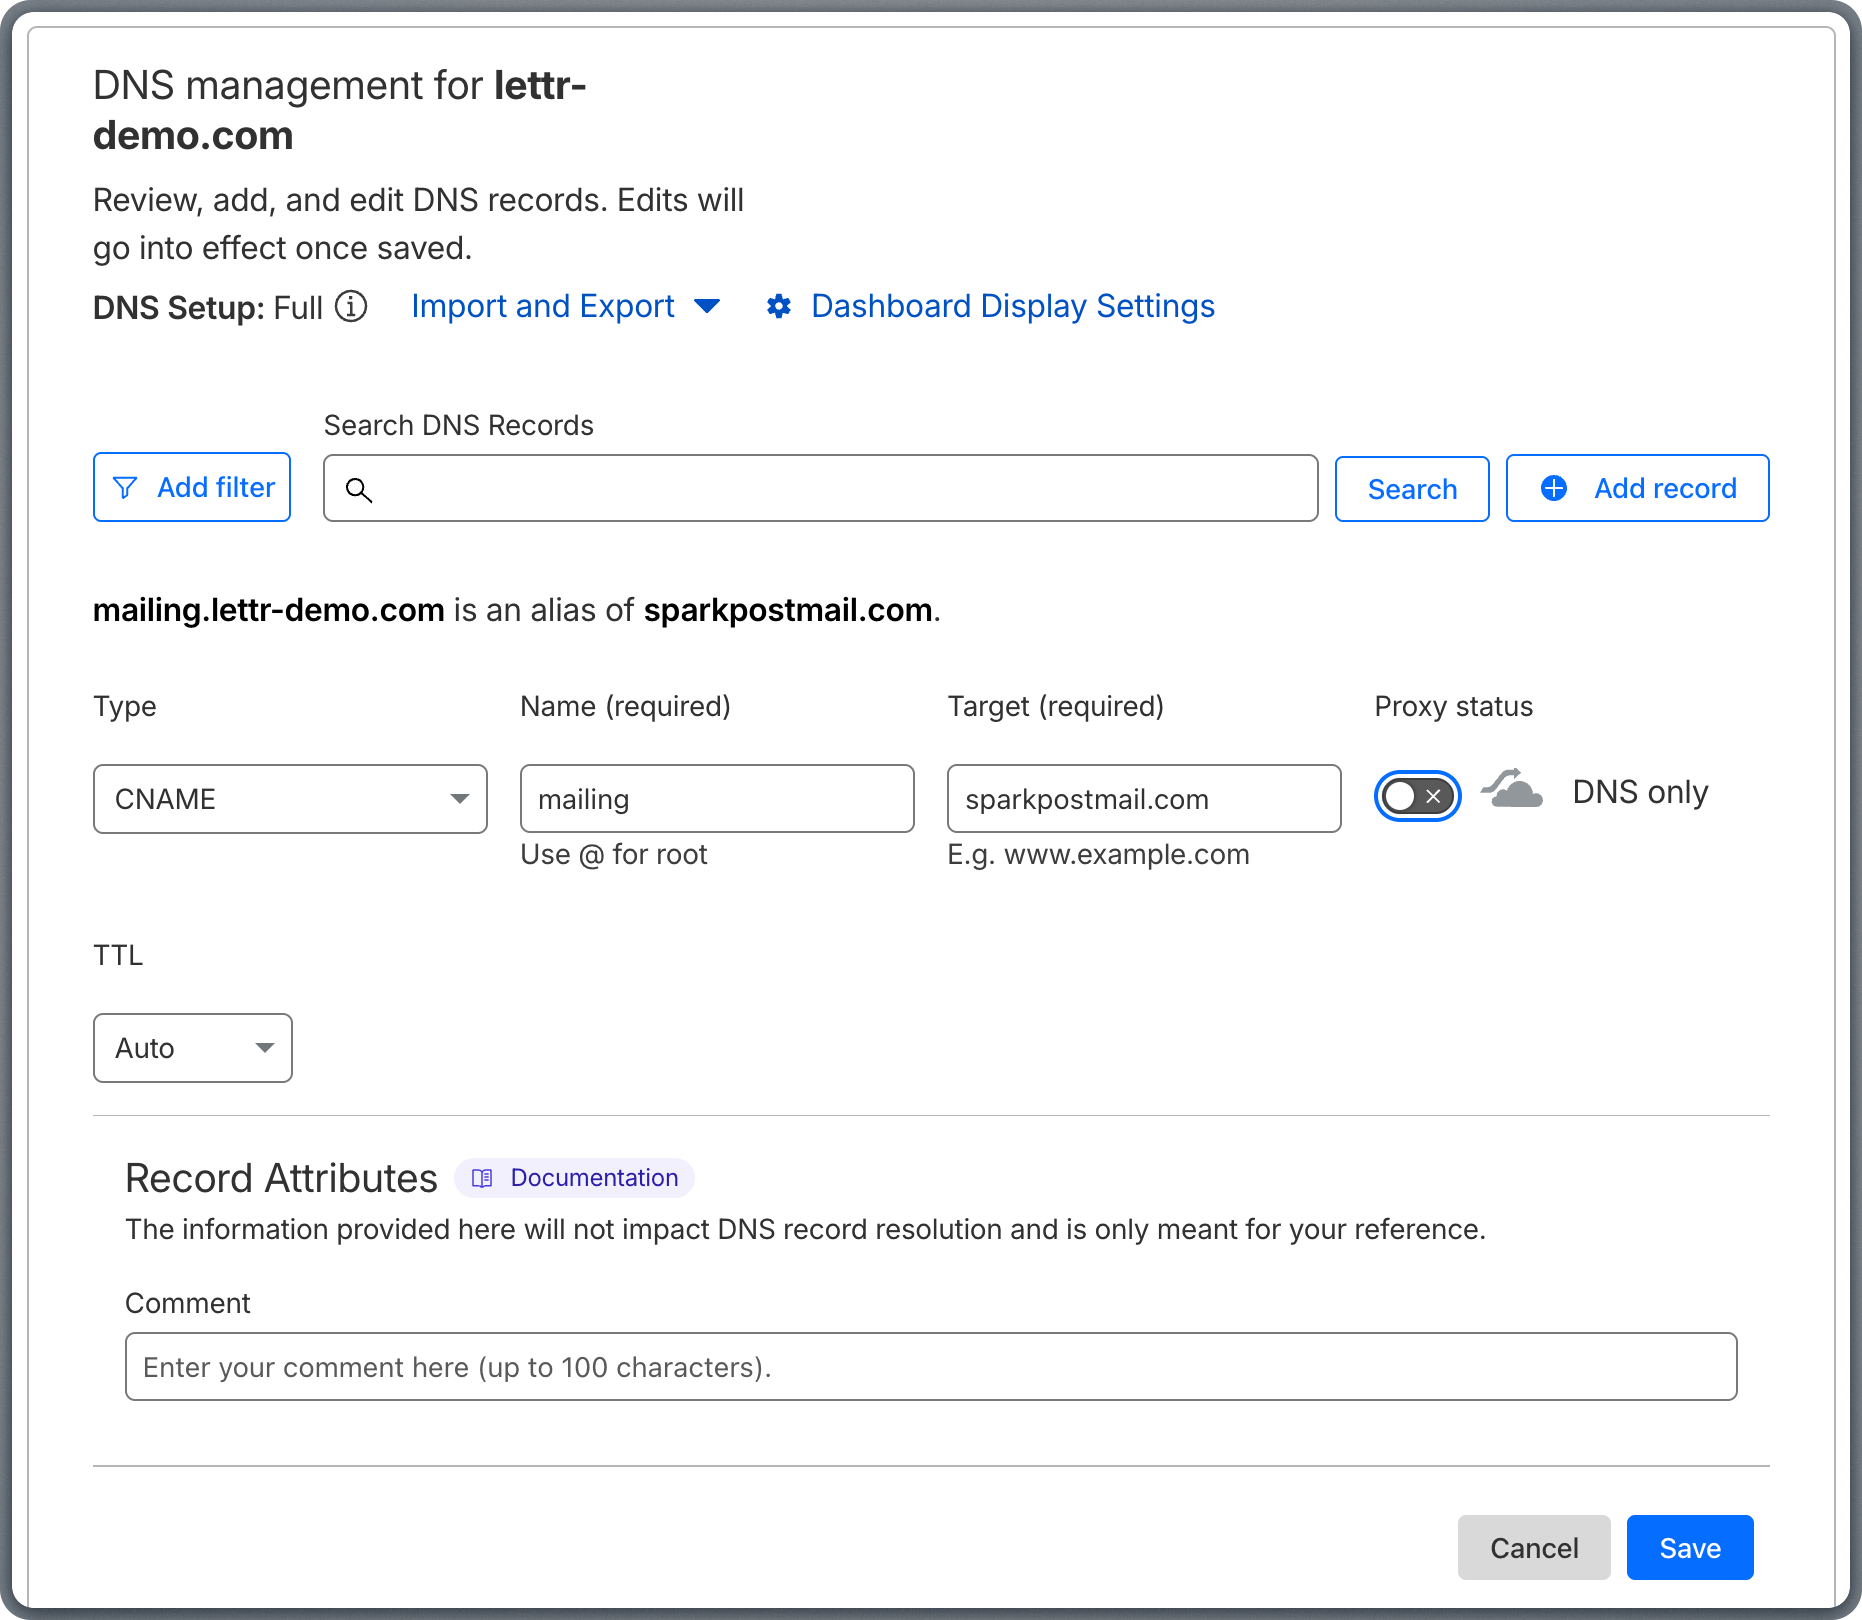
Copy the CNAME values from Lettr to Cloudflare:
1. Click **Add record** on the Cloudflare DNS page.
2. Select **CNAME** from the **Type** dropdown.
3. Copy the **Hostname** from Lettr and paste it into the **Name** field in Cloudflare.
4. Copy the **Value** from Lettr and paste it into the **Target** field in Cloudflare.
5. Set **Proxy status** to **DNS only** (grey cloud). Click the orange cloud icon to toggle it off.
6. Leave **TTL** set to Auto.
7. Click **Save**.
Cloudflare's proxy mode (orange cloud) rewrites DNS responses and will cause CNAME verification to fail. All CNAME records for Lettr **must** use **DNS only** (grey cloud) mode.
Omit your domain suffix from the Hostname when pasting into Cloudflare. For example, instead of `mailing.lettr-demo.com`, paste only `mailing`.
Until the nameservers are updated, any records you add in Cloudflare will not resolve.
### Add CNAME Record
The CNAME record verifies domain ownership with Lettr's email infrastructure.
Copy the CNAME values from Lettr to Cloudflare:
1. Click **Add record** on the Cloudflare DNS page.
2. Select **CNAME** from the **Type** dropdown.
3. Copy the **Hostname** from Lettr and paste it into the **Name** field in Cloudflare.
4. Copy the **Value** from Lettr and paste it into the **Target** field in Cloudflare.
5. Set **Proxy status** to **DNS only** (grey cloud). Click the orange cloud icon to toggle it off.
6. Leave **TTL** set to Auto.
7. Click **Save**.
Cloudflare's proxy mode (orange cloud) rewrites DNS responses and will cause CNAME verification to fail. All CNAME records for Lettr **must** use **DNS only** (grey cloud) mode.
Omit your domain suffix from the Hostname when pasting into Cloudflare. For example, instead of `mailing.lettr-demo.com`, paste only `mailing`.
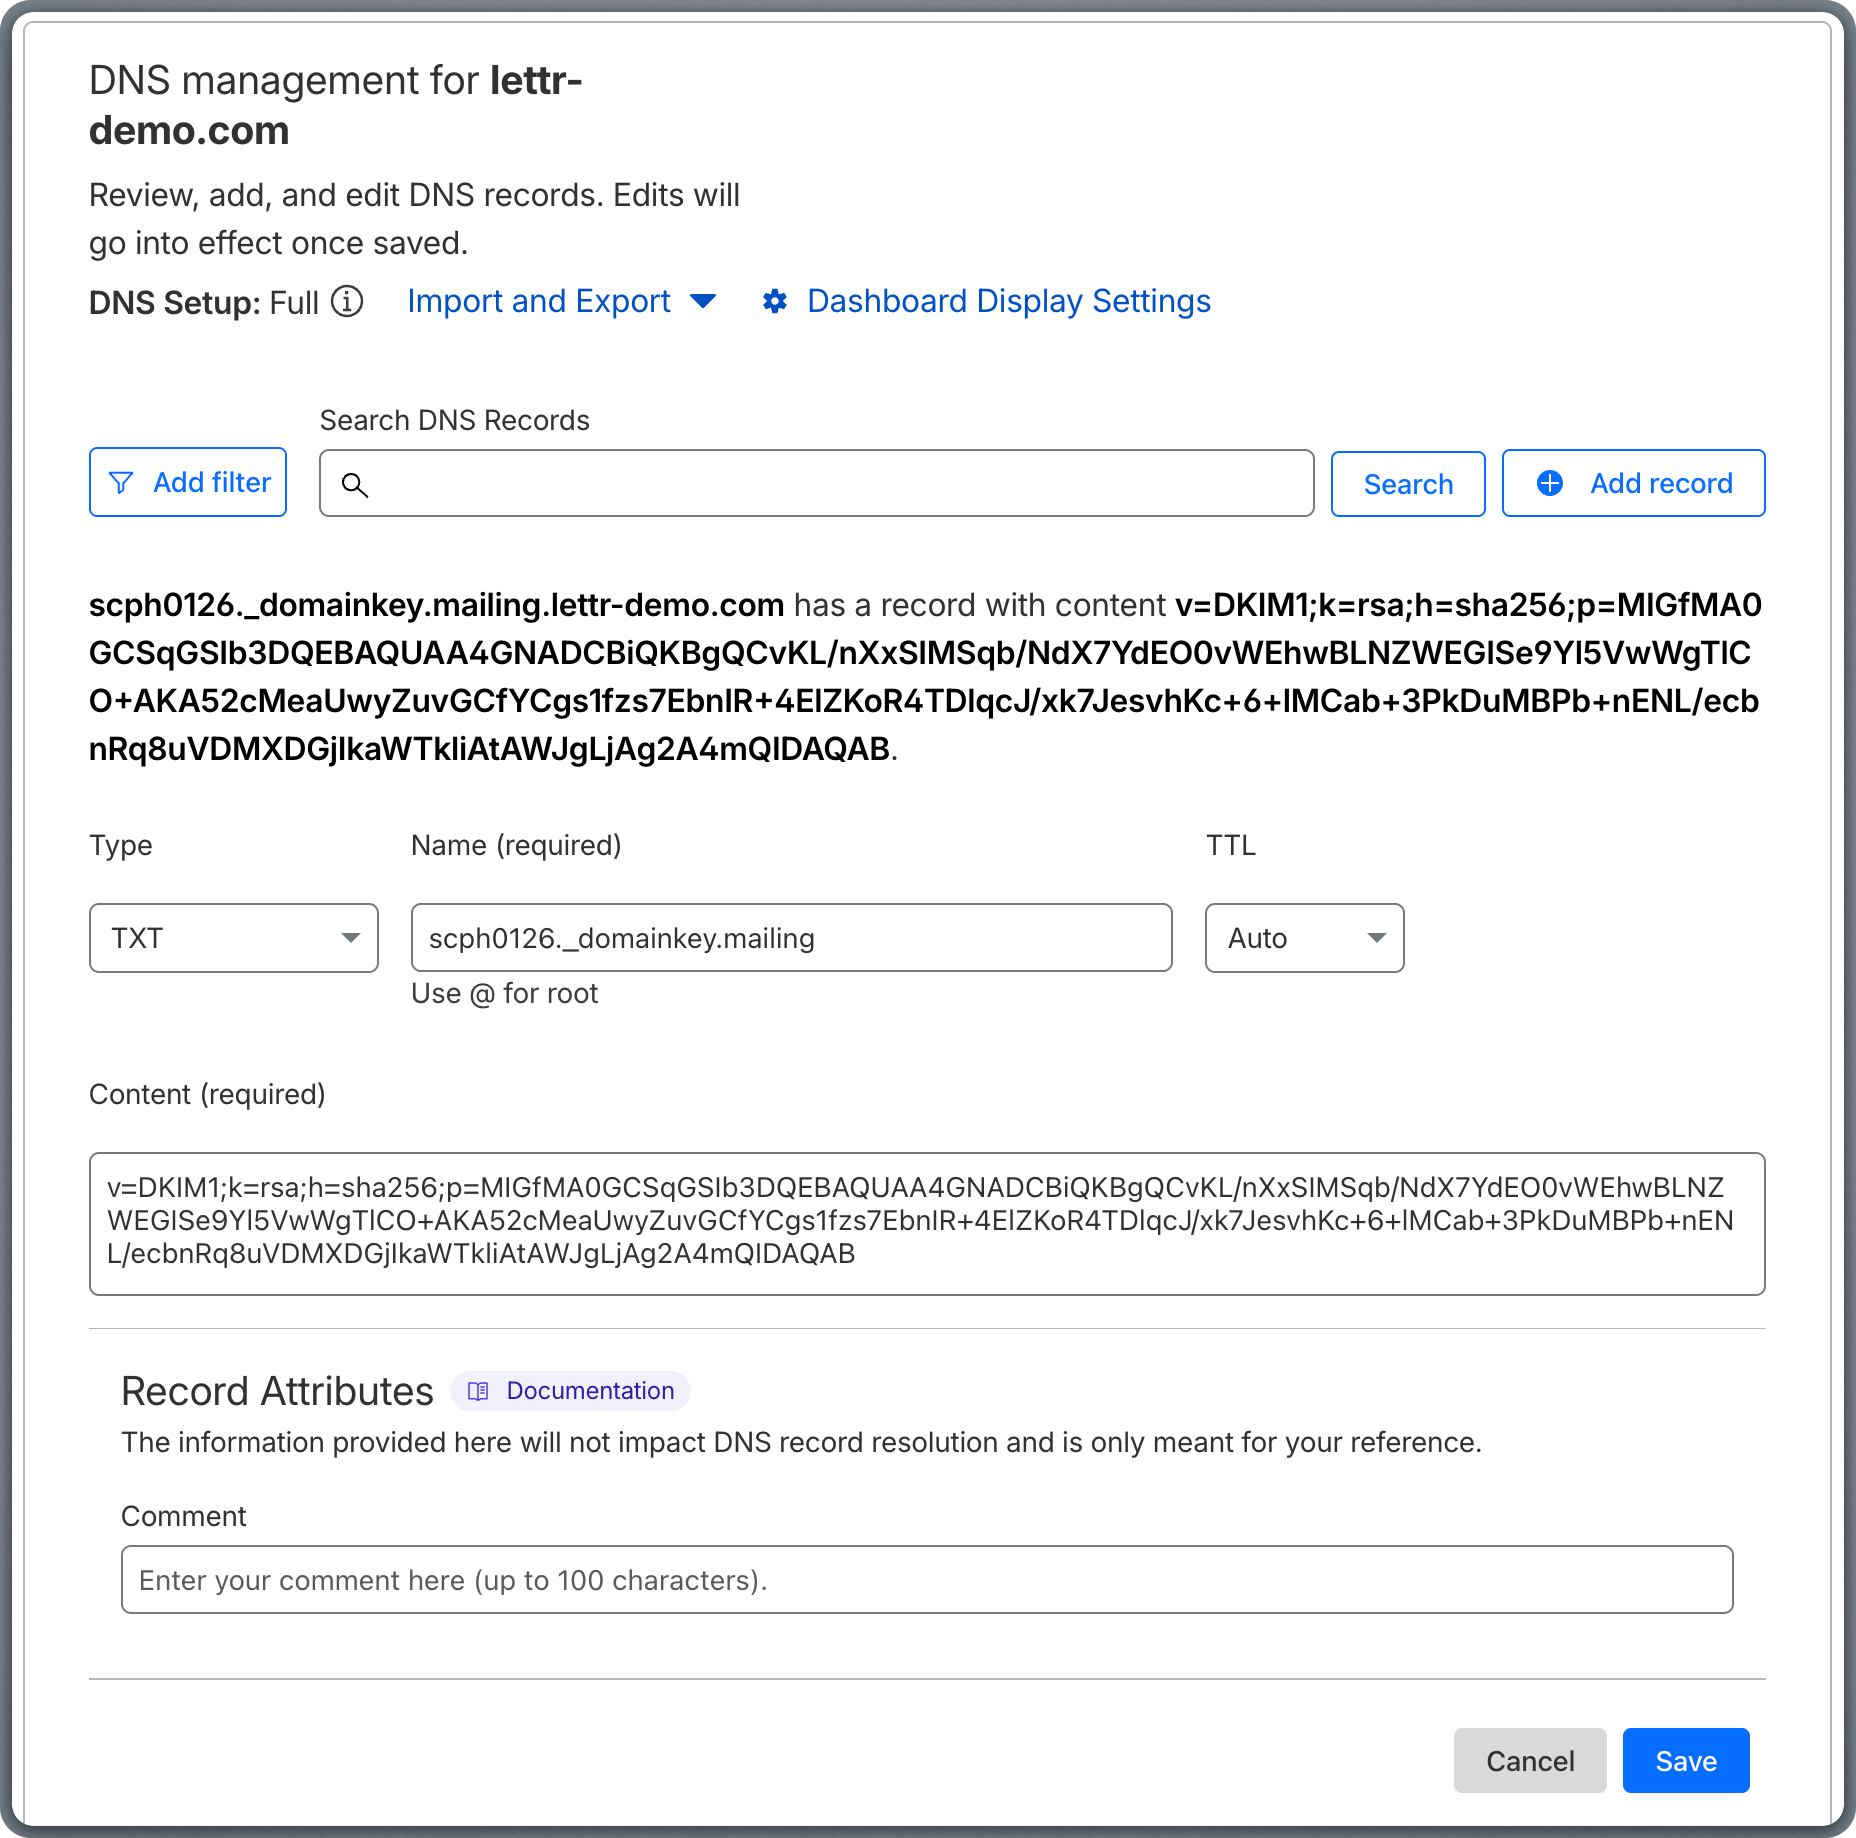
 ### Add TXT Record (DKIM)
The DKIM record adds a cryptographic signature to your outgoing emails, allowing recipients to verify they were sent by an authorized sender.
Copy the TXT values from Lettr to Cloudflare:
1. Click **Add record** on the Cloudflare DNS page.
2. Select **TXT** from the **Type** dropdown.
3. Copy the **Hostname** from Lettr and paste it into the **Name** field in Cloudflare.
4. Copy the **Value** from Lettr and paste it into the **Content** field in Cloudflare.
5. Leave **TTL** set to Auto.
6. Click **Save**.
Omit your domain suffix from the Hostname when pasting into Cloudflare. For example, instead of `scph0126._domainkey.mailing.lettr-demo.com`, paste only `scph0126._domainkey.mailing`.
### Add TXT Record (DKIM)
The DKIM record adds a cryptographic signature to your outgoing emails, allowing recipients to verify they were sent by an authorized sender.
Copy the TXT values from Lettr to Cloudflare:
1. Click **Add record** on the Cloudflare DNS page.
2. Select **TXT** from the **Type** dropdown.
3. Copy the **Hostname** from Lettr and paste it into the **Name** field in Cloudflare.
4. Copy the **Value** from Lettr and paste it into the **Content** field in Cloudflare.
5. Leave **TTL** set to Auto.
6. Click **Save**.
Omit your domain suffix from the Hostname when pasting into Cloudflare. For example, instead of `scph0126._domainkey.mailing.lettr-demo.com`, paste only `scph0126._domainkey.mailing`.
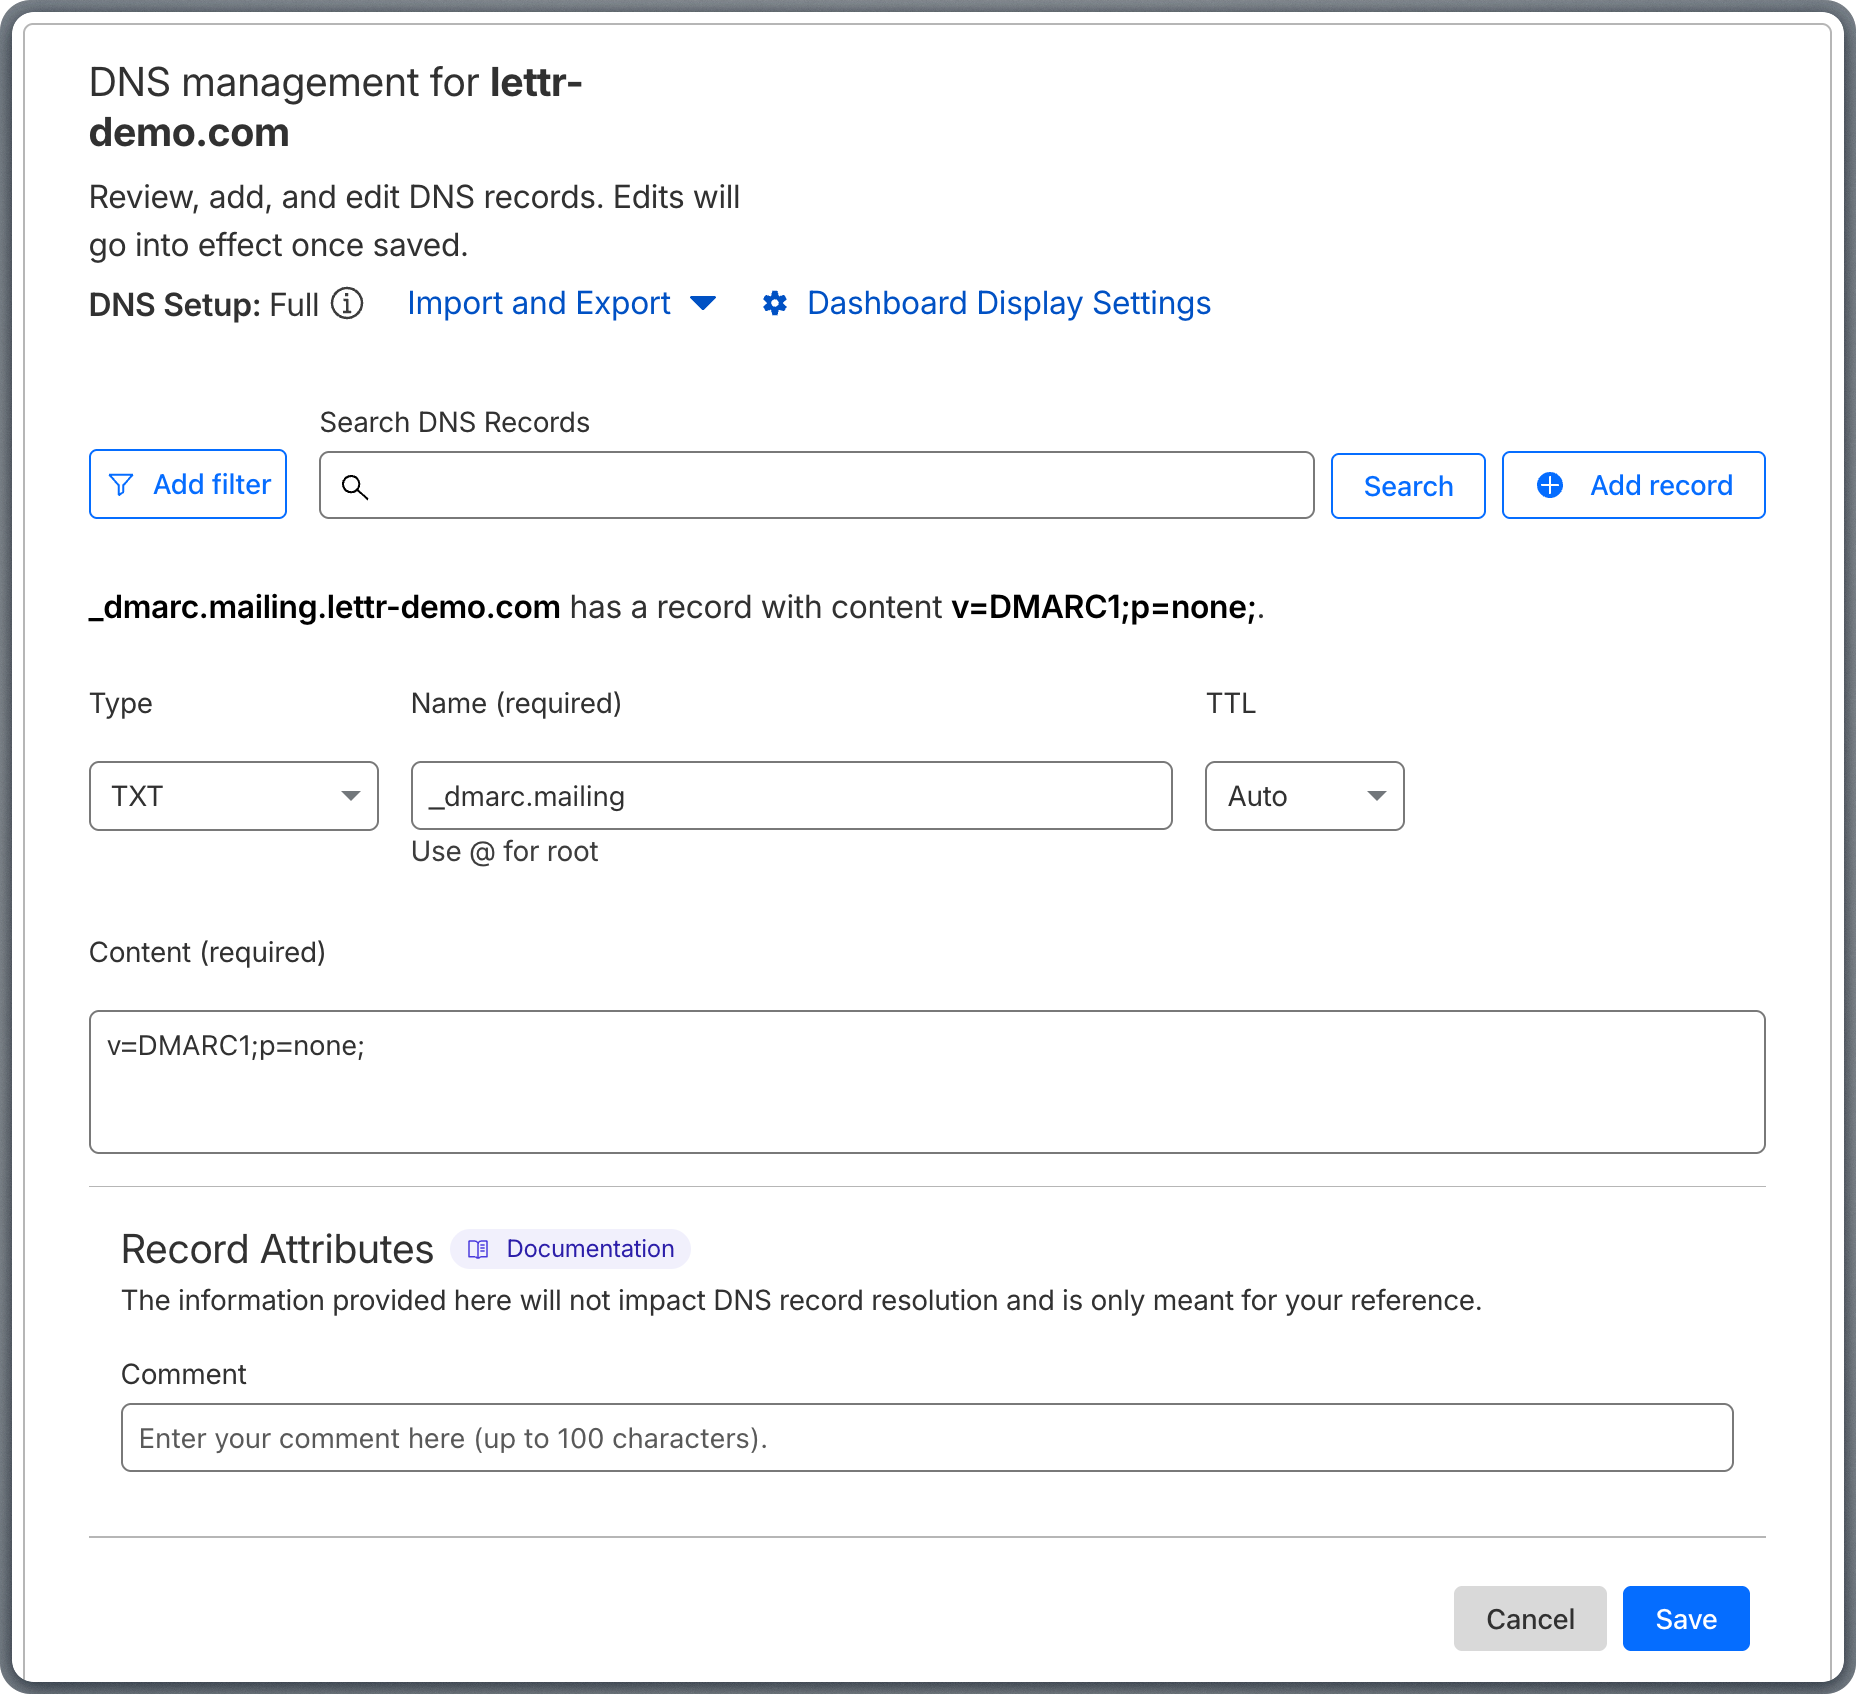
 ### Add TXT Record (DMARC)
The DMARC record tells receiving mail servers how to handle emails that fail authentication checks, protecting your domain from spoofing.
Copy the TXT values from Lettr to Cloudflare:
1. Click **Add record** on the Cloudflare DNS page.
2. Select **TXT** from the **Type** dropdown.
3. Copy the **Hostname** from Lettr and paste it into the **Name** field in Cloudflare.
4. Copy the **Value** from Lettr and paste it into the **Content** field in Cloudflare.
5. Leave **TTL** set to Auto.
6. Click **Save**.
Omit your domain suffix from the Hostname when pasting into Cloudflare. For example, instead of `_dmarc.mailing.lettr-demo.com`, paste only `_dmarc.mailing`.
### Add TXT Record (DMARC)
The DMARC record tells receiving mail servers how to handle emails that fail authentication checks, protecting your domain from spoofing.
Copy the TXT values from Lettr to Cloudflare:
1. Click **Add record** on the Cloudflare DNS page.
2. Select **TXT** from the **Type** dropdown.
3. Copy the **Hostname** from Lettr and paste it into the **Name** field in Cloudflare.
4. Copy the **Value** from Lettr and paste it into the **Content** field in Cloudflare.
5. Leave **TTL** set to Auto.
6. Click **Save**.
Omit your domain suffix from the Hostname when pasting into Cloudflare. For example, instead of `_dmarc.mailing.lettr-demo.com`, paste only `_dmarc.mailing`.
 ### Verify Your Sending Domain
After adding all three DNS records, go back to Lettr and click **Verify DNS Records**. DNS propagation can take up to 24–48 hours, though it typically completes within a few minutes.
***
## Manual Inbound Domain Setup
An inbound domain allows Lettr to receive emails on your behalf. This requires three MX records that direct incoming mail to Lettr's mail servers.
### Add Inbound Domain to Lettr
To create an Inbound domain in Lettr:
1. Select **Domains** in the navigation panel
2. Select **Inbound Domains**
3. Click **Create Inbound Domain**
4. Enter your desired inbound subdomain (e.g. `inbound.company.com`)
5. Click **Create Domain**.
Click on your new domain in the Inbound Domains list.
This will display the MX records that need to be configured.
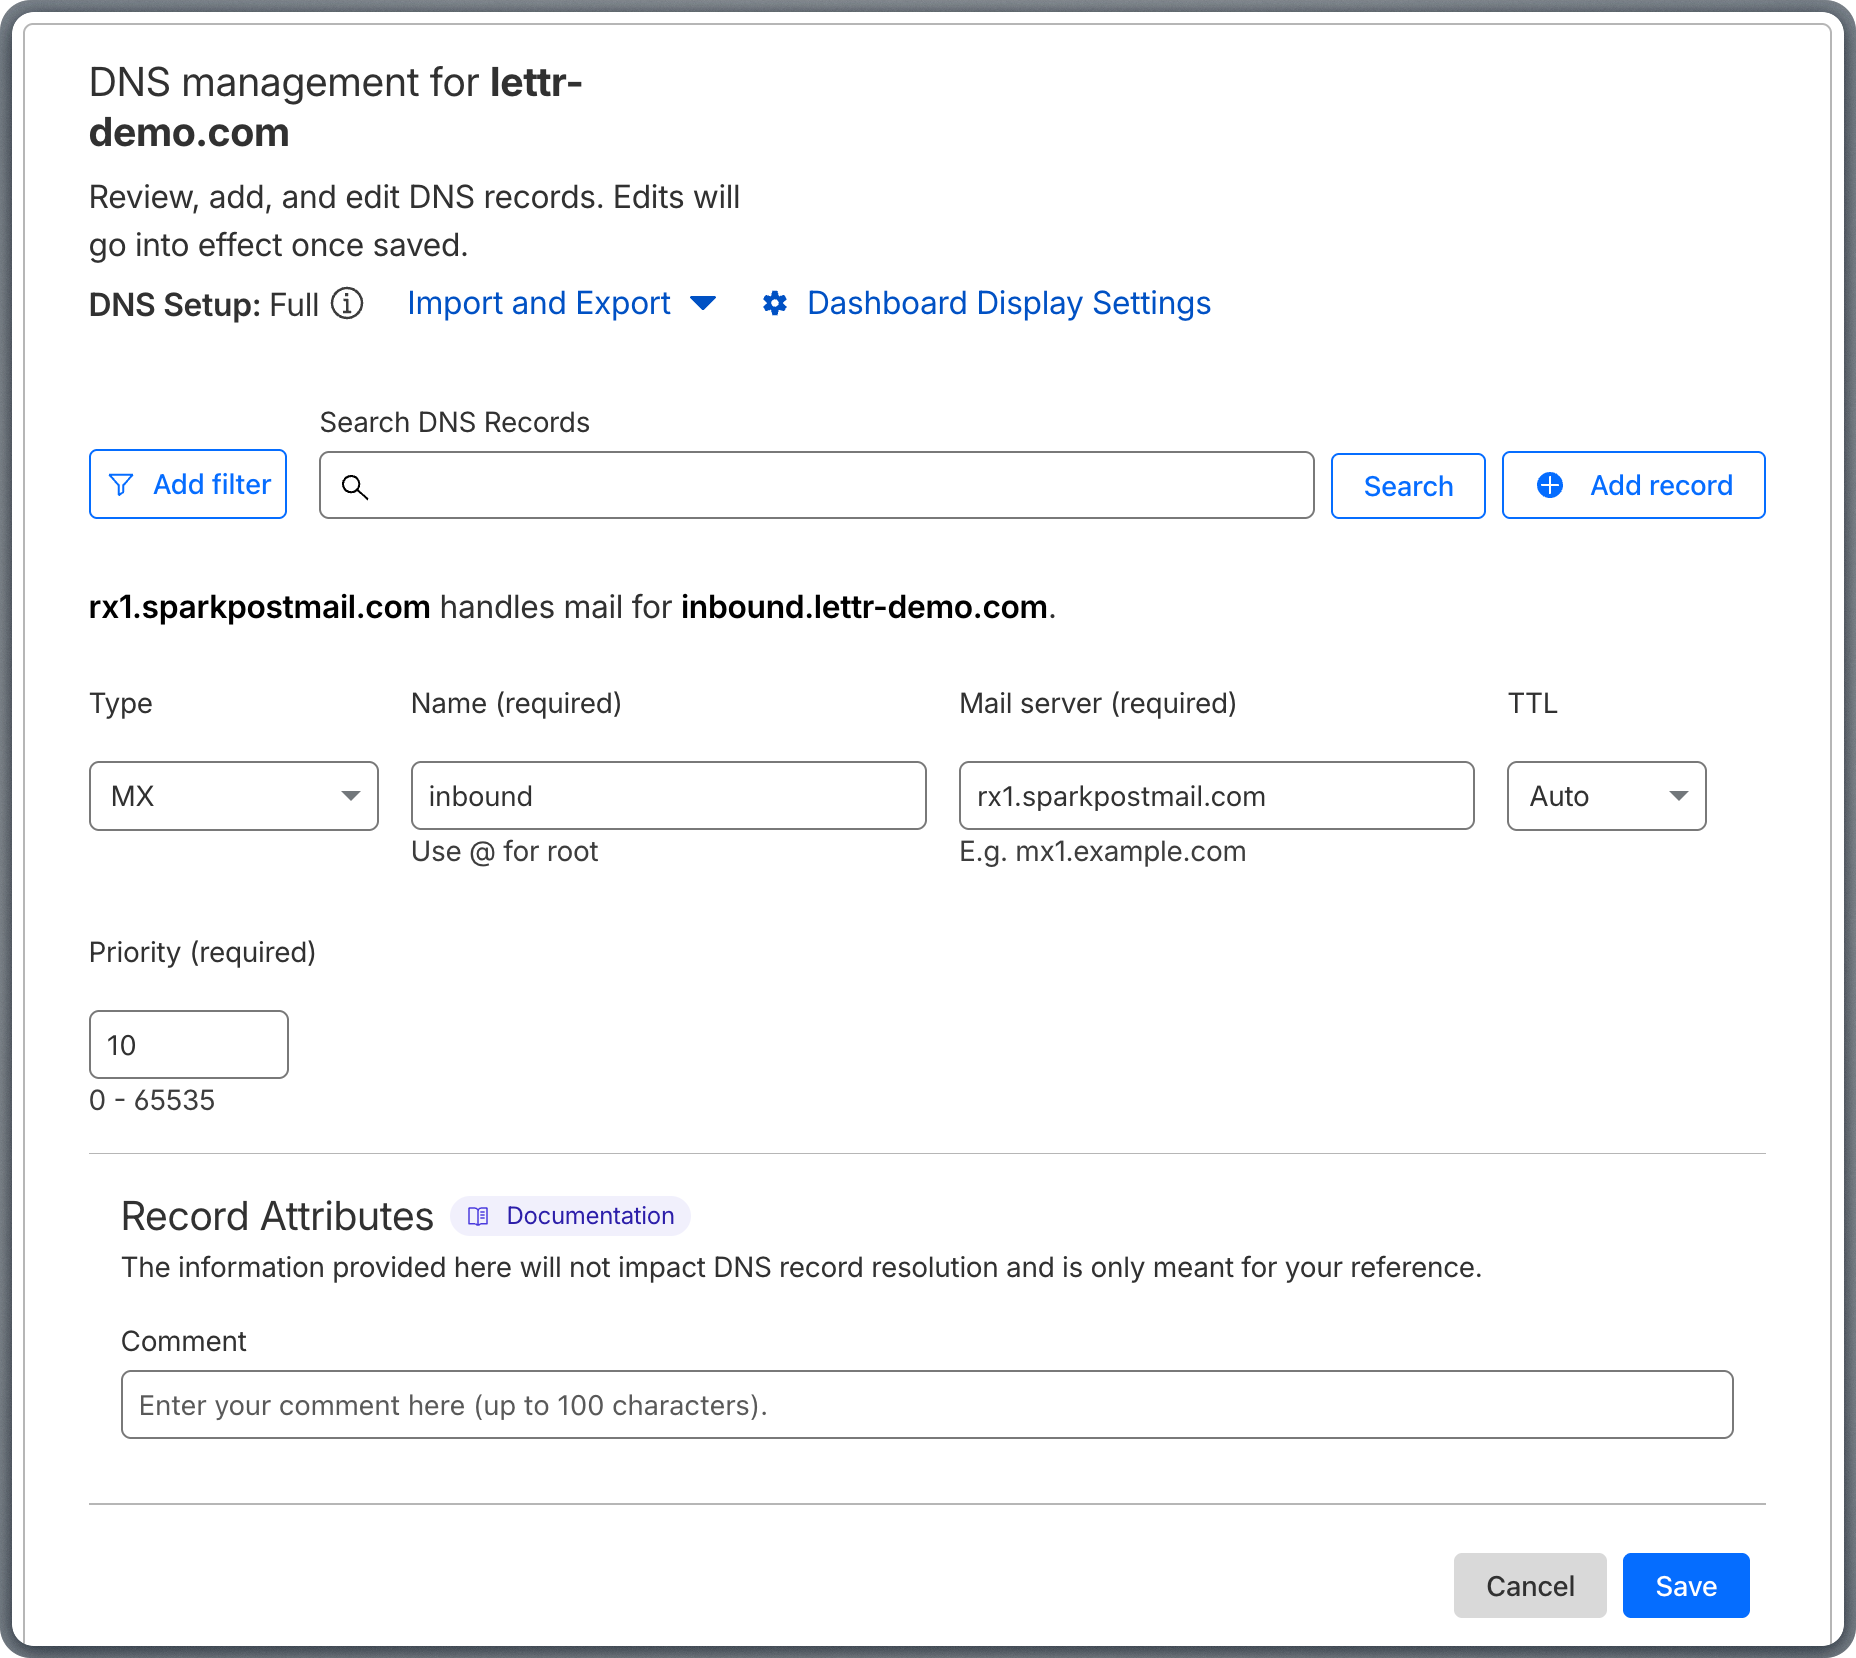
### Add MX Records
MX records tell other mail servers where to deliver emails addressed to your domain.
Copy the MX values from Lettr to Cloudflare:
1. Click **Add record** on the Cloudflare DNS page.
2. Select **MX** from the **Type** dropdown.
3. Copy the **Hostname** from Lettr and paste it into the **Name** field in Cloudflare.
4. Copy the first **Required MX Record** value (without the priority number) from Lettr and paste it into the **Mail server** field in Cloudflare.
5. Copy the **Priority** number (e.g. `10`) from Lettr and paste it into the **Priority** field in Cloudflare.
6. Leave **TTL** set to Auto.
7. Click **Save**.
8. Repeat this process for the second (rx2.sparkpostmail.com) and third (rx3.sparkpostmail.com) MX records.
Omit your domain suffix from the Hostname when pasting into Cloudflare. For example, instead of `inbound.lettr-demo.com`, paste only `inbound`.
### Verify Your Sending Domain
After adding all three DNS records, go back to Lettr and click **Verify DNS Records**. DNS propagation can take up to 24–48 hours, though it typically completes within a few minutes.
***
## Manual Inbound Domain Setup
An inbound domain allows Lettr to receive emails on your behalf. This requires three MX records that direct incoming mail to Lettr's mail servers.
### Add Inbound Domain to Lettr
To create an Inbound domain in Lettr:
1. Select **Domains** in the navigation panel
2. Select **Inbound Domains**
3. Click **Create Inbound Domain**
4. Enter your desired inbound subdomain (e.g. `inbound.company.com`)
5. Click **Create Domain**.
Click on your new domain in the Inbound Domains list.
This will display the MX records that need to be configured.
### Add MX Records
MX records tell other mail servers where to deliver emails addressed to your domain.
Copy the MX values from Lettr to Cloudflare:
1. Click **Add record** on the Cloudflare DNS page.
2. Select **MX** from the **Type** dropdown.
3. Copy the **Hostname** from Lettr and paste it into the **Name** field in Cloudflare.
4. Copy the first **Required MX Record** value (without the priority number) from Lettr and paste it into the **Mail server** field in Cloudflare.
5. Copy the **Priority** number (e.g. `10`) from Lettr and paste it into the **Priority** field in Cloudflare.
6. Leave **TTL** set to Auto.
7. Click **Save**.
8. Repeat this process for the second (rx2.sparkpostmail.com) and third (rx3.sparkpostmail.com) MX records.
Omit your domain suffix from the Hostname when pasting into Cloudflare. For example, instead of `inbound.lettr-demo.com`, paste only `inbound`.
 ### Verify Your Inbound Domain
After adding all three MX records, go back to Lettr and click **Verify DNS Records**. DNS propagation can take up to 24–48 hours, though it typically completes within a few minutes.
***
## Manual Tracking Domain Setup
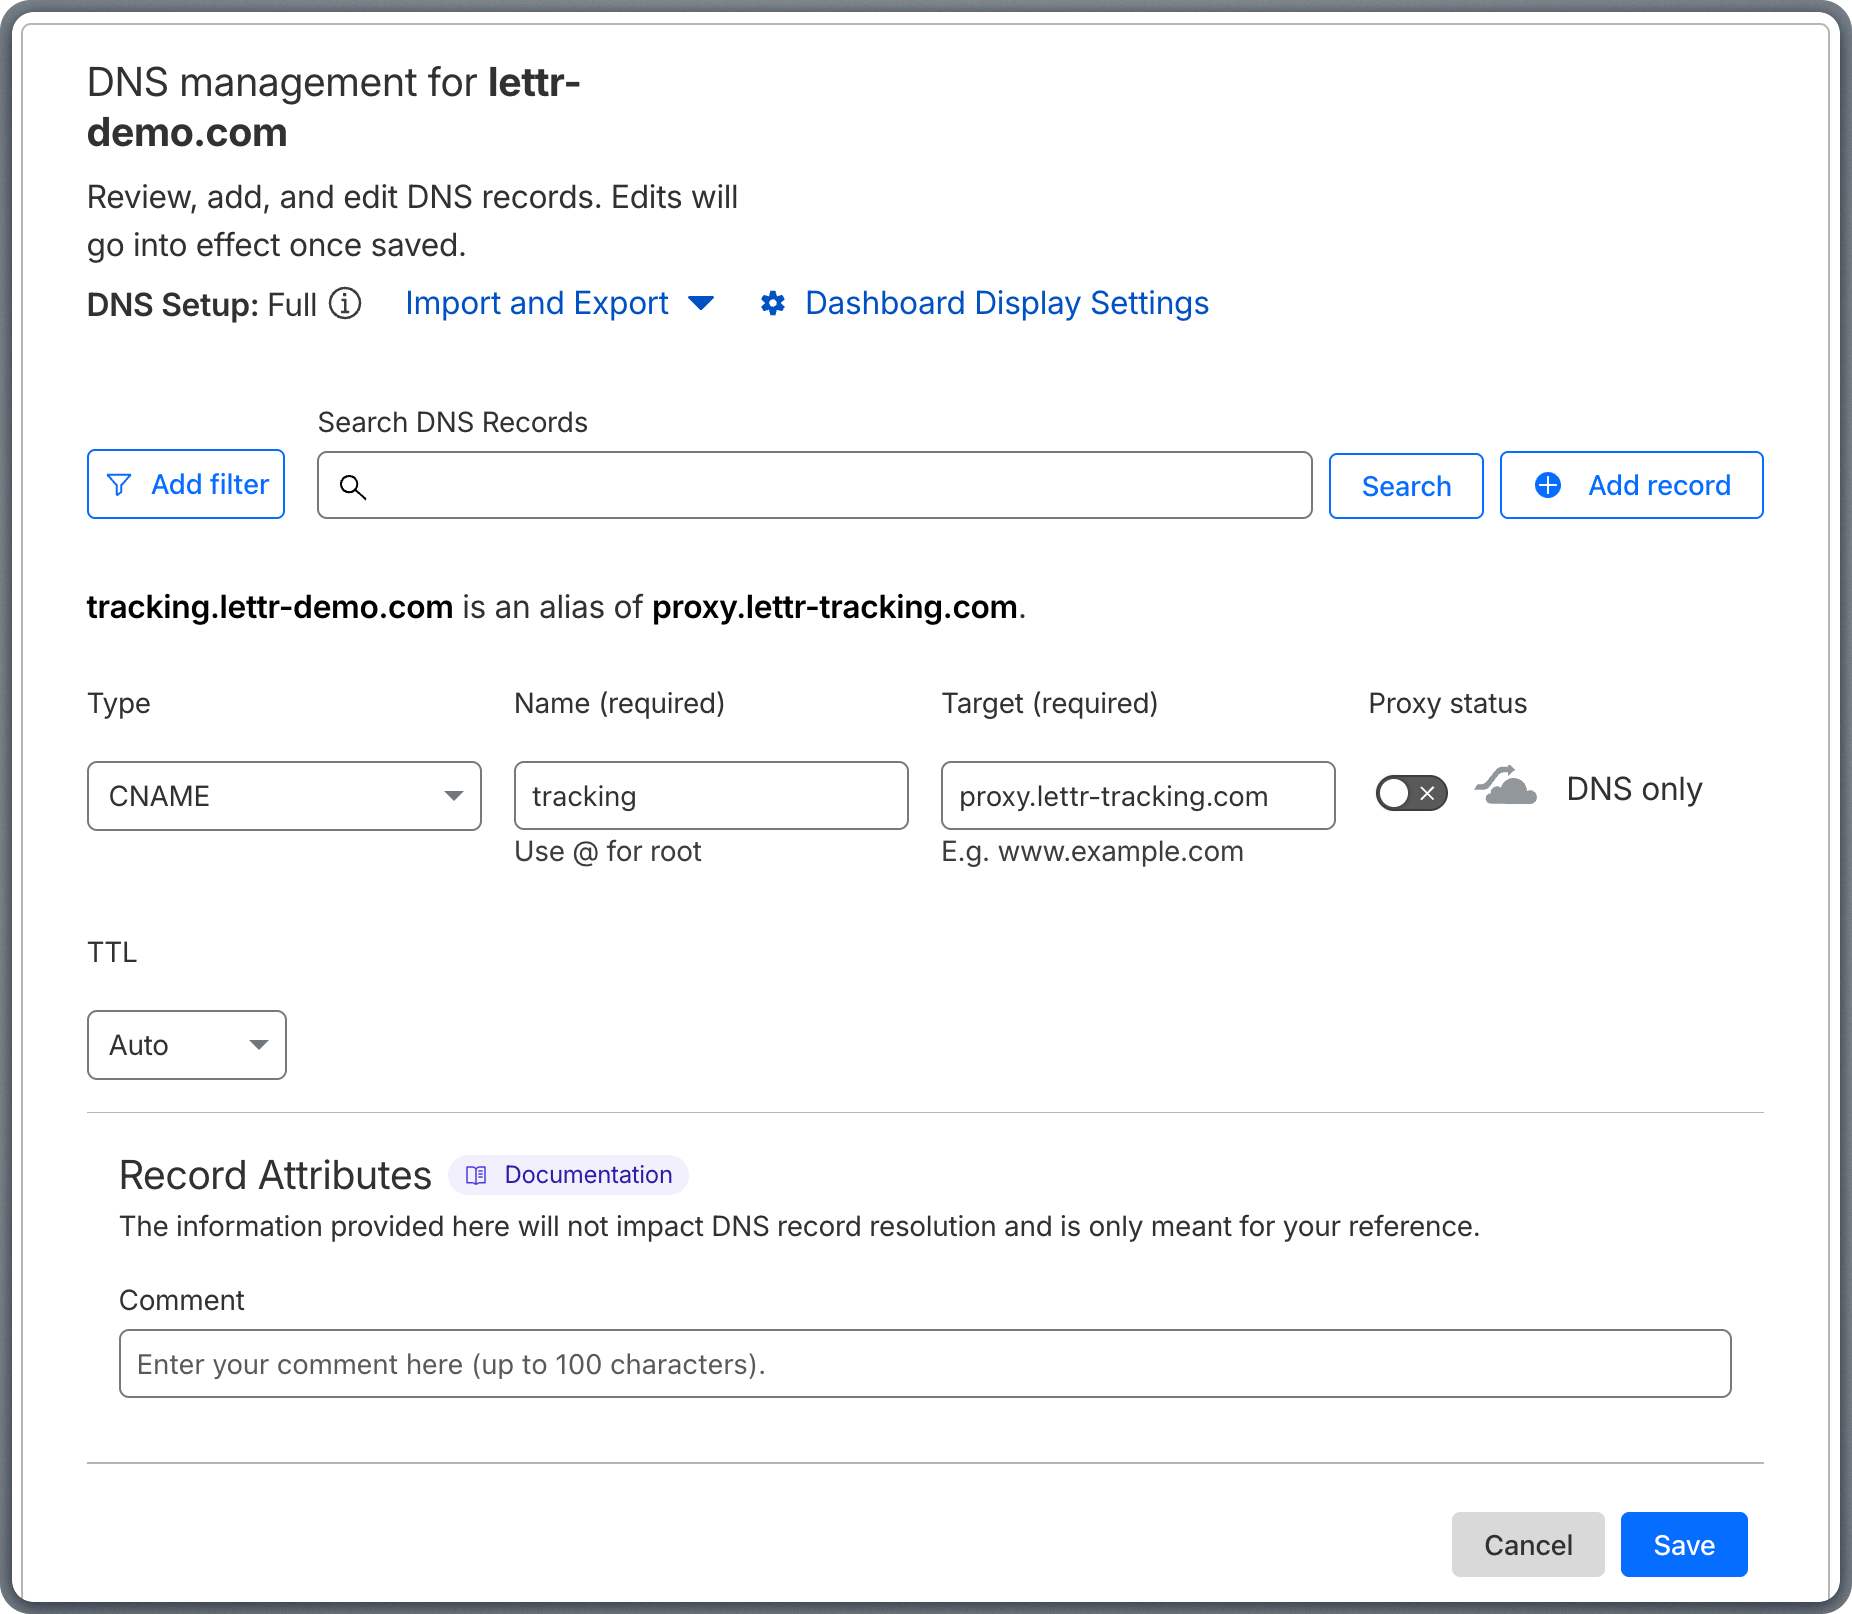
A tracking domain allows Lettr to track email opens and link clicks using your own custom domain instead of the default Lettr tracking domain. This requires two CNAME records: one for the SSL certificate and one for routing tracking traffic to Lettr's infrastructure.
### Add Tracking Domain to Lettr
To create a Tracking domain in Lettr:
1. Select **Domains** in the navigation panel
2. Select **Tracking Domains**
3. Click **Create Tracking Domain**
4. Enter your desired tracking subdomain (e.g. `tracking.company.com`)
5. Click **Create Domain**
Click on your new domain in the Tracking Domains list.
This will display the CNAME records that need to be configured.
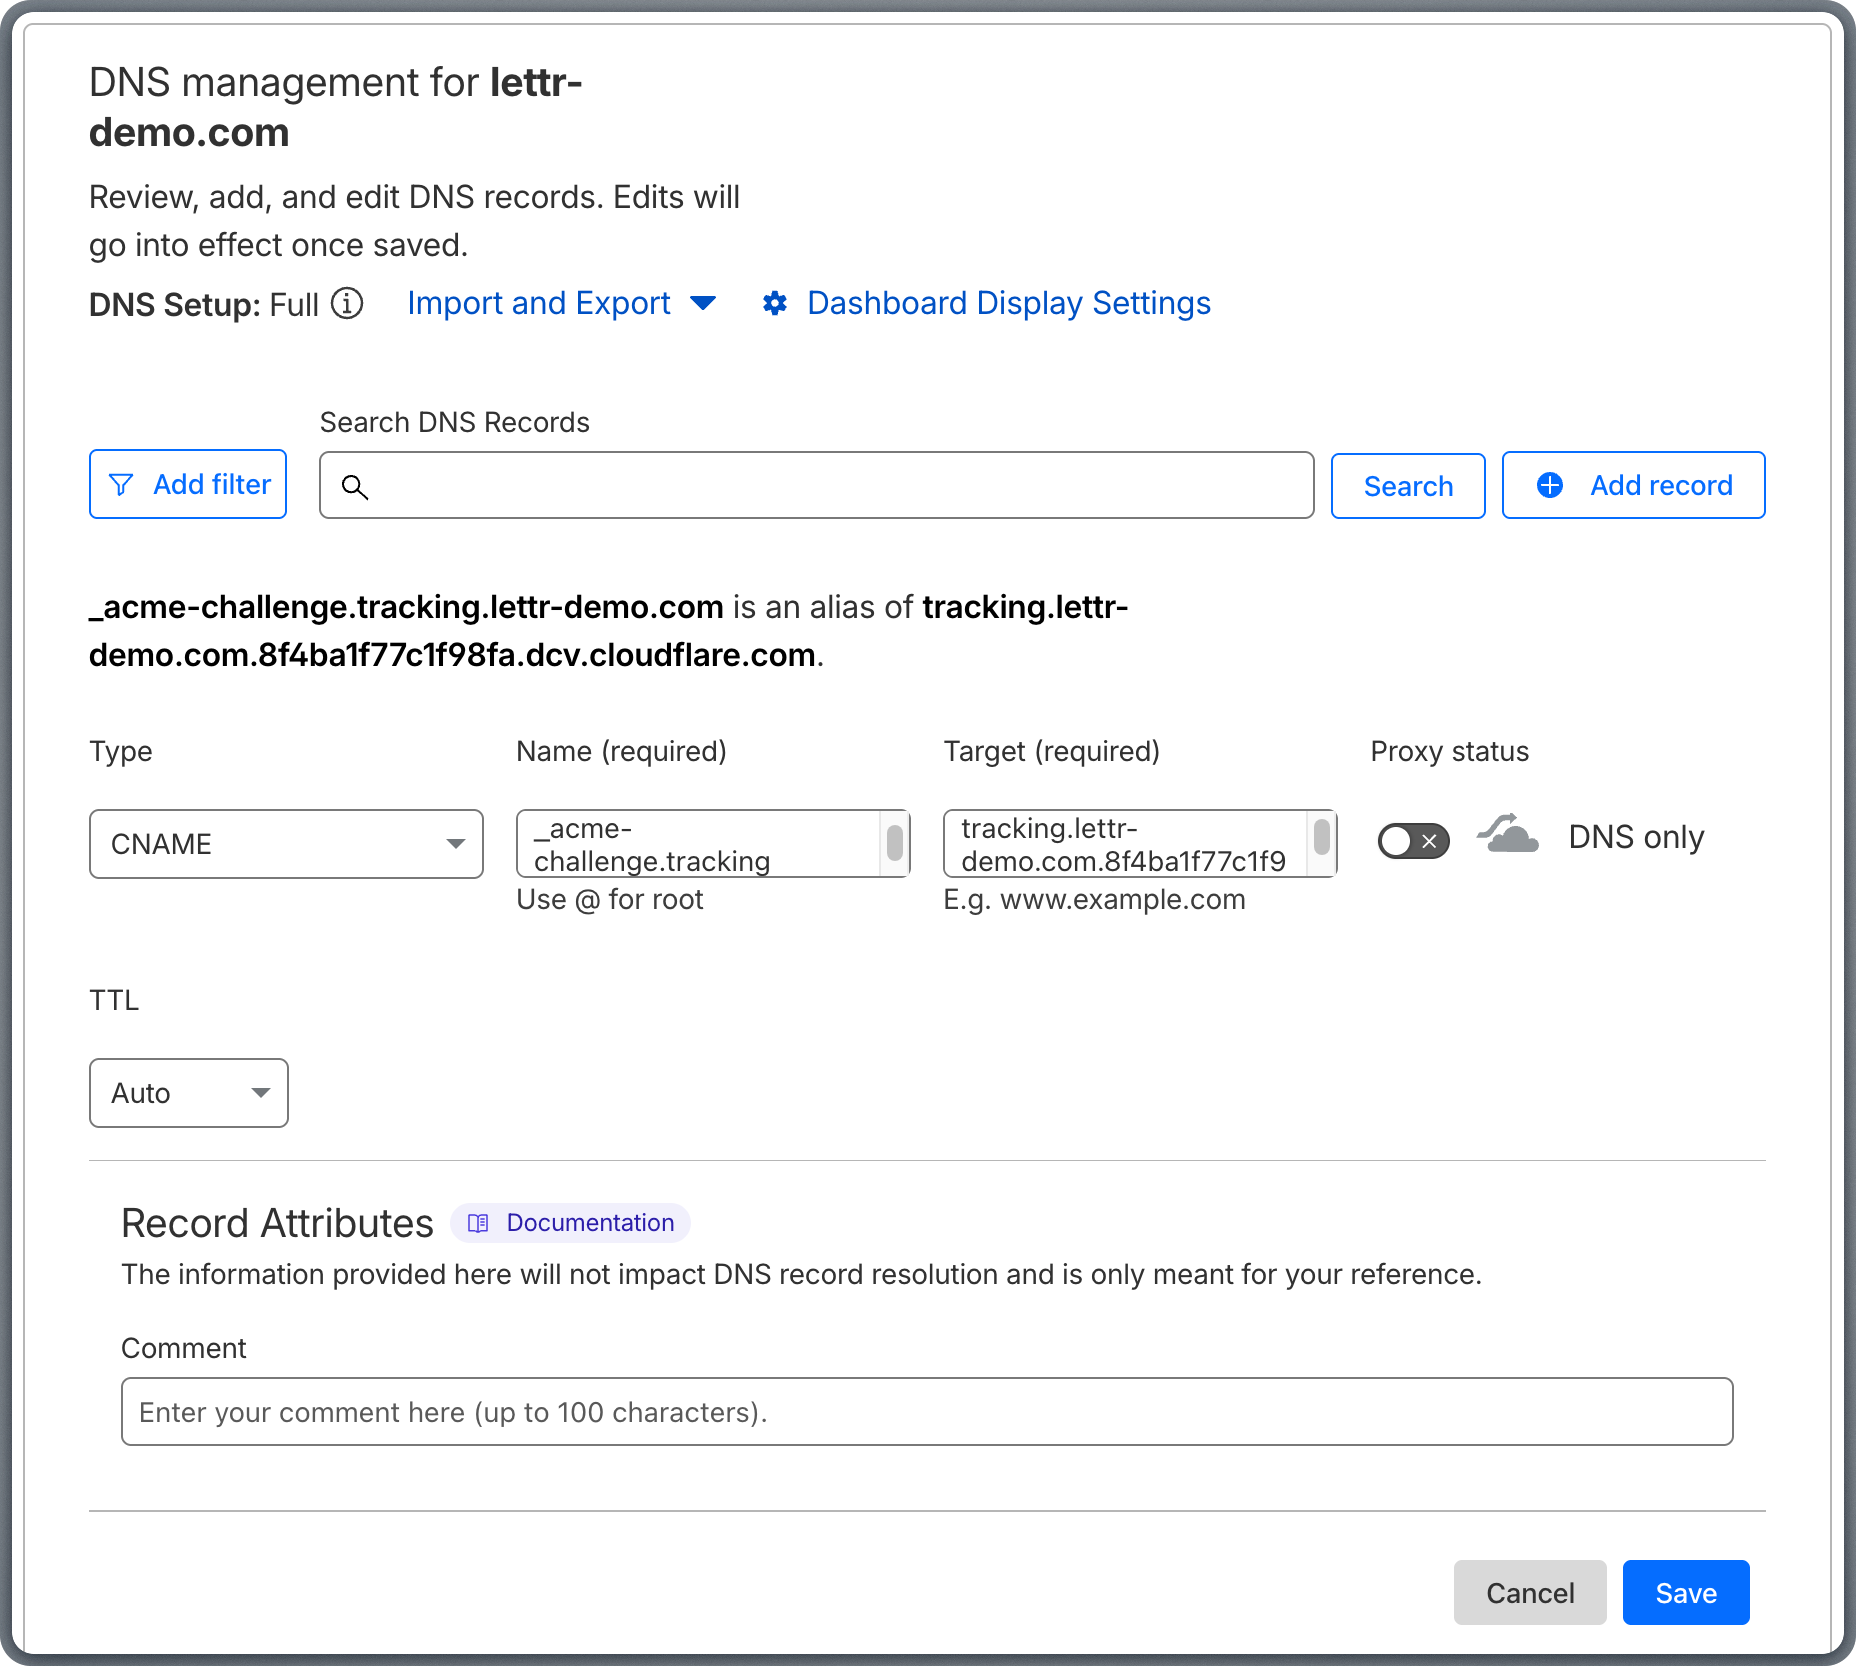
### Add SSL Certificate CNAME Record
The SSL Certificate CNAME record provisions an SSL certificate for your custom tracking domain, enabling secure HTTPS connections for tracked links.
Add the record in Cloudflare:
1. Click **Add record** on the Cloudflare DNS page.
2. Select **CNAME** from the **Type** dropdown.
3. Copy the **Hostname** from Lettr and paste it into the **Name** field in Cloudflare.
4. Copy the **Value** from Lettr and paste it into the **Target** field in Cloudflare.
5. Set **Proxy status** to **DNS only** (grey cloud).
6. Leave **TTL** set to Auto.
7. Click **Save**.
Omit your domain suffix from the Hostname when pasting into Cloudflare. For example, instead of `track.lettr-demo.com`, paste only `track`.
### Verify Your Inbound Domain
After adding all three MX records, go back to Lettr and click **Verify DNS Records**. DNS propagation can take up to 24–48 hours, though it typically completes within a few minutes.
***
## Manual Tracking Domain Setup
A tracking domain allows Lettr to track email opens and link clicks using your own custom domain instead of the default Lettr tracking domain. This requires two CNAME records: one for the SSL certificate and one for routing tracking traffic to Lettr's infrastructure.
### Add Tracking Domain to Lettr
To create a Tracking domain in Lettr:
1. Select **Domains** in the navigation panel
2. Select **Tracking Domains**
3. Click **Create Tracking Domain**
4. Enter your desired tracking subdomain (e.g. `tracking.company.com`)
5. Click **Create Domain**
Click on your new domain in the Tracking Domains list.
This will display the CNAME records that need to be configured.
### Add SSL Certificate CNAME Record
The SSL Certificate CNAME record provisions an SSL certificate for your custom tracking domain, enabling secure HTTPS connections for tracked links.
Add the record in Cloudflare:
1. Click **Add record** on the Cloudflare DNS page.
2. Select **CNAME** from the **Type** dropdown.
3. Copy the **Hostname** from Lettr and paste it into the **Name** field in Cloudflare.
4. Copy the **Value** from Lettr and paste it into the **Target** field in Cloudflare.
5. Set **Proxy status** to **DNS only** (grey cloud).
6. Leave **TTL** set to Auto.
7. Click **Save**.
Omit your domain suffix from the Hostname when pasting into Cloudflare. For example, instead of `track.lettr-demo.com`, paste only `track`.
 ### Add Traffic CNAME Record
The Traffic CNAME record routes click and open tracking requests from your custom domain to Lettr's tracking servers.
Add the record in Cloudflare:
1. Click **Add record** on the Cloudflare DNS page.
2. Select **CNAME** from the **Type** dropdown.
3. Copy the **Hostname** from Lettr and paste it into the **Name** field in Cloudflare.
4. Copy the **Value** from Lettr and paste it into the **Target** field in Cloudflare.
5. Set **Proxy status** to **DNS only** (grey cloud).
6. Leave **TTL** set to Auto.
7. Click **Save**.
Omit your domain suffix from the Hostname when pasting into Cloudflare. For example, instead of `track.lettr-demo.com`, paste only `track`.
### Add Traffic CNAME Record
The Traffic CNAME record routes click and open tracking requests from your custom domain to Lettr's tracking servers.
Add the record in Cloudflare:
1. Click **Add record** on the Cloudflare DNS page.
2. Select **CNAME** from the **Type** dropdown.
3. Copy the **Hostname** from Lettr and paste it into the **Name** field in Cloudflare.
4. Copy the **Value** from Lettr and paste it into the **Target** field in Cloudflare.
5. Set **Proxy status** to **DNS only** (grey cloud).
6. Leave **TTL** set to Auto.
7. Click **Save**.
Omit your domain suffix from the Hostname when pasting into Cloudflare. For example, instead of `track.lettr-demo.com`, paste only `track`.
 ### Verify Your Tracking Domain
After adding both CNAME records, go back to Lettr and click **Verify DNS Records**.
***
## Manual Storage Domain Setup
A storage domain lets you serve email assets (images, attachments) from your own custom domain instead of the default Lettr storage URL. This requires two TXT records for certificate validation and ownership verification, and a CNAME record for routing asset requests to Lettr's storage infrastructure.
### Add Storage Domain to Lettr
To create a Storage domain in Lettr:
1. Select **Domains** in the navigation panel
2. Select **Storage Domains**
3. Click **Create Storage Domain**
4. Enter your desired storage subdomain (e.g. `assets.company.com`)
5. Click **Create Domain**
Click on your new domain in the Storage Domains list.
This will display the TXT and CNAME records that need to be configured.
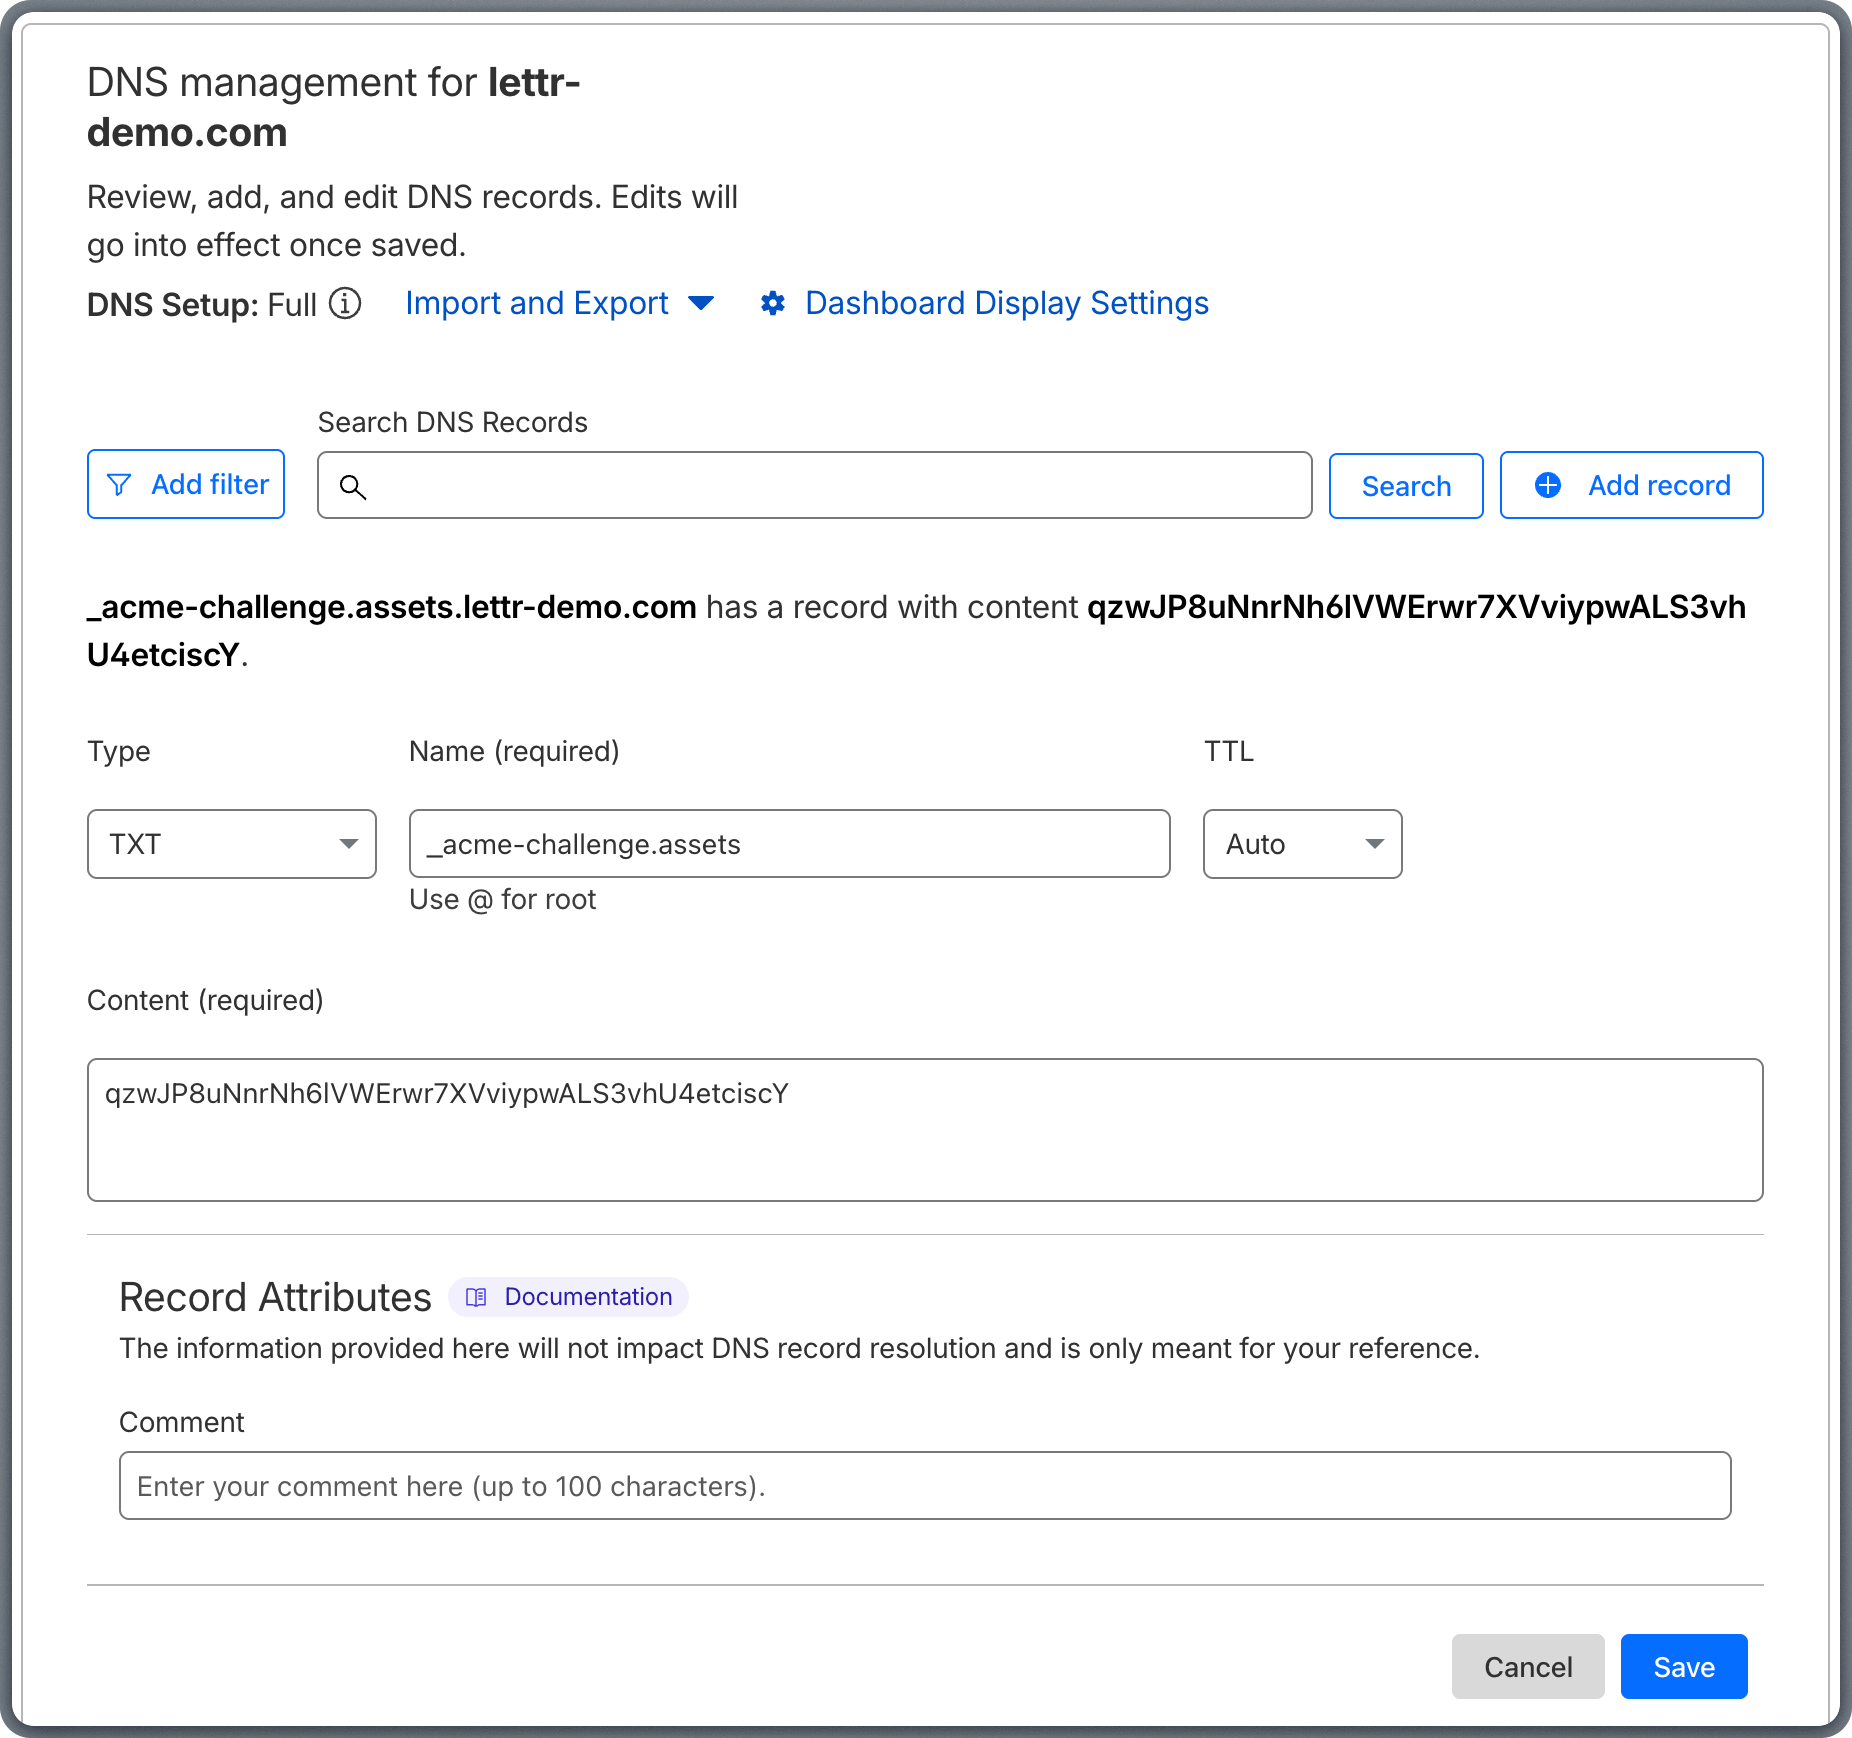
### Add TXT Record (Certificate Validation)
The Certificate Validation TXT record provisions an SSL certificate for your custom storage domain, enabling secure HTTPS delivery of email assets.
Add the record in Cloudflare:
1. Click **Add record** on the Cloudflare DNS page.
2. Select **TXT** from the **Type** dropdown.
3. Copy the **Hostname** from Lettr and paste it into the **Name** field in Cloudflare.
4. Copy the **Value** from Lettr and paste it into the **Content** field in Cloudflare.
5. Leave **TTL** set to Auto.
6. Click **Save**.
Omit your domain suffix from the Hostname when pasting into Cloudflare, just as with the CNAME record above.
### Verify Your Tracking Domain
After adding both CNAME records, go back to Lettr and click **Verify DNS Records**.
***
## Manual Storage Domain Setup
A storage domain lets you serve email assets (images, attachments) from your own custom domain instead of the default Lettr storage URL. This requires two TXT records for certificate validation and ownership verification, and a CNAME record for routing asset requests to Lettr's storage infrastructure.
### Add Storage Domain to Lettr
To create a Storage domain in Lettr:
1. Select **Domains** in the navigation panel
2. Select **Storage Domains**
3. Click **Create Storage Domain**
4. Enter your desired storage subdomain (e.g. `assets.company.com`)
5. Click **Create Domain**
Click on your new domain in the Storage Domains list.
This will display the TXT and CNAME records that need to be configured.
### Add TXT Record (Certificate Validation)
The Certificate Validation TXT record provisions an SSL certificate for your custom storage domain, enabling secure HTTPS delivery of email assets.
Add the record in Cloudflare:
1. Click **Add record** on the Cloudflare DNS page.
2. Select **TXT** from the **Type** dropdown.
3. Copy the **Hostname** from Lettr and paste it into the **Name** field in Cloudflare.
4. Copy the **Value** from Lettr and paste it into the **Content** field in Cloudflare.
5. Leave **TTL** set to Auto.
6. Click **Save**.
Omit your domain suffix from the Hostname when pasting into Cloudflare, just as with the CNAME record above.
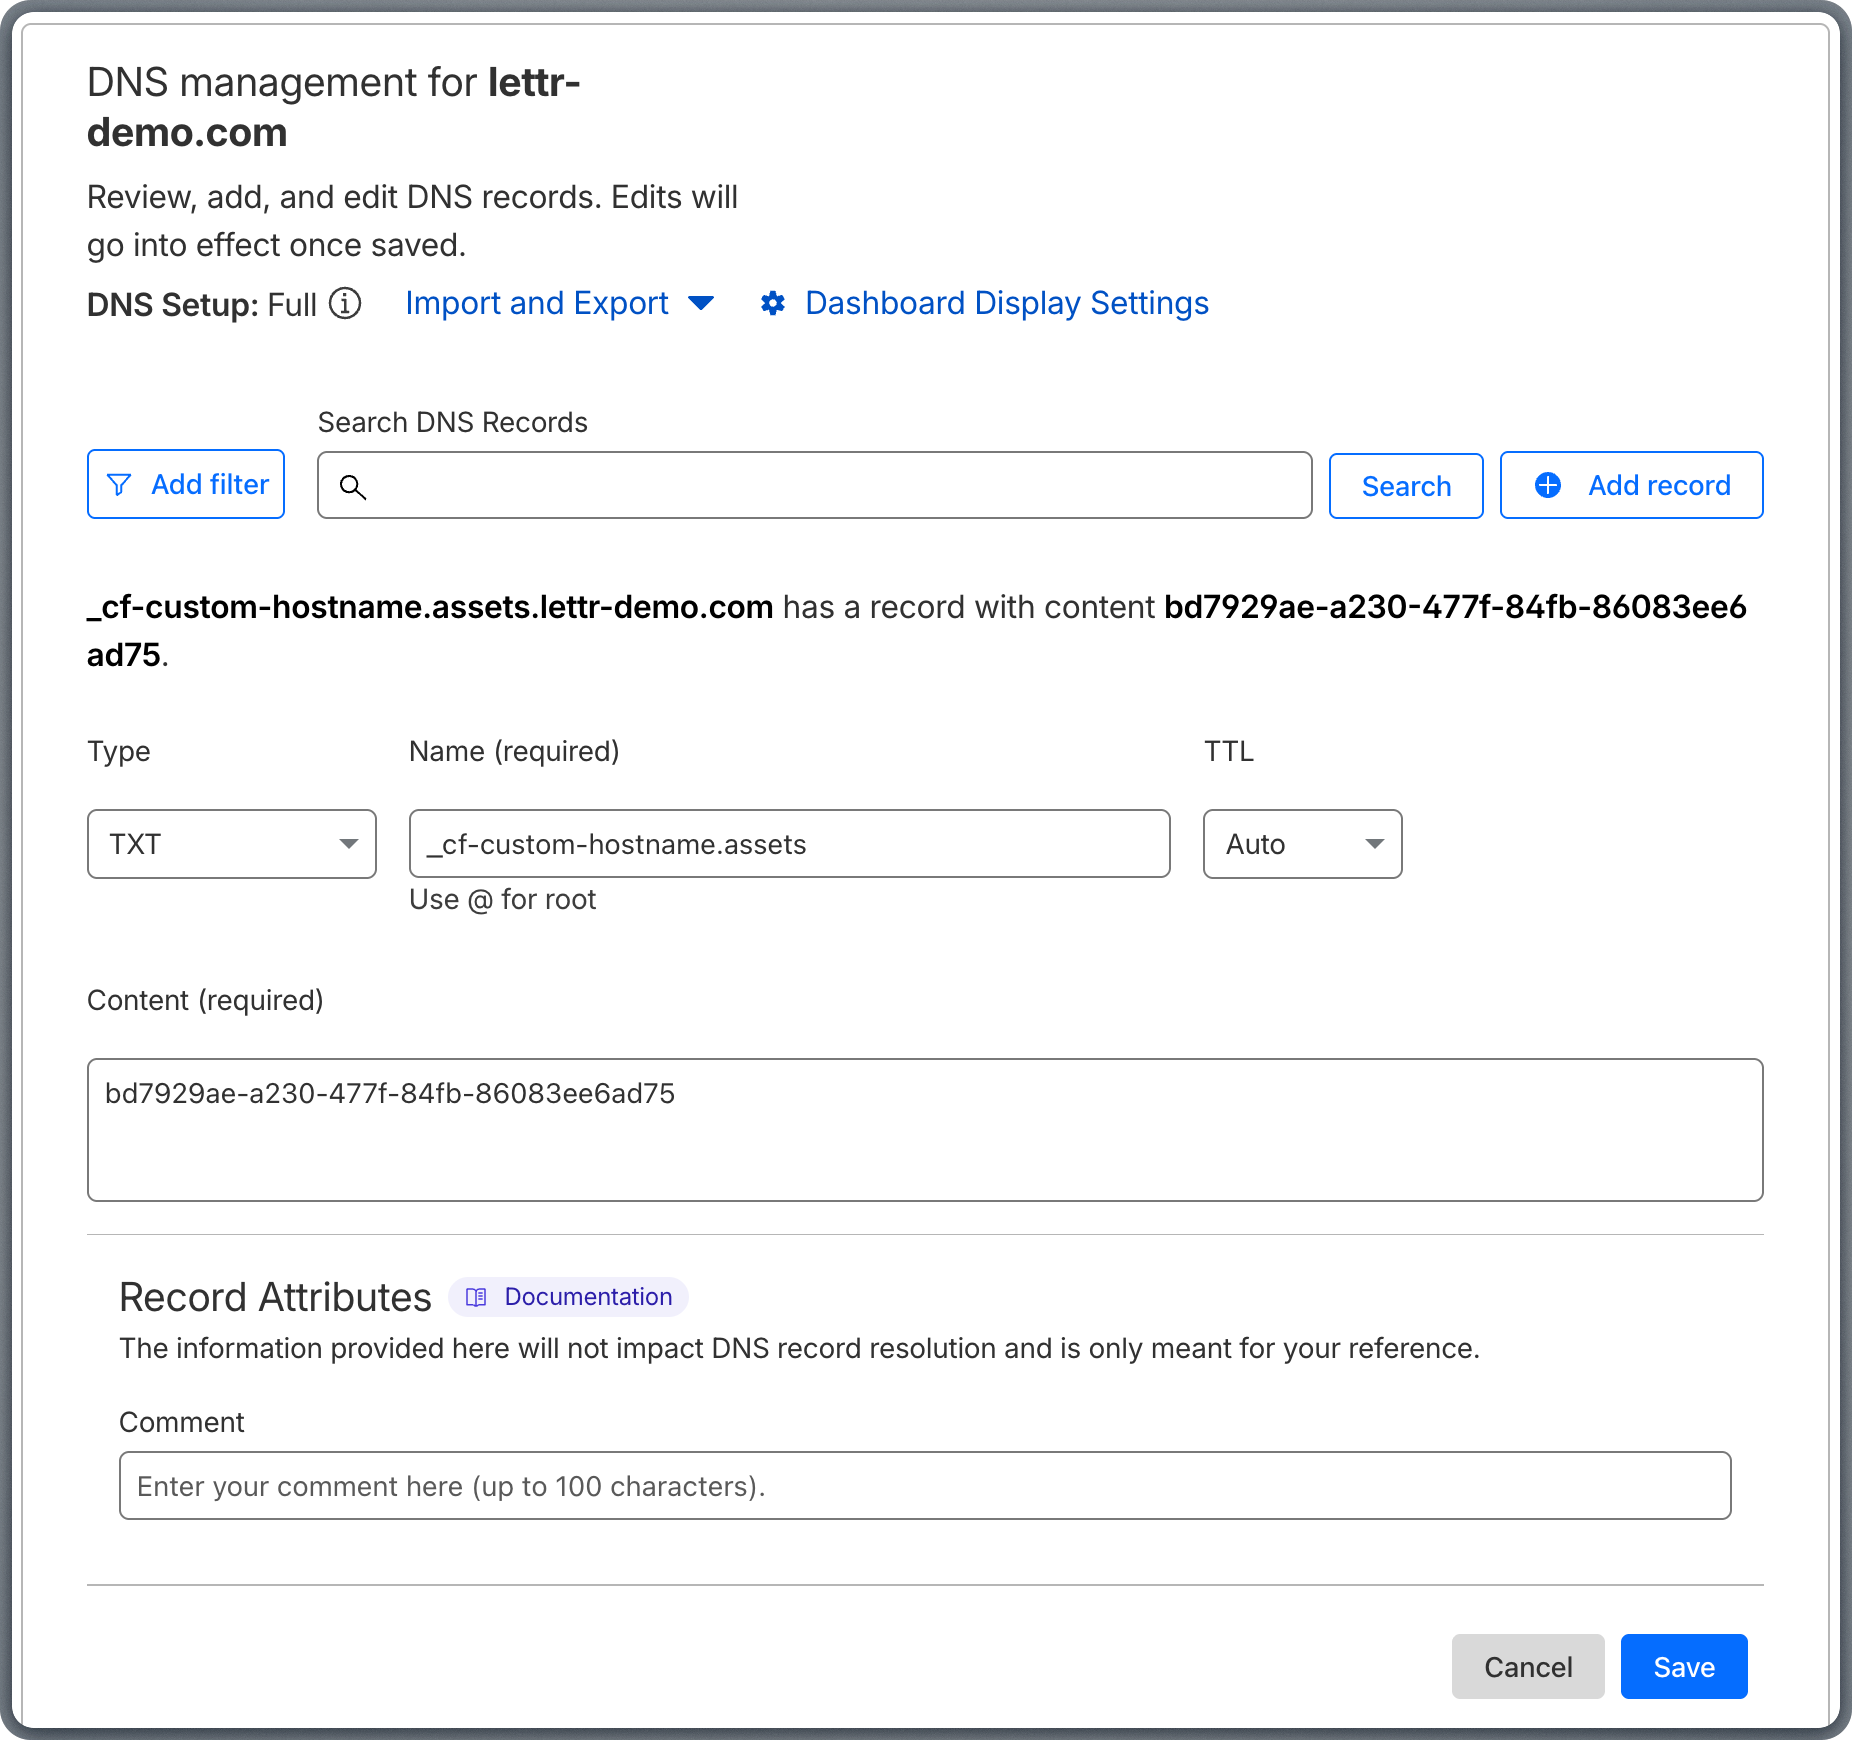
 ### Add TXT Record (Hostname Pre-validation)
The Hostname Pre-validation TXT record verifies ownership of the storage domain before Lettr provisions a custom hostname for it.
Add the record in Cloudflare:
1. Click **Add record** on the Cloudflare DNS page.
2. Select **TXT** from the **Type** dropdown.
3. Copy the **Hostname** from Lettr and paste it into the **Name** field in Cloudflare.
4. Copy the **Value** from Lettr and paste it into the **Content** field in Cloudflare.
5. Leave **TTL** set to Auto.
6. Click **Save**.
Omit your domain suffix from the Hostname when pasting into Cloudflare, just as with the CNAME record above.
### Add TXT Record (Hostname Pre-validation)
The Hostname Pre-validation TXT record verifies ownership of the storage domain before Lettr provisions a custom hostname for it.
Add the record in Cloudflare:
1. Click **Add record** on the Cloudflare DNS page.
2. Select **TXT** from the **Type** dropdown.
3. Copy the **Hostname** from Lettr and paste it into the **Name** field in Cloudflare.
4. Copy the **Value** from Lettr and paste it into the **Content** field in Cloudflare.
5. Leave **TTL** set to Auto.
6. Click **Save**.
Omit your domain suffix from the Hostname when pasting into Cloudflare, just as with the CNAME record above.
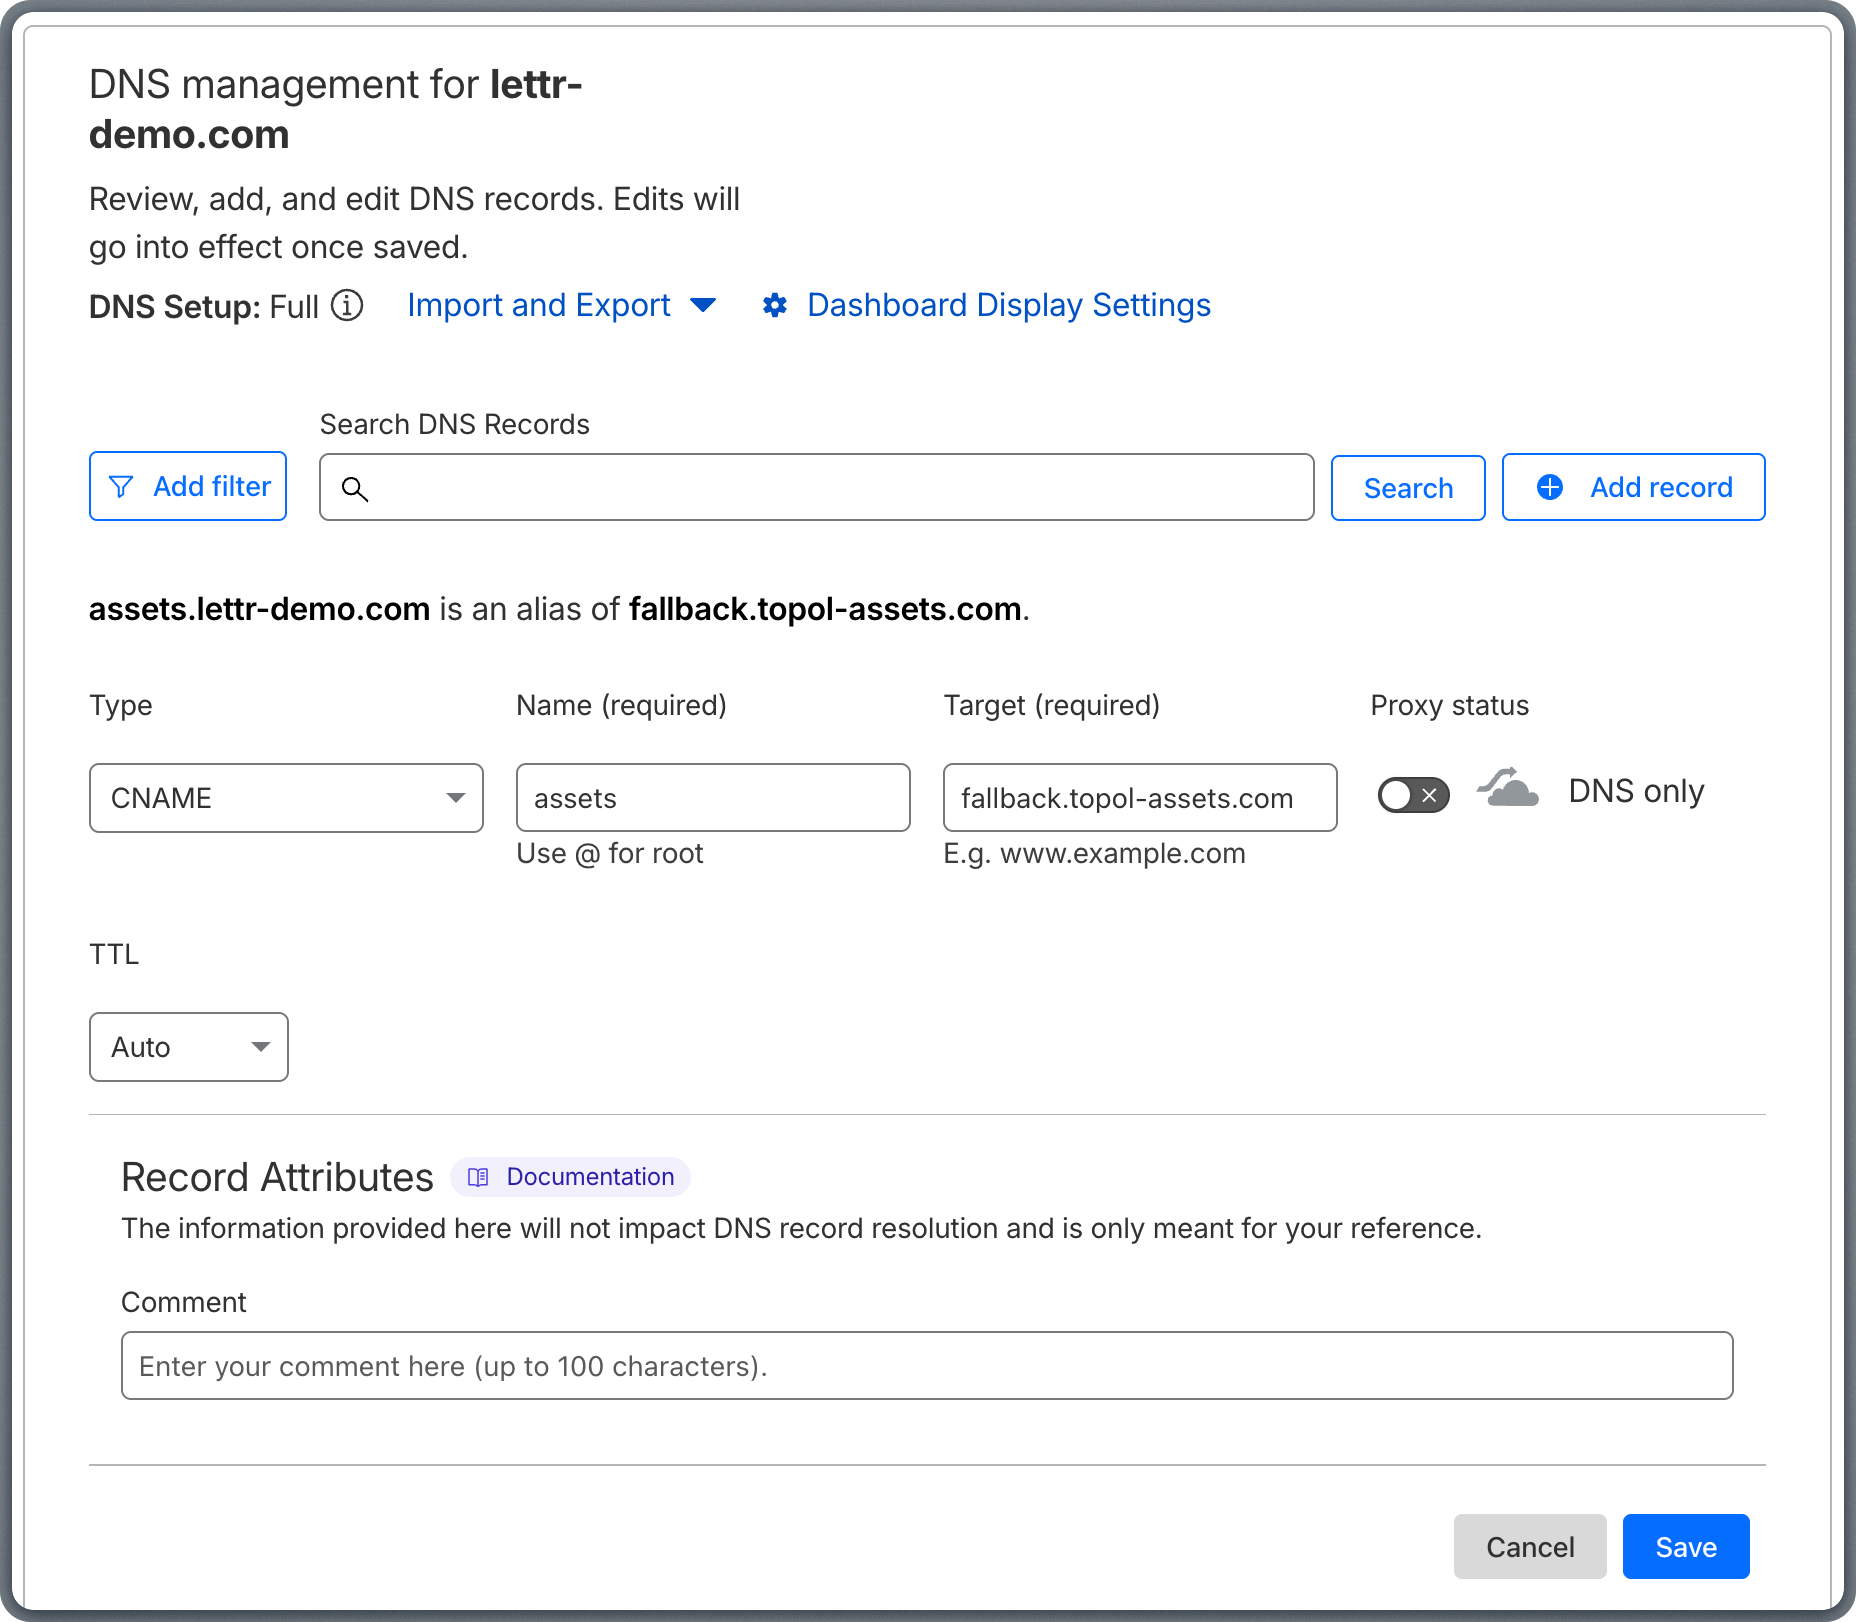
 ### Add CNAME Record (Domain Routing)
The Domain Routing CNAME record routes asset requests from your custom domain to Lettr's storage infrastructure.
Add the record in Cloudflare:
1. Click **Add record** on the Cloudflare DNS page.
2. Select **CNAME** from the **Type** dropdown.
3. Copy the **Hostname** from Lettr and paste it into the **Name** field in Cloudflare.
4. Copy the **Value** from Lettr and paste it into the **Target** field in Cloudflare.
5. Set **Proxy status** to **DNS only** (grey cloud).
6. Leave **TTL** set to Auto.
7. Click **Save**.
Omit your domain suffix from the Hostname when pasting into Cloudflare. For example, instead of `assets.lettr-demo.com`, paste only `assets`.
### Add CNAME Record (Domain Routing)
The Domain Routing CNAME record routes asset requests from your custom domain to Lettr's storage infrastructure.
Add the record in Cloudflare:
1. Click **Add record** on the Cloudflare DNS page.
2. Select **CNAME** from the **Type** dropdown.
3. Copy the **Hostname** from Lettr and paste it into the **Name** field in Cloudflare.
4. Copy the **Value** from Lettr and paste it into the **Target** field in Cloudflare.
5. Set **Proxy status** to **DNS only** (grey cloud).
6. Leave **TTL** set to Auto.
7. Click **Save**.
Omit your domain suffix from the Hostname when pasting into Cloudflare. For example, instead of `assets.lettr-demo.com`, paste only `assets`.
 ### Verify Your Storage Domain
After adding all three records, go back to Lettr and click **Verify DNS Records**.
***
## Troubleshooting
This is the most common issue when using Cloudflare with Lettr. Cloudflare's proxy mode (orange cloud icon) intercepts and rewrites DNS responses, which causes CNAME verification to fail because Lettr cannot see the original CNAME target.
**How to fix:**
1. Go to your domain in the [Cloudflare dashboard](https://dash.cloudflare.com).
2. Open the **DNS** tab.
3. Find each CNAME record you added for Lettr.
4. Click the orange cloud icon next to the record to toggle it to **DNS only** (grey cloud).
5. Wait a few minutes for the change to propagate, then re-verify in Lettr.
All CNAME records for Lettr (sending verification, tracking SSL, tracking traffic, and storage domain routing) must be set to **DNS only** (grey cloud). TXT and MX records are not affected by proxy mode.
Cloudflare automatically appends your domain to the record name. If you paste the full hostname (e.g. `mailing.lettr-demo.com`), the resulting record will be `mailing.lettr-demo.com.lettr-demo.com`, which will fail verification.
Always paste only the subdomain portion (e.g. `mailing`, `scph0126._domainkey.mailing`, `_dmarc.mailing`).
If verification fails after adding records, check the following:
* **Wait at least 30 minutes** before your first verification attempt. Most records propagate within 1–2 hours.
* **Confirm proxy mode is off** for all CNAME records (see above).
* **Confirm the records exist** using command-line tools:
```bash theme={null}
# Check CNAME record
dig CNAME mailing.yourdomain.com +short
# Check DKIM record
dig TXT scph0126._domainkey.mailing.yourdomain.com +short
# Check DMARC record
dig TXT _dmarc.mailing.yourdomain.com +short
# Check MX records (inbound)
dig MX inbound.yourdomain.com +short
# Check tracking domain CNAME
dig CNAME track.yourdomain.com +short
# Check storage domain CNAME
dig CNAME assets.yourdomain.com +short
```
* **Use a web tool** like [dnschecker.org](https://dnschecker.org) to verify propagation across multiple DNS servers worldwide.
If a `dig CNAME` query returns an IP address instead of a hostname, the record is still proxied (orange cloud). Toggle it to DNS only and check again.
A common mistake is selecting the wrong type in Cloudflare's dropdown:
| Record | Correct Type |
| ------------------------------- | ------------ |
| Sending verification | CNAME |
| DKIM | TXT |
| DMARC | TXT |
| Inbound mail | MX |
| Tracking SSL certificate | CNAME |
| Tracking traffic | CNAME |
| Storage certificate validation | TXT |
| Storage hostname pre-validation | TXT |
| Storage domain routing | CNAME |
The DKIM TXT value is a long string. Cloudflare handles long TXT values well, but copying errors can occasionally cut off the string. After saving the record, click **Edit** on the record to confirm the full value was stored. If it appears truncated, try pasting the value again.
If your records are saved in Cloudflare but not resolving, confirm that your domain registrar is pointing to Cloudflare's nameservers. You can check this with:
```bash theme={null}
dig NS yourdomain.com +short
```
The output should include the two Cloudflare nameservers assigned to your domain (e.g. `anna.ns.cloudflare.com`, `bob.ns.cloudflare.com`). These are displayed on the domain overview page in the Cloudflare dashboard. If the output shows a different provider's nameservers, update them at your domain registrar.
If you are adding a CNAME record at the root of your domain (e.g. `company.com` instead of `mailing.company.com`), Cloudflare will automatically apply CNAME flattening. This resolves the CNAME to an A record, which can cause verification to fail. Use a subdomain for your sending domain to avoid this issue.
If your DNS records are correctly configured (confirmed with `dig` or dnschecker.org), proxy mode is disabled for all CNAME records, and verification still fails after 48 hours, contact Lettr support at **[support@lettr.com](mailto:support@lettr.com)** or through the in-app chat. Include your domain name and the output of the `dig` commands above.
***
## Related Topics
Learn about sending domain setup, SPF, DKIM, and DMARC.
Configure MX records to receive emails with Lettr.
Set up a custom tracking domain for click and open tracking.
Serve email assets from your own custom domain.
How automatic DNS setup works under the hood.
Understand domain types and how they work in Lettr.
Troubleshoot common DNS configuration and propagation issues.
### Verify Your Storage Domain
After adding all three records, go back to Lettr and click **Verify DNS Records**.
***
## Troubleshooting
This is the most common issue when using Cloudflare with Lettr. Cloudflare's proxy mode (orange cloud icon) intercepts and rewrites DNS responses, which causes CNAME verification to fail because Lettr cannot see the original CNAME target.
**How to fix:**
1. Go to your domain in the [Cloudflare dashboard](https://dash.cloudflare.com).
2. Open the **DNS** tab.
3. Find each CNAME record you added for Lettr.
4. Click the orange cloud icon next to the record to toggle it to **DNS only** (grey cloud).
5. Wait a few minutes for the change to propagate, then re-verify in Lettr.
All CNAME records for Lettr (sending verification, tracking SSL, tracking traffic, and storage domain routing) must be set to **DNS only** (grey cloud). TXT and MX records are not affected by proxy mode.
Cloudflare automatically appends your domain to the record name. If you paste the full hostname (e.g. `mailing.lettr-demo.com`), the resulting record will be `mailing.lettr-demo.com.lettr-demo.com`, which will fail verification.
Always paste only the subdomain portion (e.g. `mailing`, `scph0126._domainkey.mailing`, `_dmarc.mailing`).
If verification fails after adding records, check the following:
* **Wait at least 30 minutes** before your first verification attempt. Most records propagate within 1–2 hours.
* **Confirm proxy mode is off** for all CNAME records (see above).
* **Confirm the records exist** using command-line tools:
```bash theme={null}
# Check CNAME record
dig CNAME mailing.yourdomain.com +short
# Check DKIM record
dig TXT scph0126._domainkey.mailing.yourdomain.com +short
# Check DMARC record
dig TXT _dmarc.mailing.yourdomain.com +short
# Check MX records (inbound)
dig MX inbound.yourdomain.com +short
# Check tracking domain CNAME
dig CNAME track.yourdomain.com +short
# Check storage domain CNAME
dig CNAME assets.yourdomain.com +short
```
* **Use a web tool** like [dnschecker.org](https://dnschecker.org) to verify propagation across multiple DNS servers worldwide.
If a `dig CNAME` query returns an IP address instead of a hostname, the record is still proxied (orange cloud). Toggle it to DNS only and check again.
A common mistake is selecting the wrong type in Cloudflare's dropdown:
| Record | Correct Type |
| ------------------------------- | ------------ |
| Sending verification | CNAME |
| DKIM | TXT |
| DMARC | TXT |
| Inbound mail | MX |
| Tracking SSL certificate | CNAME |
| Tracking traffic | CNAME |
| Storage certificate validation | TXT |
| Storage hostname pre-validation | TXT |
| Storage domain routing | CNAME |
The DKIM TXT value is a long string. Cloudflare handles long TXT values well, but copying errors can occasionally cut off the string. After saving the record, click **Edit** on the record to confirm the full value was stored. If it appears truncated, try pasting the value again.
If your records are saved in Cloudflare but not resolving, confirm that your domain registrar is pointing to Cloudflare's nameservers. You can check this with:
```bash theme={null}
dig NS yourdomain.com +short
```
The output should include the two Cloudflare nameservers assigned to your domain (e.g. `anna.ns.cloudflare.com`, `bob.ns.cloudflare.com`). These are displayed on the domain overview page in the Cloudflare dashboard. If the output shows a different provider's nameservers, update them at your domain registrar.
If you are adding a CNAME record at the root of your domain (e.g. `company.com` instead of `mailing.company.com`), Cloudflare will automatically apply CNAME flattening. This resolves the CNAME to an A record, which can cause verification to fail. Use a subdomain for your sending domain to avoid this issue.
If your DNS records are correctly configured (confirmed with `dig` or dnschecker.org), proxy mode is disabled for all CNAME records, and verification still fails after 48 hours, contact Lettr support at **[support@lettr.com](mailto:support@lettr.com)** or through the in-app chat. Include your domain name and the output of the `dig` commands above.
***
## Related Topics
Learn about sending domain setup, SPF, DKIM, and DMARC.
Configure MX records to receive emails with Lettr.
Set up a custom tracking domain for click and open tracking.
Serve email assets from your own custom domain.
How automatic DNS setup works under the hood.
Understand domain types and how they work in Lettr.
Troubleshoot common DNS configuration and propagation issues.