> ## Documentation Index
> Fetch the complete documentation index at: https://docs.lettr.com/llms.txt
> Use this file to discover all available pages before exploring further.
# GoDaddy
> Add the DNS records Lettr needs in your GoDaddy account to verify your sending, inbound, tracking, and storage domains with DKIM and DMARC.
This guide walks you through adding the required DNS records for Lettr using GoDaddy's DNS management. GoDaddy is a domain registrar and web hosting provider that offers DNS management through its account dashboard at [dcc.godaddy.com](https://dcc.godaddy.com).
You will configure a **sending domain** (CNAME, DKIM TXT, and DMARC TXT records) and, optionally, an **inbound domain** (MX records), **tracking domain** (two CNAME records), and **storage domain** (CNAME and two TXT records).
***
## Sending Domain Setup
A sending domain authenticates your outgoing emails with DKIM and DMARC, ensuring they are delivered reliably and not marked as spam. This requires a CNAME record for domain verification, a TXT record for DKIM signing, and a TXT record for DMARC policy.
To create a sending domain in Lettr:
1. Select **Domains** in the navigation panel
2. Select **Sending Domains**
3. Click **Create Sending Domain**
4. Enter your desired sending subdomain (e.g. `mailing.company.com`)
5. Click **Create Domain**
Use a subdomain (e.g. `mailing.company.com`) instead of the root domain (`company.com`). A subdomain provides proper
reputation segmentation and is required if you also plan to receive emails with Lettr.
Click your new domain in the Sending Domains list.
This will display a list of DNS records that need to be configured. Keep this page open — you will need these values soon.
### Configure GoDaddy DNS
Log in to your [GoDaddy account](https://dcc.godaddy.com), make sure the **DNS** in the left-hand menu is selected, and select the domain for which you want to manage DNS records from the dropdown. Scroll down for DNS management.
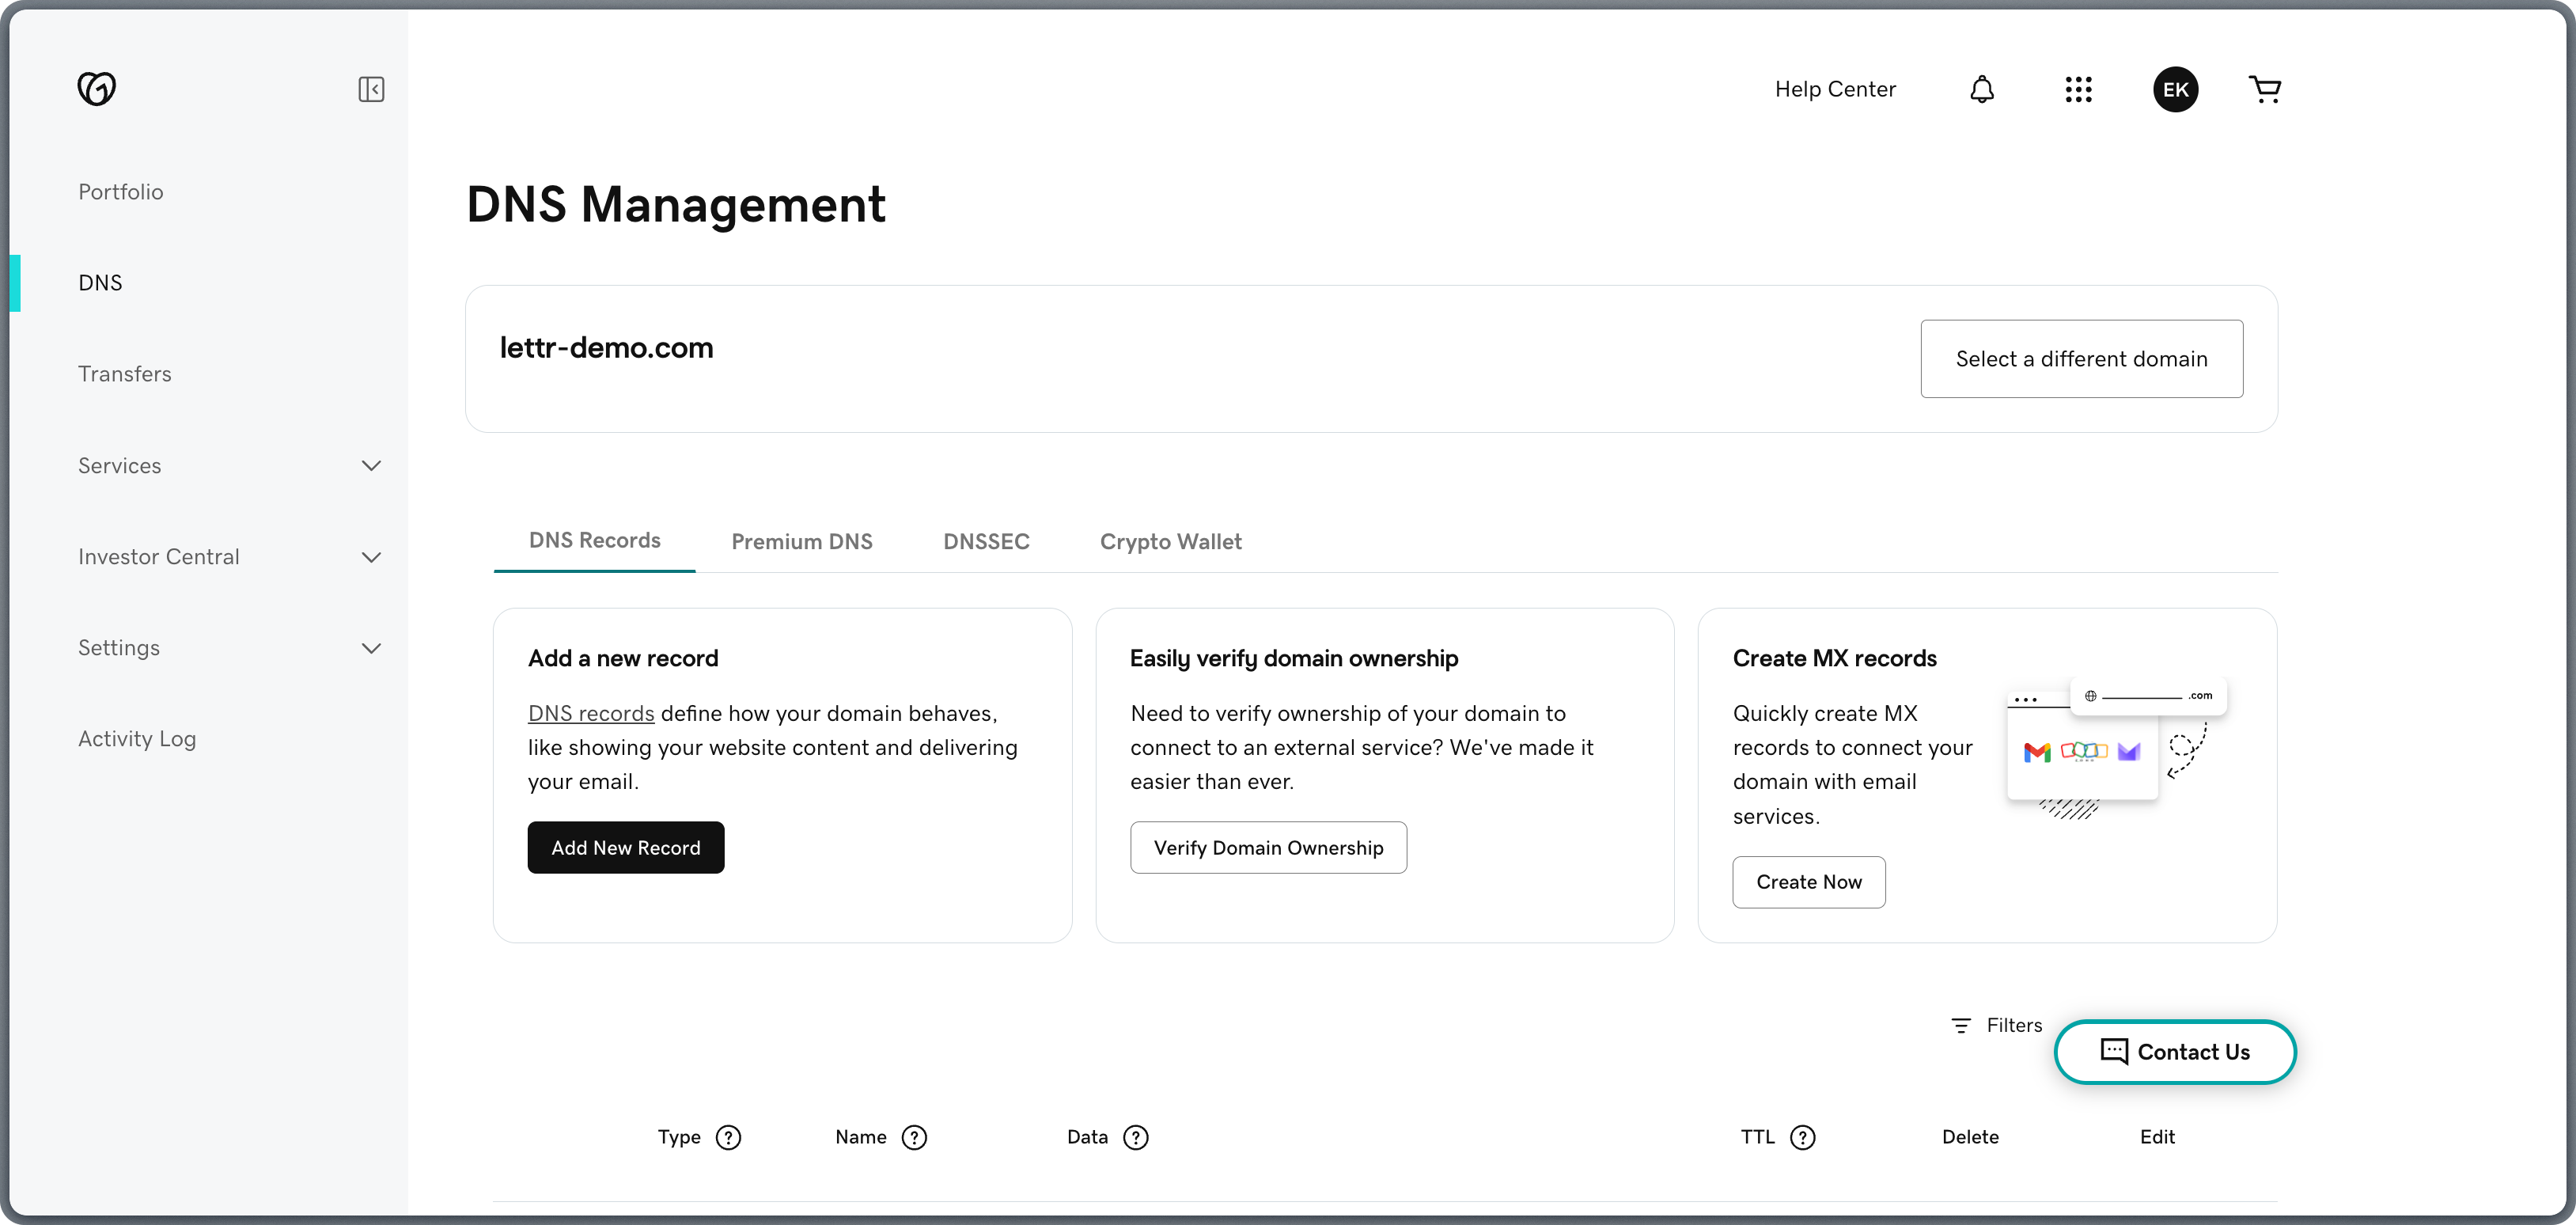 If your domain was purchased through GoDaddy or your nameservers already point to GoDaddy, skip nameserver
configuration entirely. Your domain is already using GoDaddy's nameservers by default — proceed directly to adding the
DNS records below.
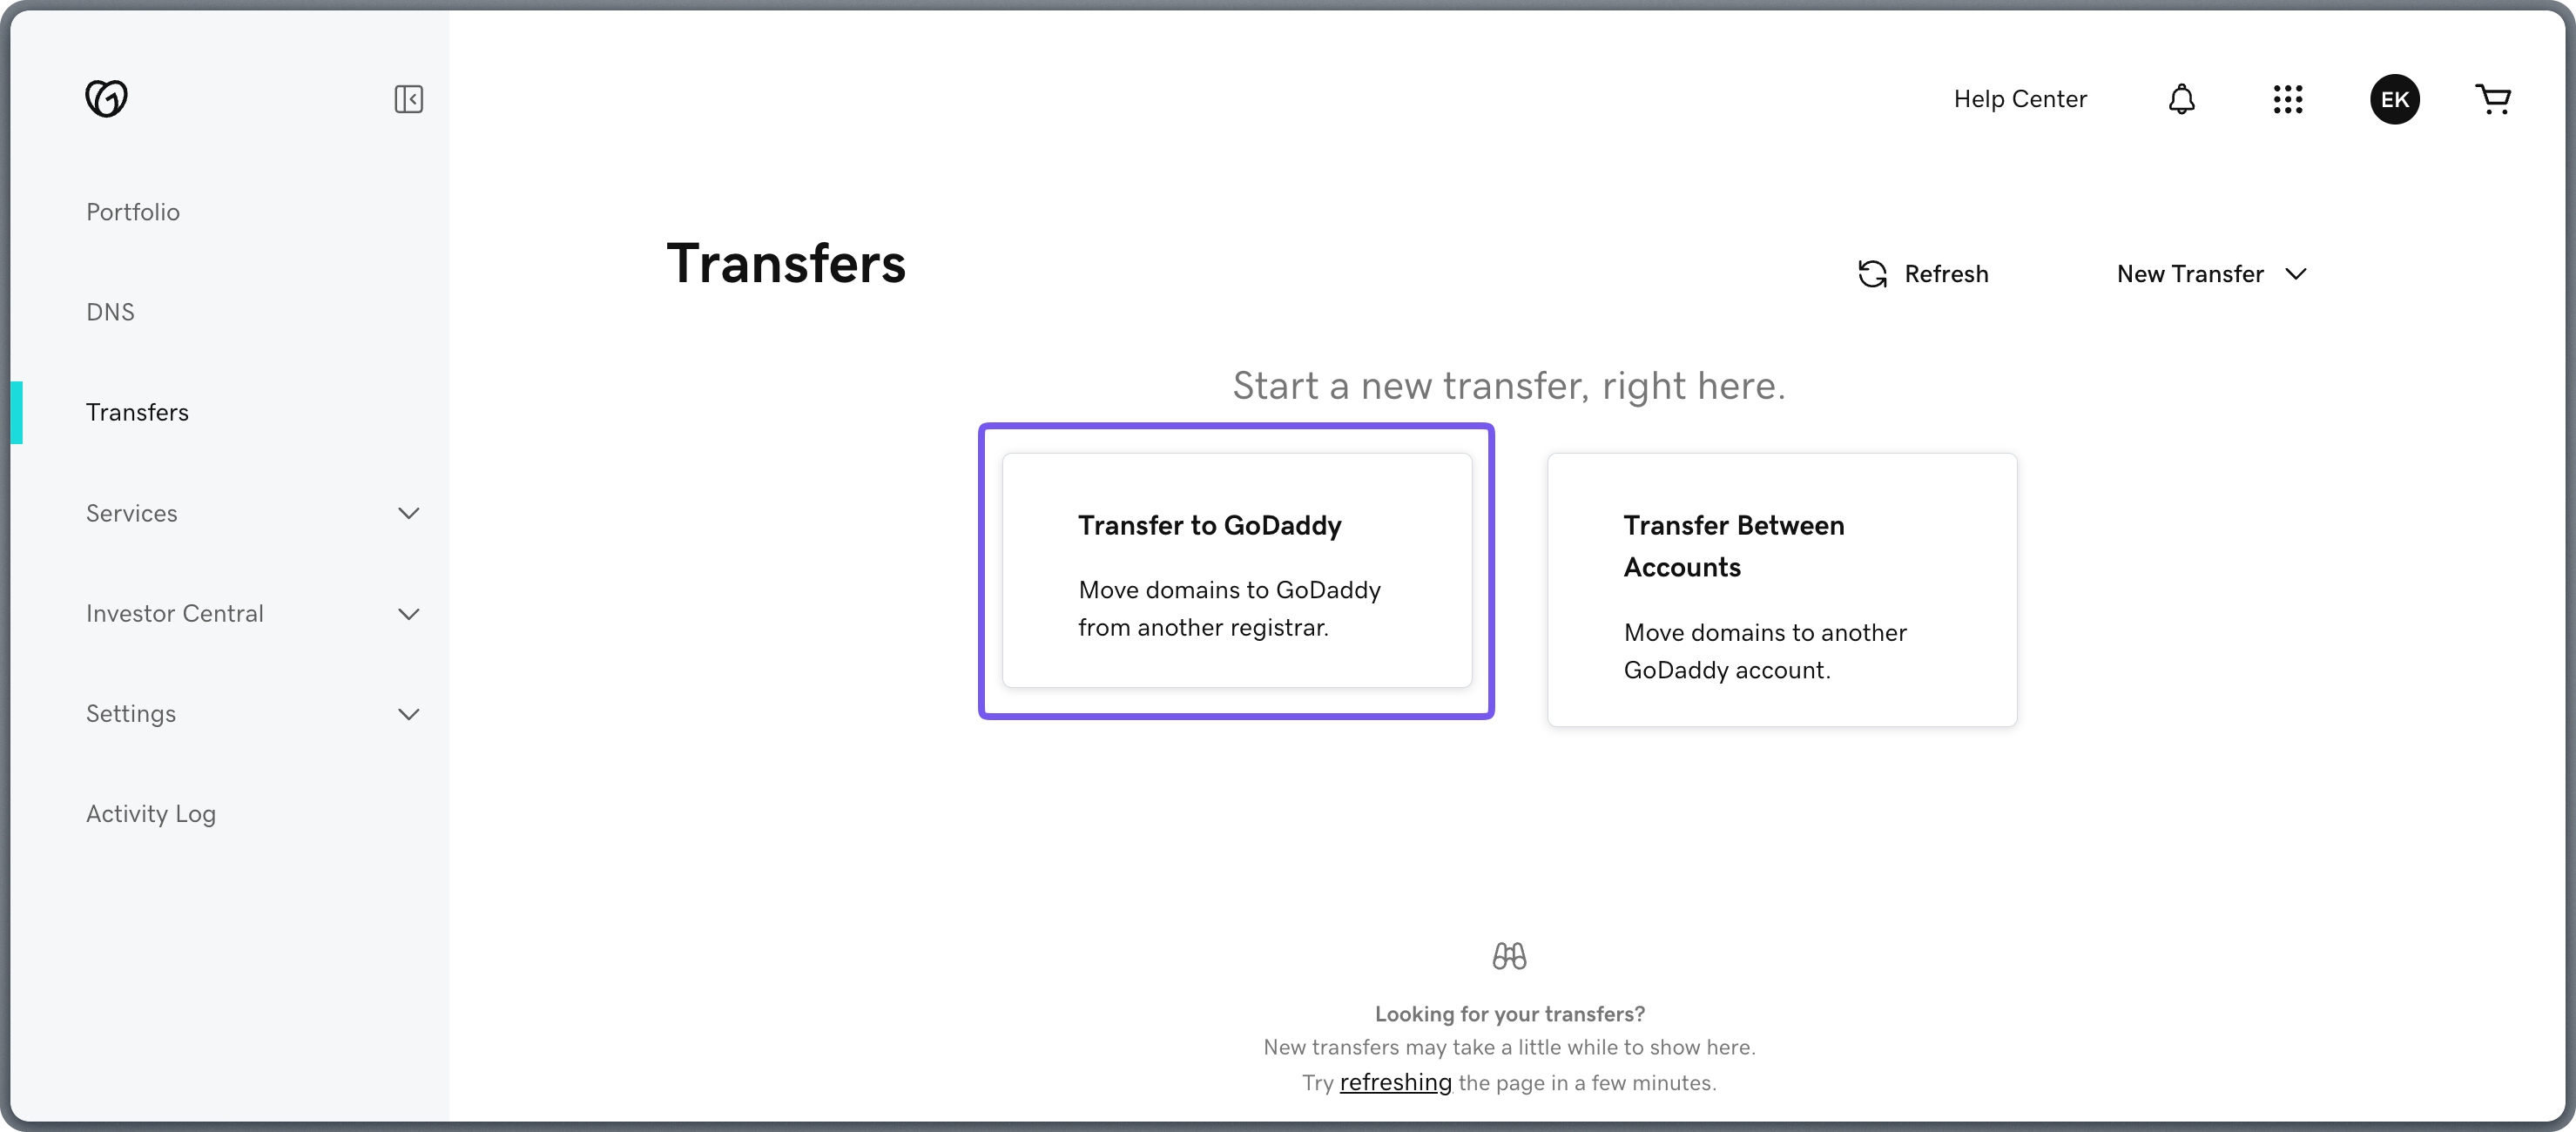
If you registered your domain elsewhere but want to manage DNS on GoDaddy, you must first transfer the domain to GoDaddy. Select **Transfer** in the left-hand menu and follow the instructions.
If your domain was purchased through GoDaddy or your nameservers already point to GoDaddy, skip nameserver
configuration entirely. Your domain is already using GoDaddy's nameservers by default — proceed directly to adding the
DNS records below.
If you registered your domain elsewhere but want to manage DNS on GoDaddy, you must first transfer the domain to GoDaddy. Select **Transfer** in the left-hand menu and follow the instructions.
 Then, select DNS in the left-hand menu, select your domain, and **update the nameservers**
at your registrar to GoDaddy's nameservers shown in the domain configuration.
Then, select DNS in the left-hand menu, select your domain, and **update the nameservers**
at your registrar to GoDaddy's nameservers shown in the domain configuration.
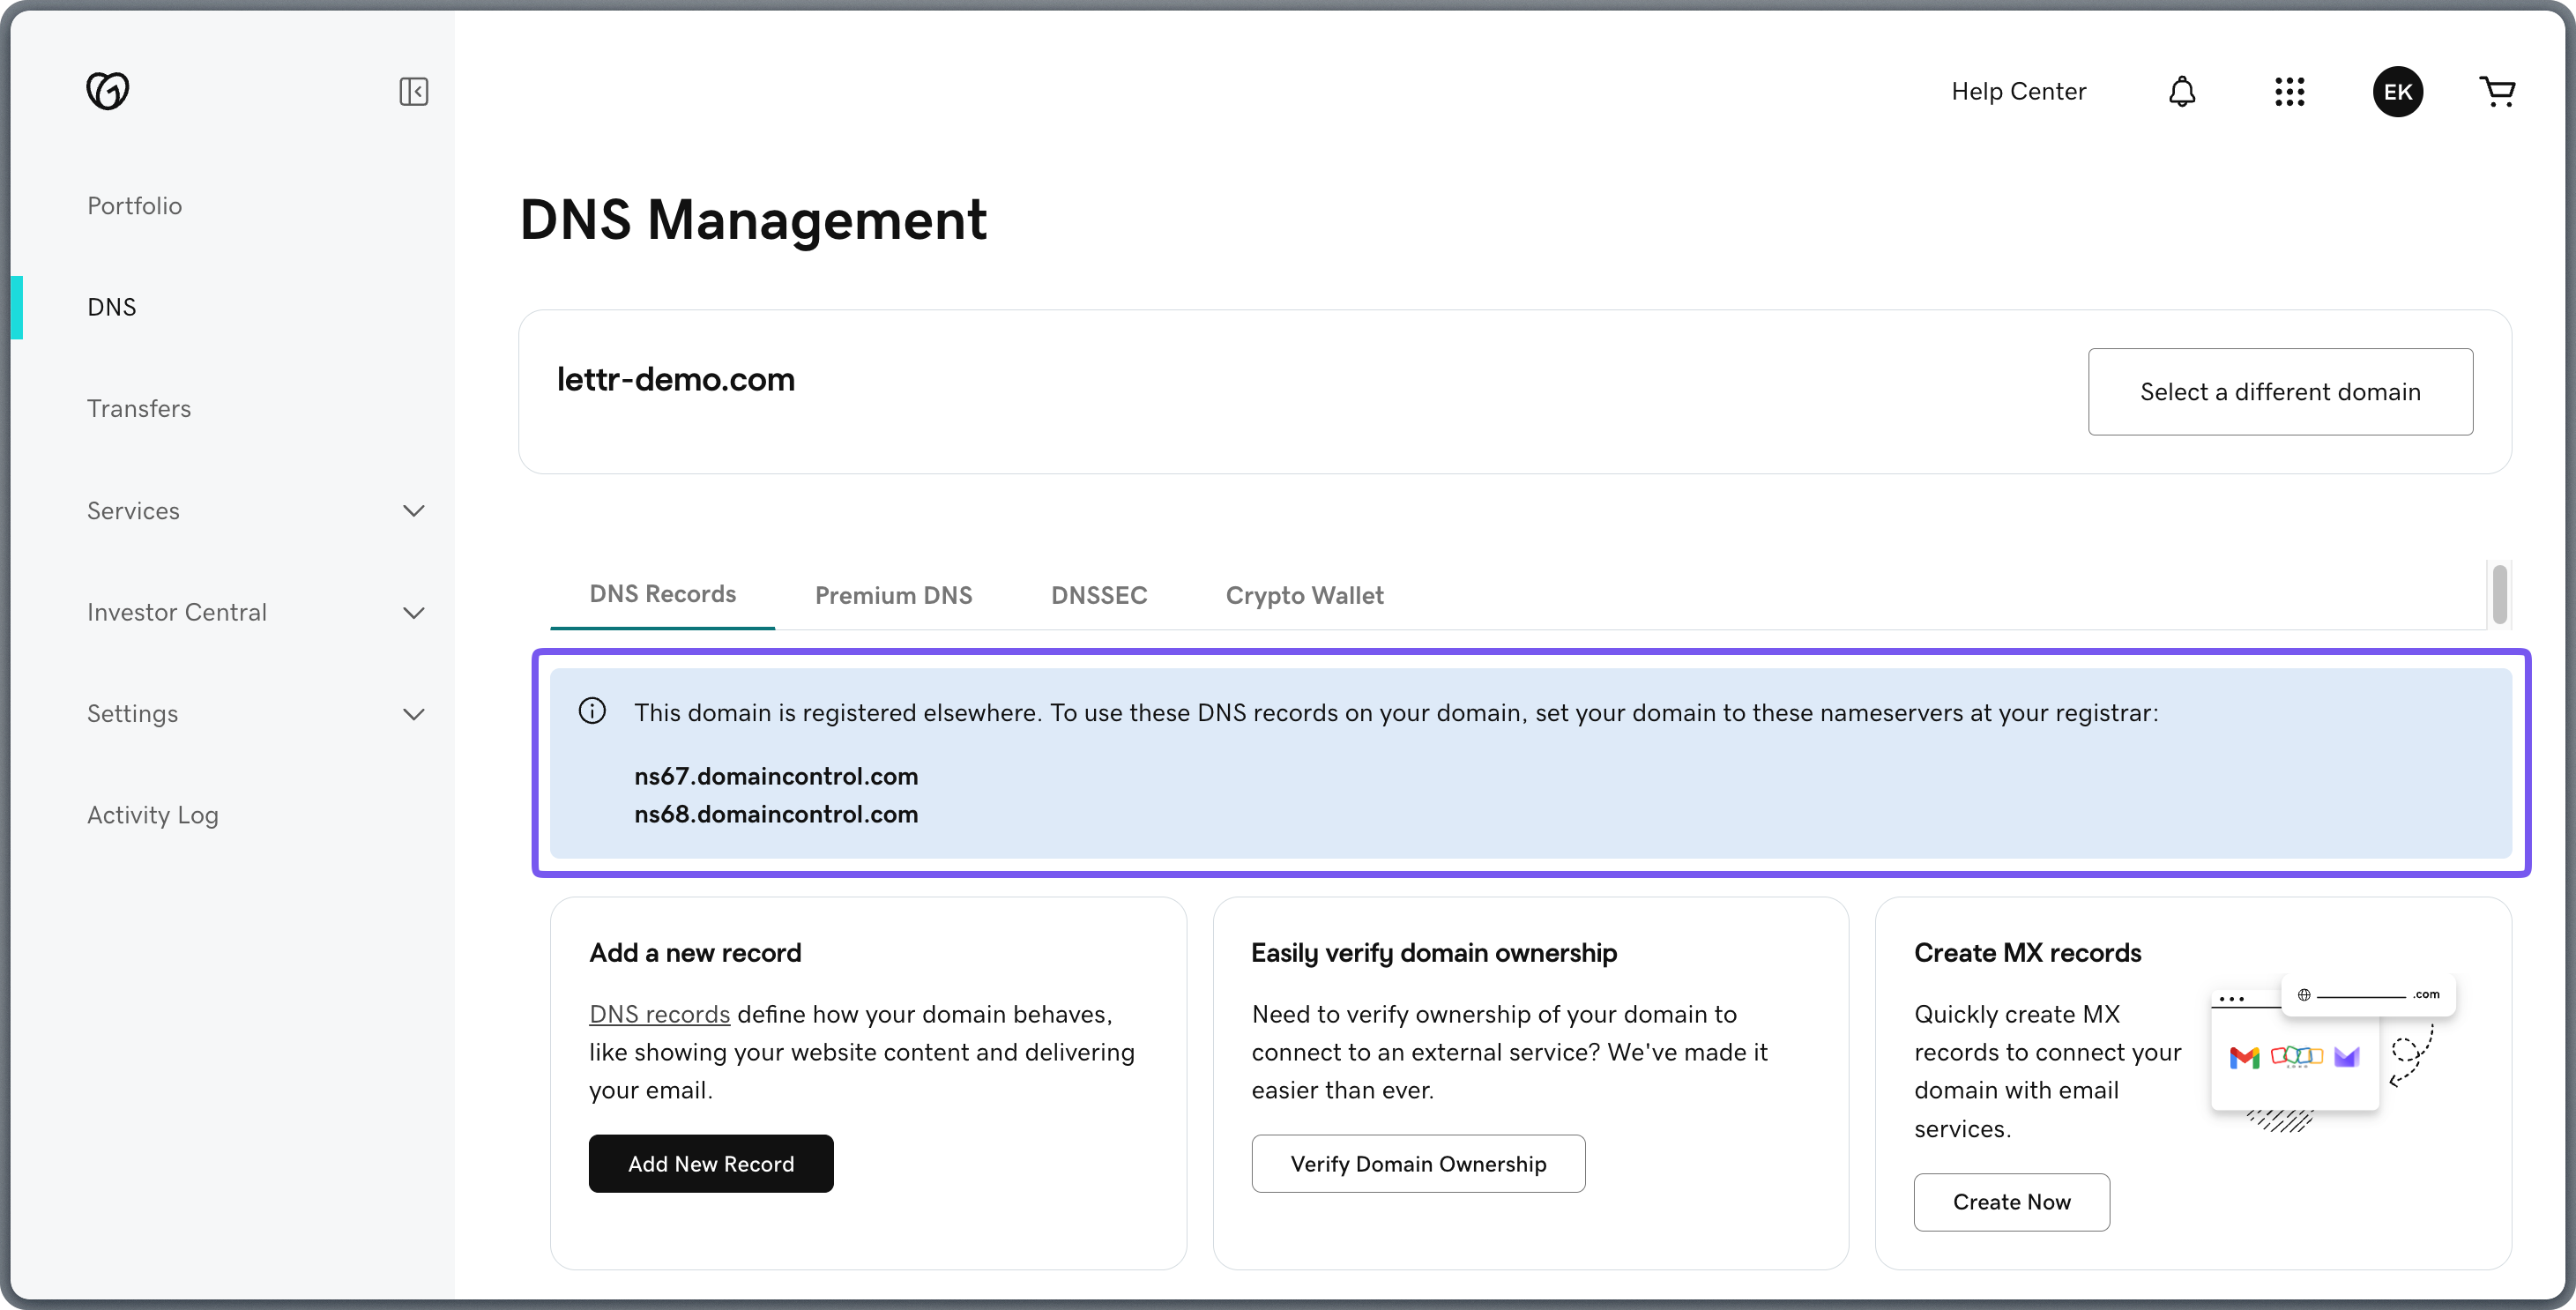 Until the nameservers are updated, any records you add in GoDaddy will not resolve.
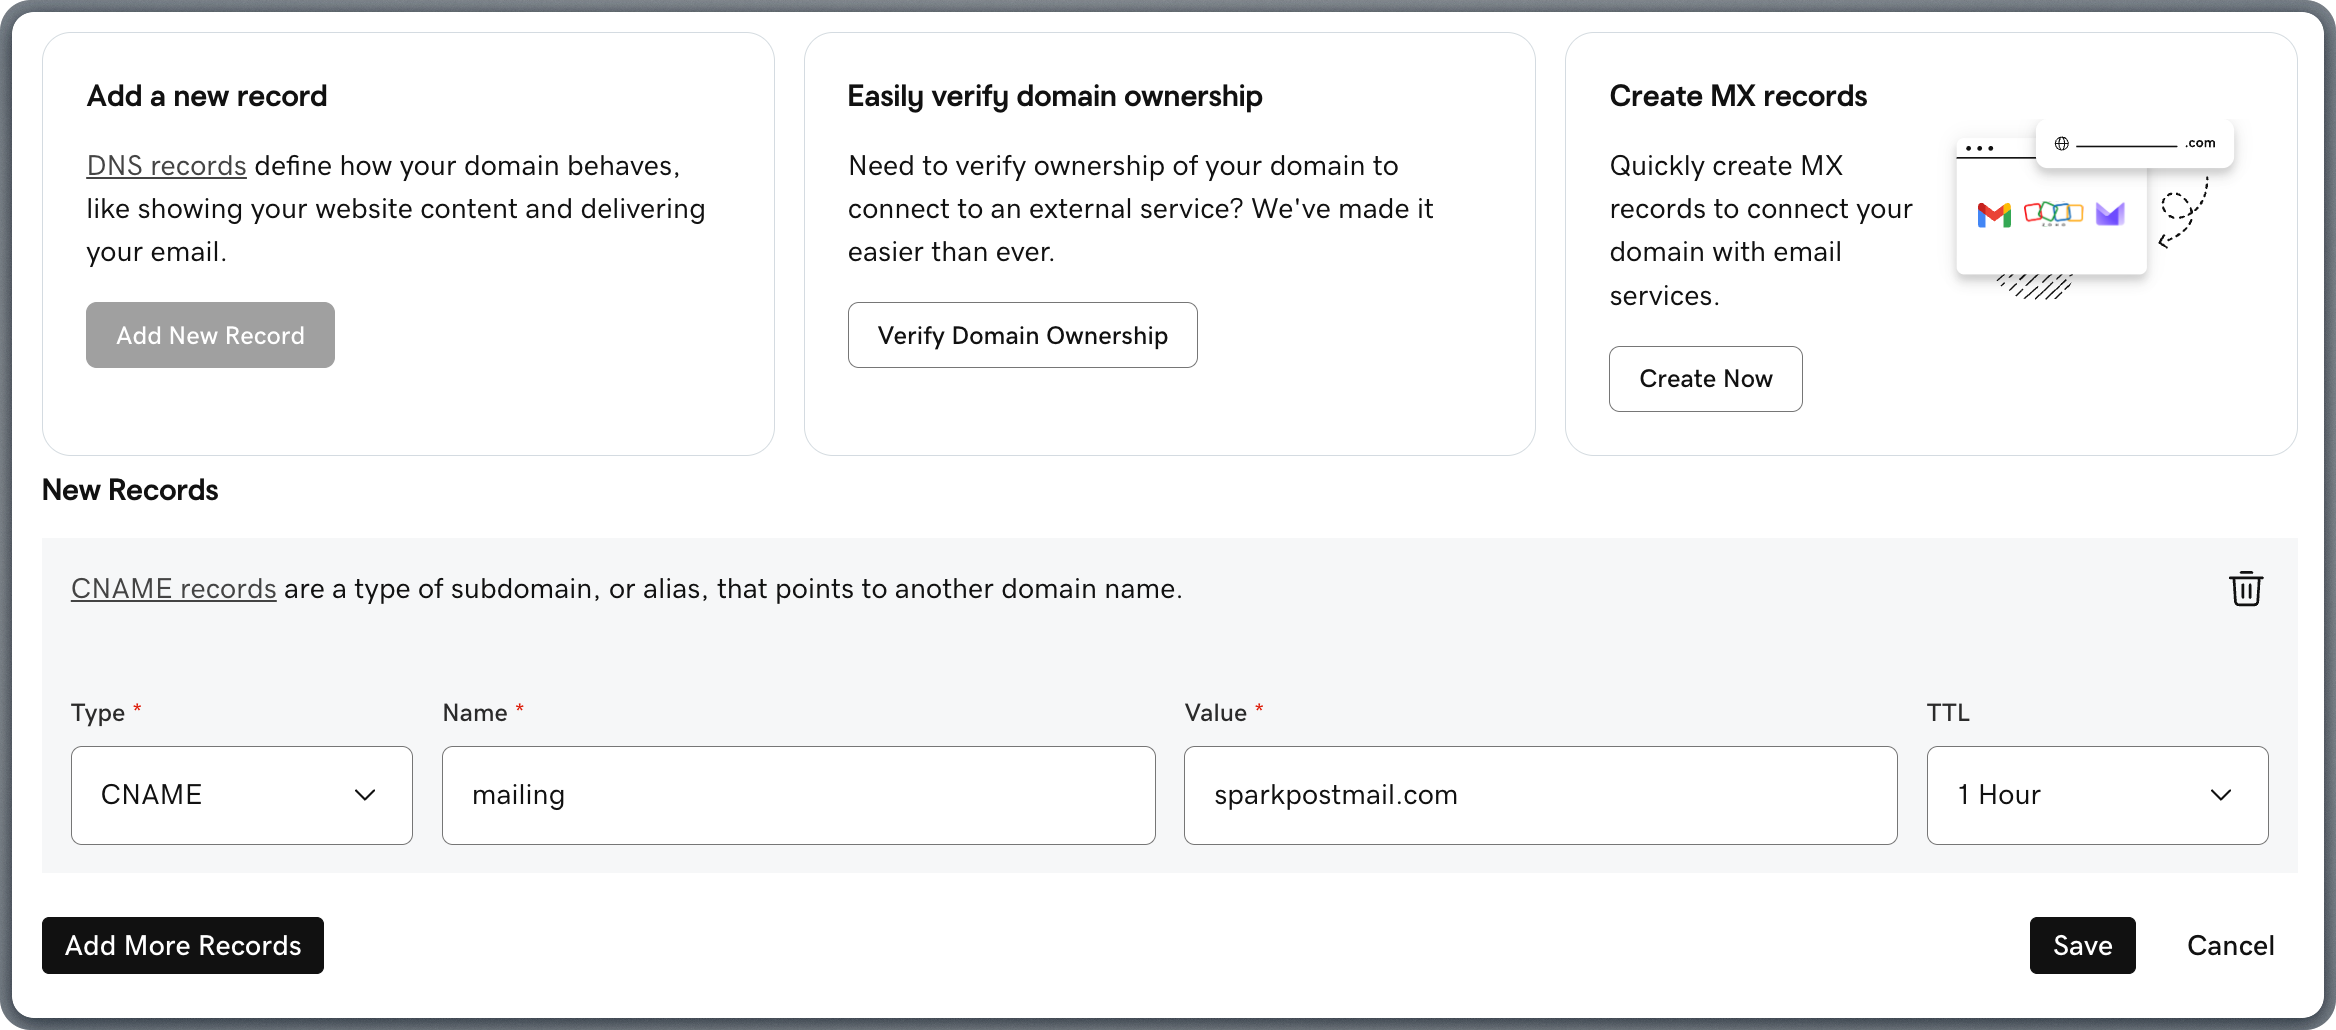
### Add CNAME Record
The CNAME record verifies domain ownership with Lettr's email infrastructure.
Copy the CNAME values from Lettr to GoDaddy:
1. Click **Add New Record** on the DNS Management page.
2. Select **CNAME** from the **Type** dropdown.
3. Copy the **Hostname** from Lettr and paste it into the **Name** field in GoDaddy.
4. Copy the **Value** from Lettr and paste it into the **Value** field in GoDaddy.
5. Leave **TTL** set to the default (typically 1 Hour).
6. Click **Save**.
Omit your domain suffix from the Hostname when pasting into GoDaddy. For example, instead of `mailing.lettr-demo.com`, paste only `mailing`. GoDaddy automatically appends your domain to the record name.
Until the nameservers are updated, any records you add in GoDaddy will not resolve.
### Add CNAME Record
The CNAME record verifies domain ownership with Lettr's email infrastructure.
Copy the CNAME values from Lettr to GoDaddy:
1. Click **Add New Record** on the DNS Management page.
2. Select **CNAME** from the **Type** dropdown.
3. Copy the **Hostname** from Lettr and paste it into the **Name** field in GoDaddy.
4. Copy the **Value** from Lettr and paste it into the **Value** field in GoDaddy.
5. Leave **TTL** set to the default (typically 1 Hour).
6. Click **Save**.
Omit your domain suffix from the Hostname when pasting into GoDaddy. For example, instead of `mailing.lettr-demo.com`, paste only `mailing`. GoDaddy automatically appends your domain to the record name.
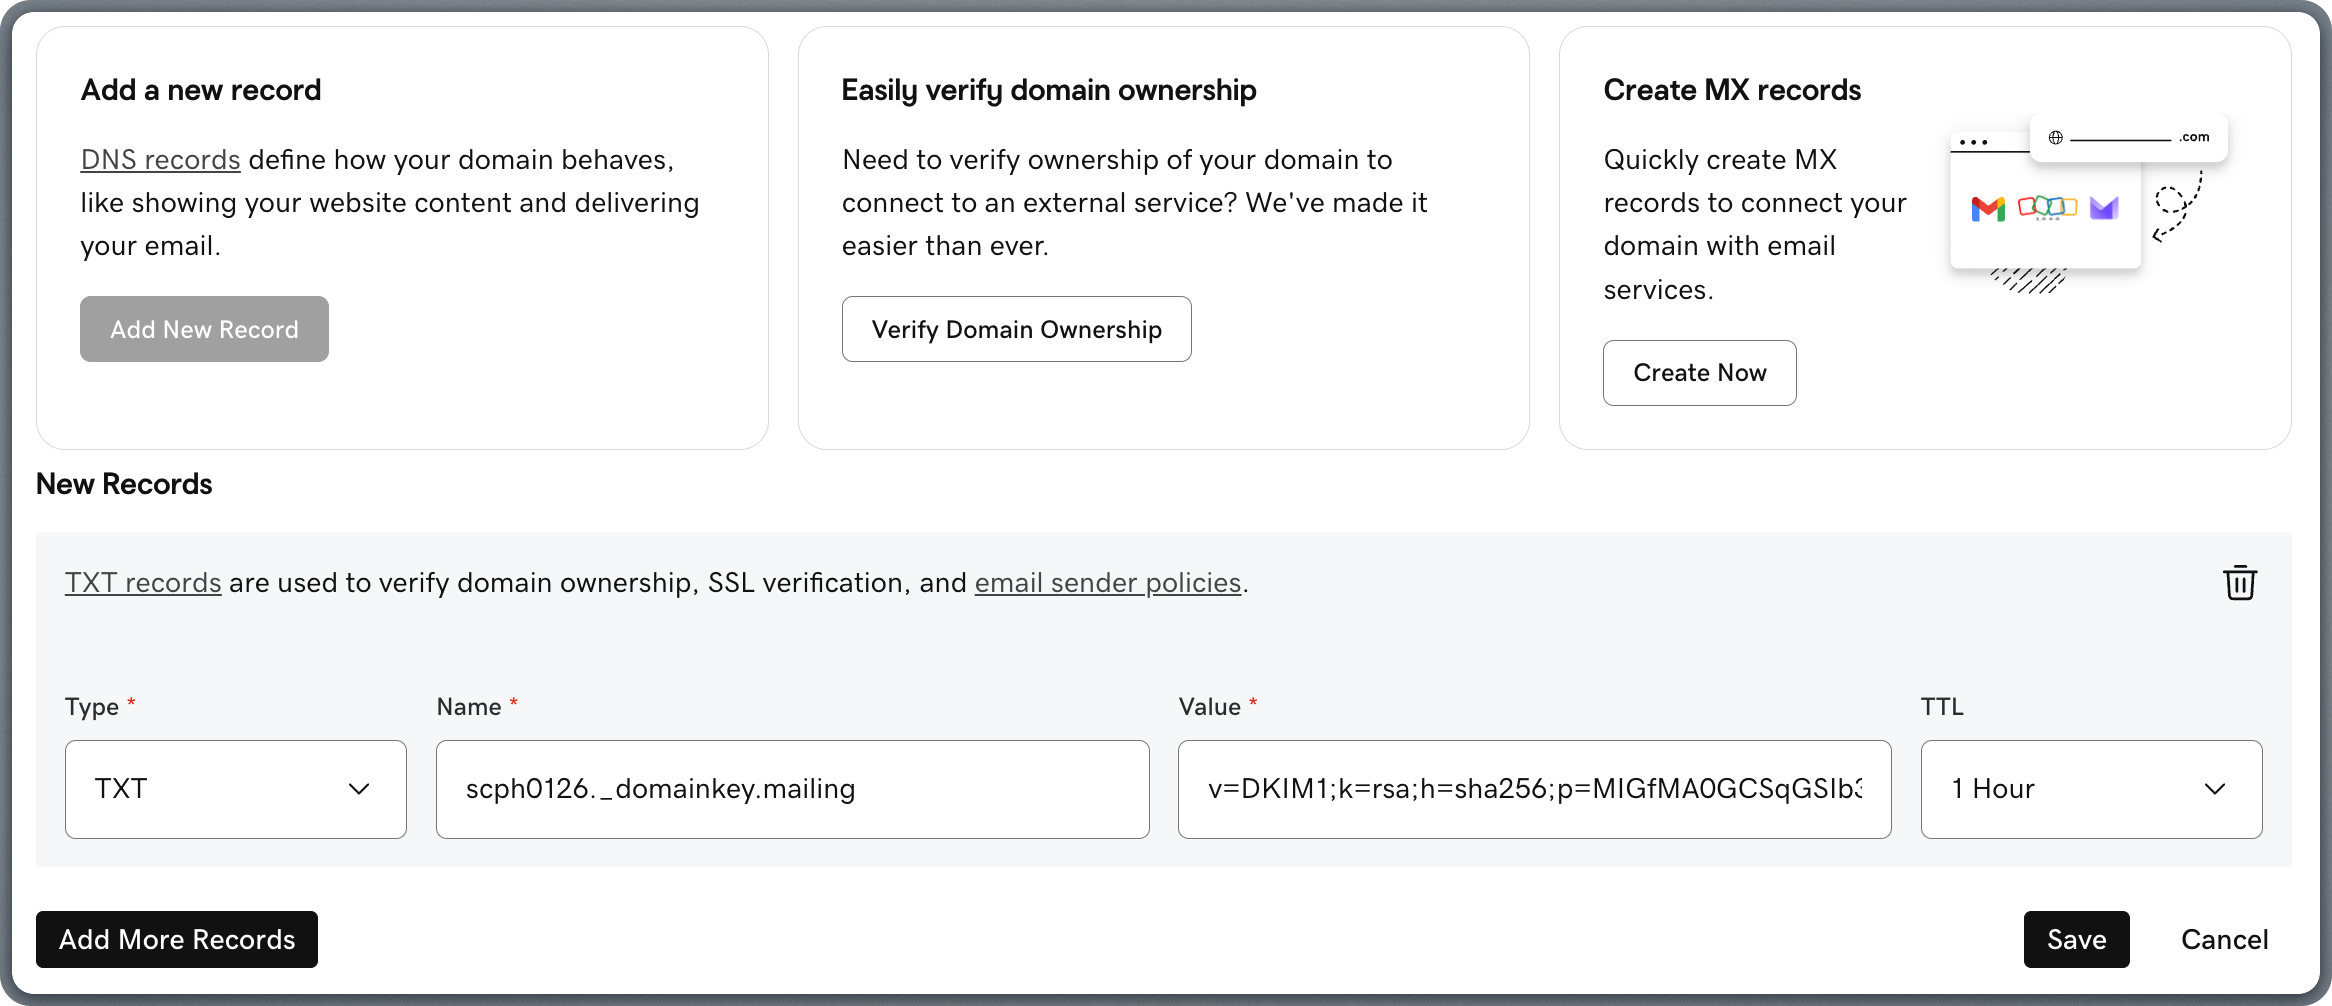
 ### Add TXT Record (DKIM)
The DKIM record adds a cryptographic signature to your outgoing emails, allowing recipients to verify they were sent by an authorized sender.
Copy the TXT values from Lettr to GoDaddy:
1. Click **Add New Record** on the DNS Management page.
2. Select **TXT** from the **Type** dropdown.
3. Copy the **Hostname** from Lettr and paste it into the **Name** field in GoDaddy.
4. Copy the **Value** from Lettr and paste it into the **Value** field in GoDaddy.
5. Leave **TTL** set to the default.
6. Click **Save**.
Omit your domain suffix from the Hostname when pasting into GoDaddy. For example, instead of `scph0126._domainkey.mailing.lettr-demo.com`, paste only `scph0126._domainkey.mailing`.
### Add TXT Record (DKIM)
The DKIM record adds a cryptographic signature to your outgoing emails, allowing recipients to verify they were sent by an authorized sender.
Copy the TXT values from Lettr to GoDaddy:
1. Click **Add New Record** on the DNS Management page.
2. Select **TXT** from the **Type** dropdown.
3. Copy the **Hostname** from Lettr and paste it into the **Name** field in GoDaddy.
4. Copy the **Value** from Lettr and paste it into the **Value** field in GoDaddy.
5. Leave **TTL** set to the default.
6. Click **Save**.
Omit your domain suffix from the Hostname when pasting into GoDaddy. For example, instead of `scph0126._domainkey.mailing.lettr-demo.com`, paste only `scph0126._domainkey.mailing`.
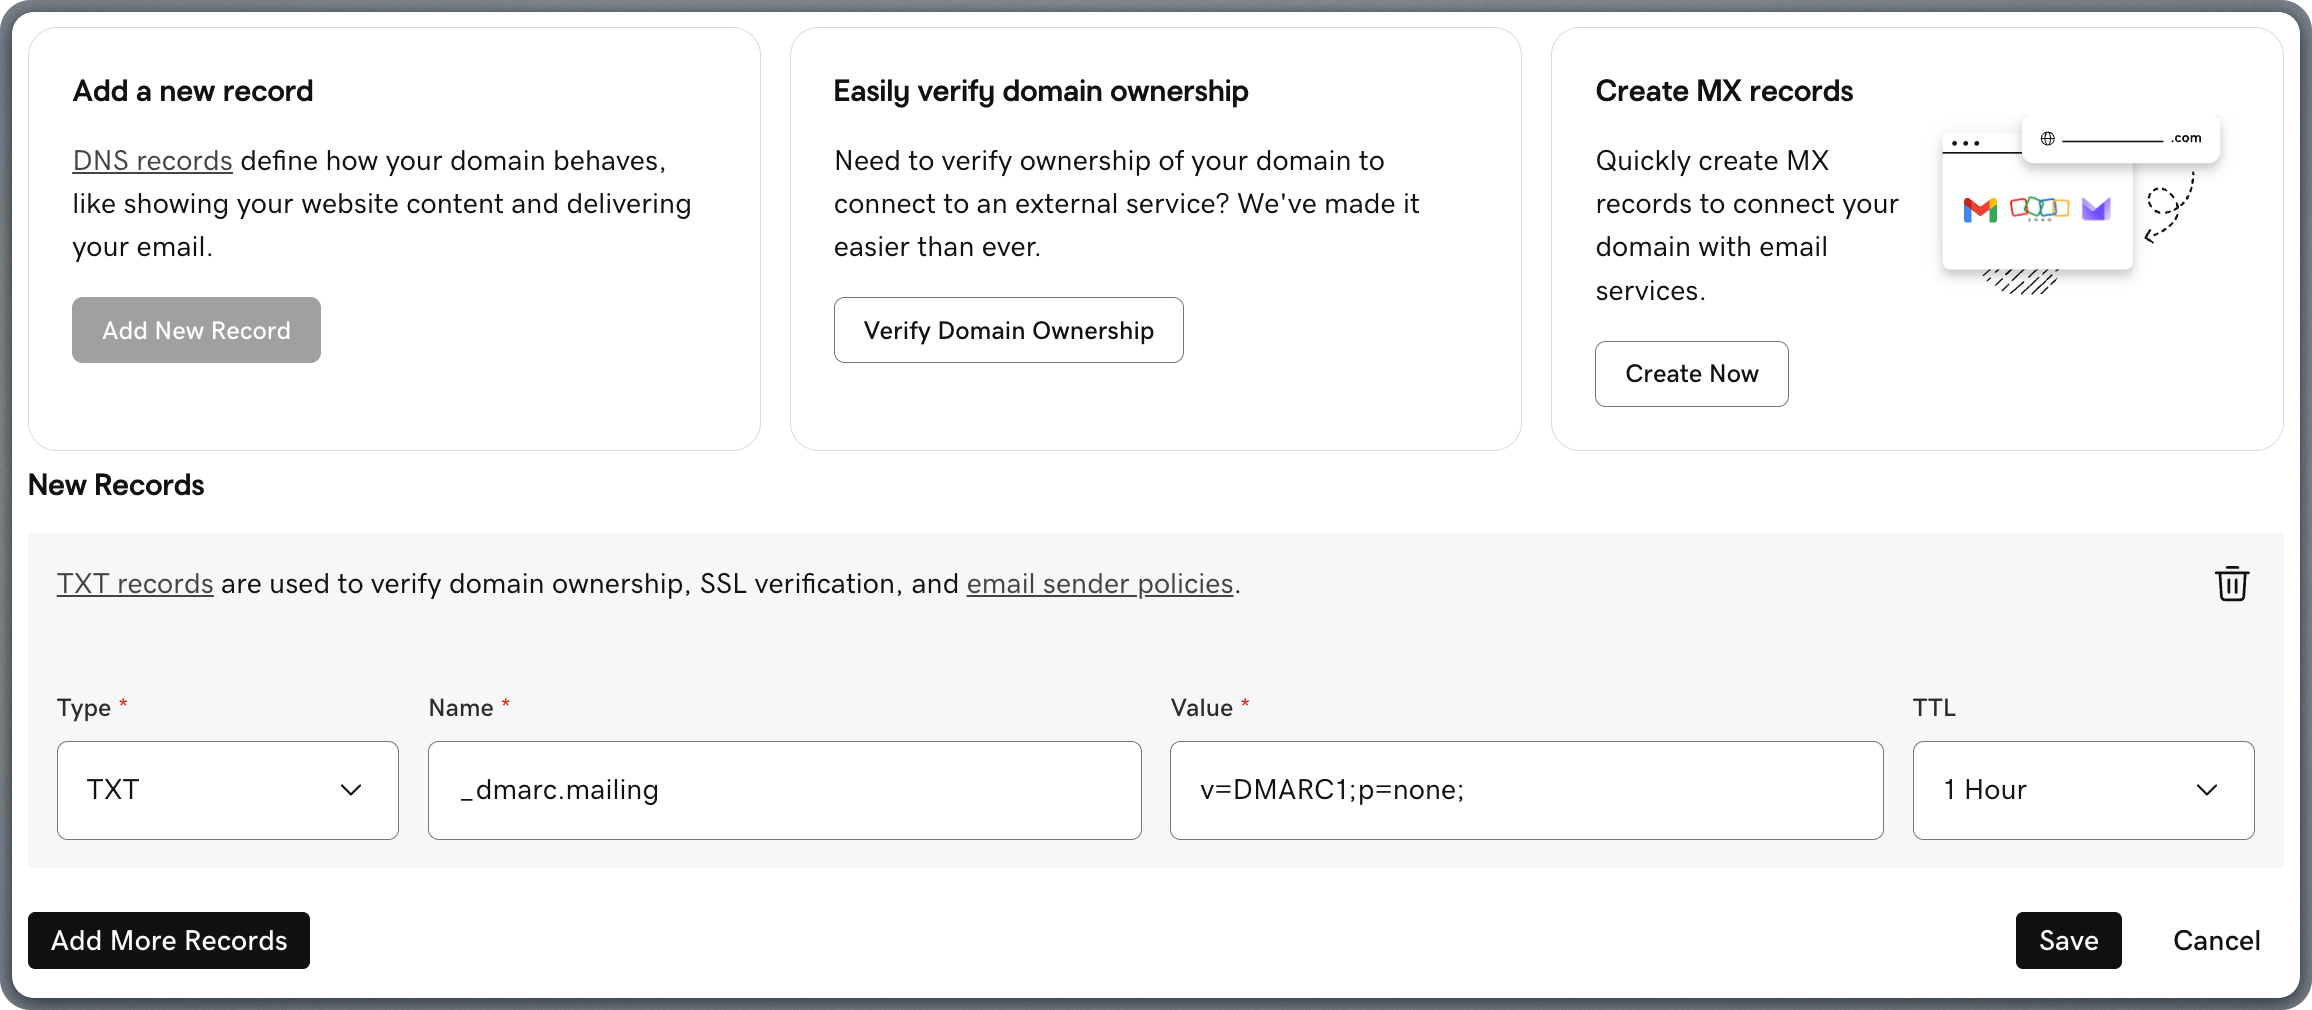
 ### Add TXT Record (DMARC)
The DMARC record tells receiving mail servers how to handle emails that fail authentication checks, protecting your domain from spoofing.
Copy the TXT values from Lettr to GoDaddy:
1. Click **Add New Record** on the DNS Management page.
2. Select **TXT** from the **Type** dropdown.
3. Copy the **Hostname** from Lettr and paste it into the **Name** field in GoDaddy.
4. Copy the **Value** from Lettr and paste it into the **Value** field in GoDaddy.
5. Leave **TTL** set to the default.
6. Click **Save**.
Omit your domain suffix from the Hostname when pasting into GoDaddy. For example, instead of `_dmarc.mailing.lettr-demo.com`, paste only `_dmarc.mailing`.
### Add TXT Record (DMARC)
The DMARC record tells receiving mail servers how to handle emails that fail authentication checks, protecting your domain from spoofing.
Copy the TXT values from Lettr to GoDaddy:
1. Click **Add New Record** on the DNS Management page.
2. Select **TXT** from the **Type** dropdown.
3. Copy the **Hostname** from Lettr and paste it into the **Name** field in GoDaddy.
4. Copy the **Value** from Lettr and paste it into the **Value** field in GoDaddy.
5. Leave **TTL** set to the default.
6. Click **Save**.
Omit your domain suffix from the Hostname when pasting into GoDaddy. For example, instead of `_dmarc.mailing.lettr-demo.com`, paste only `_dmarc.mailing`.
 ### Verify Your Sending Domain
After adding all three DNS records, go back to Lettr and click **Verify DNS Records**. DNS propagation can take up to 24–48 hours, though it typically completes within a few minutes.
***
## Inbound Domain Setup
An inbound domain allows Lettr to receive emails on your behalf. This requires three MX records that direct incoming mail to Lettr's mail servers.
### Add Inbound Domain to Lettr
To create an Inbound domain in Lettr:
1. Select **Domains** in the navigation panel
2. Select **Inbound Domains**
3. Click **Create Inbound Domain**
4. Enter your desired inbound subdomain (e.g. `inbound.company.com`)
5. Click **Create Domain**.
Click on your new domain in the Inbound Domains list.
This will display the MX records that need to be configured.
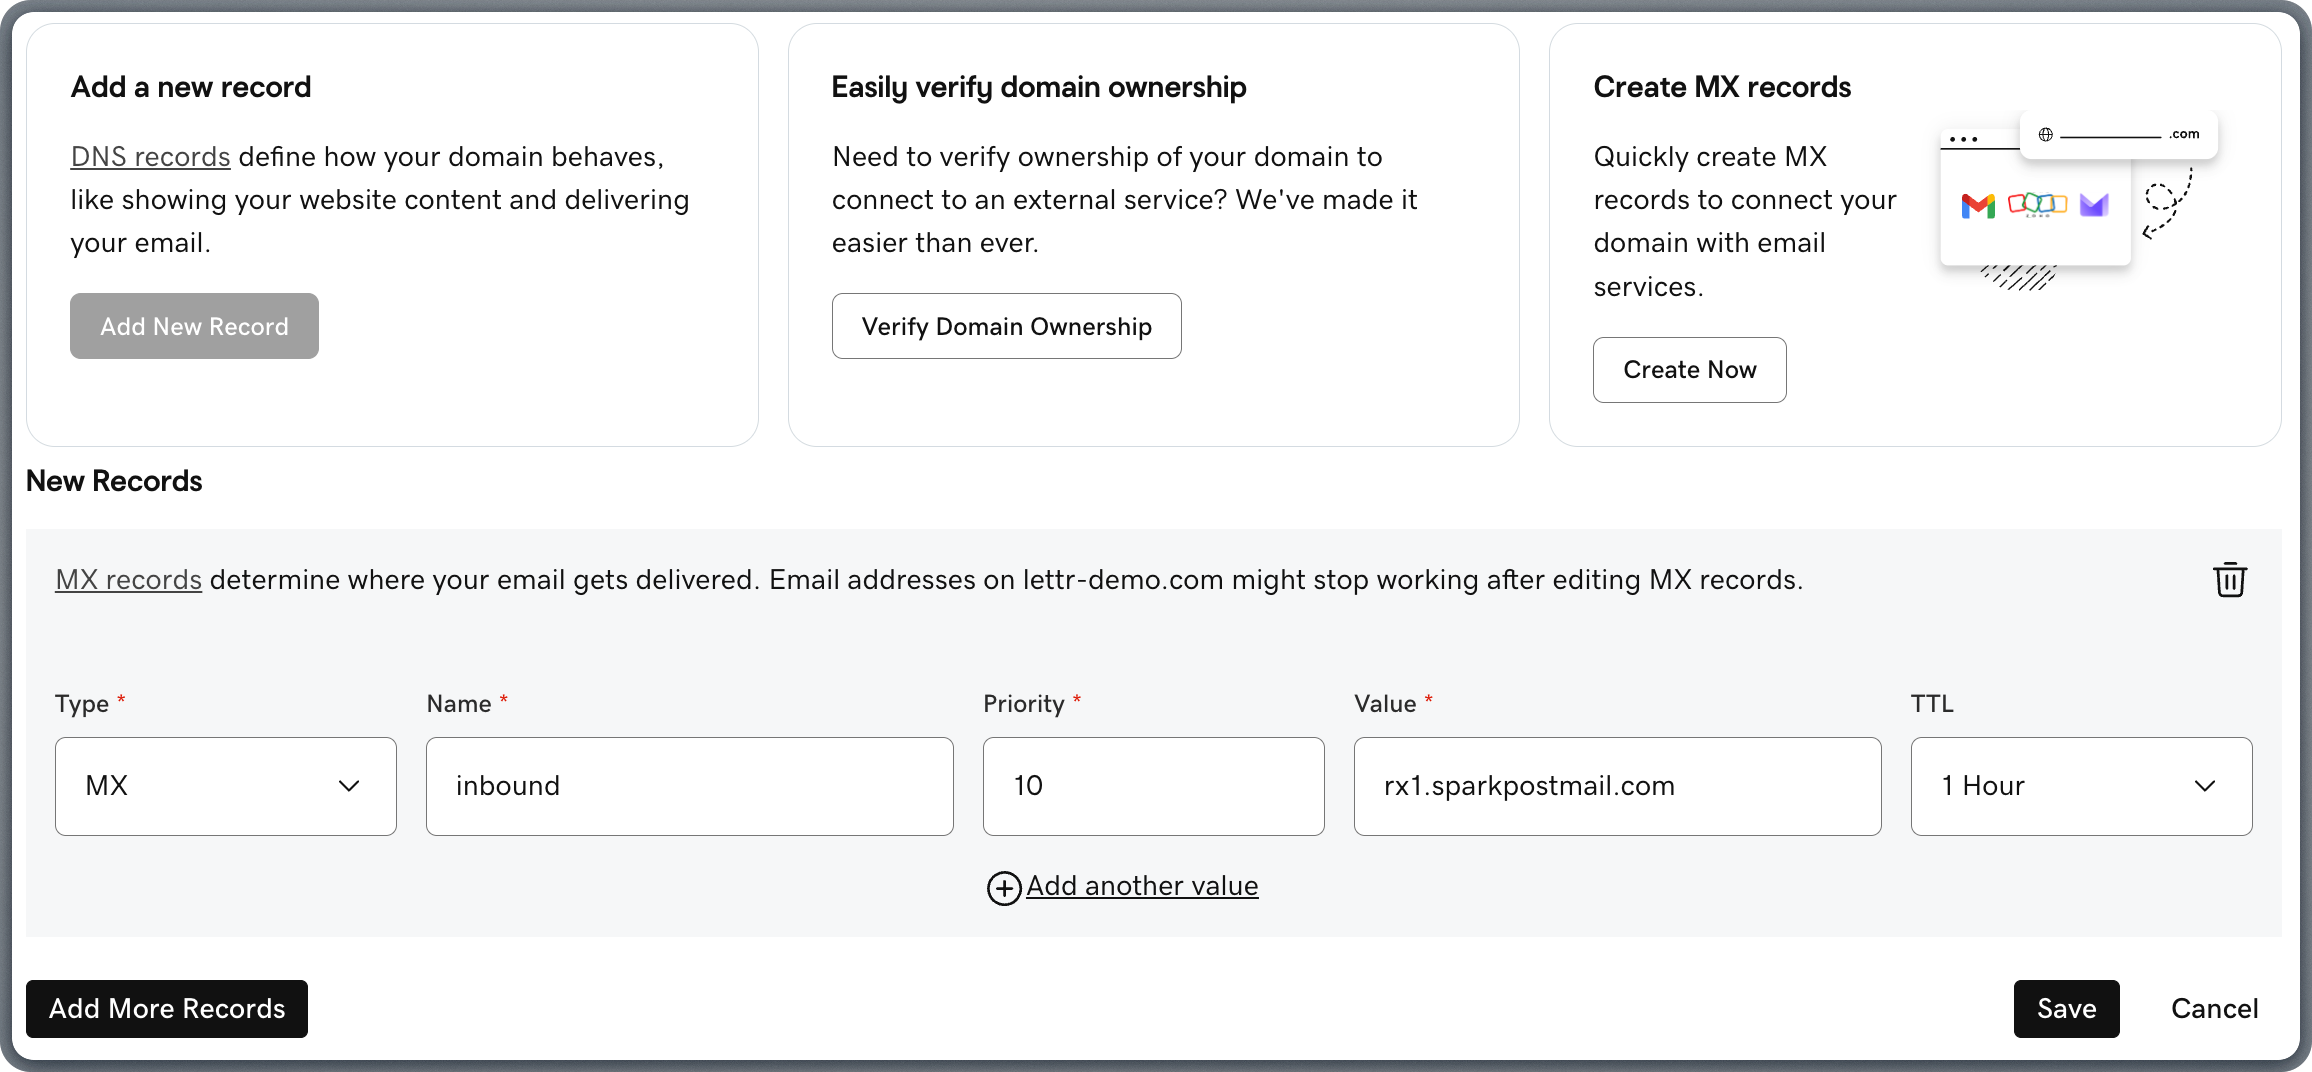
### Add MX Records
MX records tell other mail servers where to deliver emails addressed to your domain.
Copy the MX values from Lettr to GoDaddy:
1. Click **Add New Record** on the DNS Management page.
2. Select **MX** from the **Type** dropdown.
3. Copy the **Hostname** from Lettr and paste it into the **Name** field in GoDaddy.
4. Copy the **Priority** number (e.g. `10`) from Lettr and paste it into the **Priority** field in GoDaddy.
5. Copy the first **Required MX Record** value (without the priority number) from Lettr and paste it into the **Value** field in GoDaddy.
6. Leave **TTL** set to the default.
7. Click **Save**.
8. Repeat this process for the second (rx2.sparkpostmail.com) and third (rx3.sparkpostmail.com) MX records.
GoDaddy may have default MX records (e.g. pointing to GoDaddy's own mail servers). If you are not using GoDaddy email, delete or update these existing MX records before adding the Lettr MX records to avoid mail delivery conflicts.
Omit your domain suffix from the Hostname when pasting into GoDaddy. For example, instead of `inbound.lettr-demo.com`, paste only `inbound`.
### Verify Your Sending Domain
After adding all three DNS records, go back to Lettr and click **Verify DNS Records**. DNS propagation can take up to 24–48 hours, though it typically completes within a few minutes.
***
## Inbound Domain Setup
An inbound domain allows Lettr to receive emails on your behalf. This requires three MX records that direct incoming mail to Lettr's mail servers.
### Add Inbound Domain to Lettr
To create an Inbound domain in Lettr:
1. Select **Domains** in the navigation panel
2. Select **Inbound Domains**
3. Click **Create Inbound Domain**
4. Enter your desired inbound subdomain (e.g. `inbound.company.com`)
5. Click **Create Domain**.
Click on your new domain in the Inbound Domains list.
This will display the MX records that need to be configured.
### Add MX Records
MX records tell other mail servers where to deliver emails addressed to your domain.
Copy the MX values from Lettr to GoDaddy:
1. Click **Add New Record** on the DNS Management page.
2. Select **MX** from the **Type** dropdown.
3. Copy the **Hostname** from Lettr and paste it into the **Name** field in GoDaddy.
4. Copy the **Priority** number (e.g. `10`) from Lettr and paste it into the **Priority** field in GoDaddy.
5. Copy the first **Required MX Record** value (without the priority number) from Lettr and paste it into the **Value** field in GoDaddy.
6. Leave **TTL** set to the default.
7. Click **Save**.
8. Repeat this process for the second (rx2.sparkpostmail.com) and third (rx3.sparkpostmail.com) MX records.
GoDaddy may have default MX records (e.g. pointing to GoDaddy's own mail servers). If you are not using GoDaddy email, delete or update these existing MX records before adding the Lettr MX records to avoid mail delivery conflicts.
Omit your domain suffix from the Hostname when pasting into GoDaddy. For example, instead of `inbound.lettr-demo.com`, paste only `inbound`.
 ### Verify Your Inbound Domain
After adding all three MX records, go back to Lettr and click **Verify DNS Records**. DNS propagation can take up to 24–48 hours, though it typically completes within a few minutes.
***
## Tracking Domain Setup
A tracking domain allows Lettr to track email opens and link clicks using your own custom domain instead of the default Lettr tracking domain. This requires two CNAME records: one for the SSL certificate and one for routing tracking traffic to Lettr's infrastructure.
### Add Tracking Domain to Lettr
To create a Tracking domain in Lettr:
1. Select **Domains** in the navigation panel
2. Select **Tracking Domains**
3. Click **Create Tracking Domain**
4. Enter your desired tracking subdomain (e.g. `tracking.company.com`)
5. Click **Create Domain**
Click on your new domain in the Tracking Domains list.
This will display the CNAME records that need to be configured.
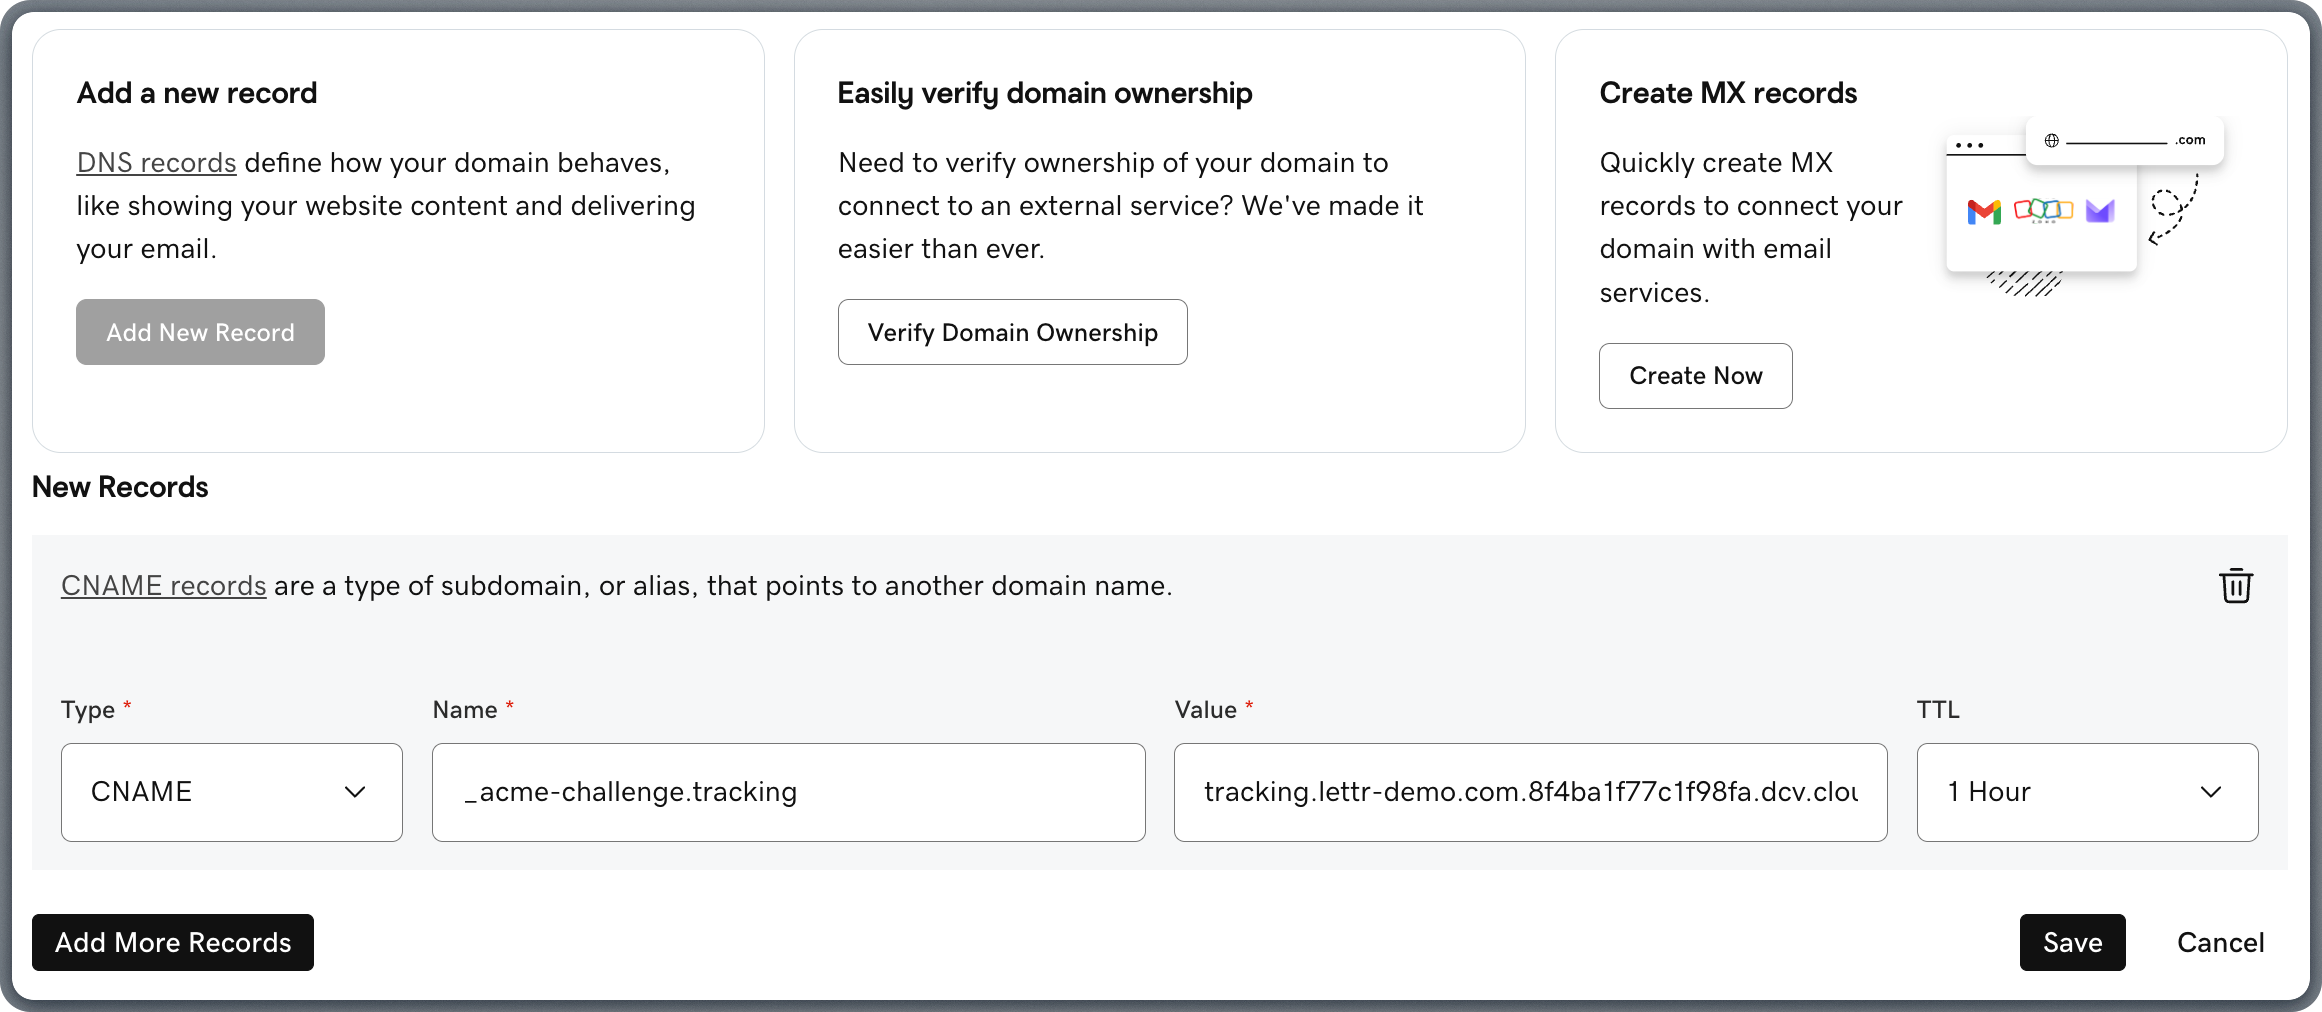
### Add SSL Certificate CNAME Record
The SSL Certificate CNAME record provisions an SSL certificate for your custom tracking domain, enabling secure HTTPS connections for tracked links.
Add the record in GoDaddy:
1. Click **Add New Record** on the DNS Management page.
2. Select **CNAME** from the **Type** dropdown.
3. Copy the **Hostname** from Lettr and paste it into the **Name** field in GoDaddy.
4. Copy the **Value** from Lettr and paste it into the **Value** field in GoDaddy.
5. Leave **TTL** set to the default.
6. Click **Save**.
Omit your domain suffix from the Hostname when pasting into GoDaddy. For example, instead of `track.lettr-demo.com`, paste only `track`.
### Verify Your Inbound Domain
After adding all three MX records, go back to Lettr and click **Verify DNS Records**. DNS propagation can take up to 24–48 hours, though it typically completes within a few minutes.
***
## Tracking Domain Setup
A tracking domain allows Lettr to track email opens and link clicks using your own custom domain instead of the default Lettr tracking domain. This requires two CNAME records: one for the SSL certificate and one for routing tracking traffic to Lettr's infrastructure.
### Add Tracking Domain to Lettr
To create a Tracking domain in Lettr:
1. Select **Domains** in the navigation panel
2. Select **Tracking Domains**
3. Click **Create Tracking Domain**
4. Enter your desired tracking subdomain (e.g. `tracking.company.com`)
5. Click **Create Domain**
Click on your new domain in the Tracking Domains list.
This will display the CNAME records that need to be configured.
### Add SSL Certificate CNAME Record
The SSL Certificate CNAME record provisions an SSL certificate for your custom tracking domain, enabling secure HTTPS connections for tracked links.
Add the record in GoDaddy:
1. Click **Add New Record** on the DNS Management page.
2. Select **CNAME** from the **Type** dropdown.
3. Copy the **Hostname** from Lettr and paste it into the **Name** field in GoDaddy.
4. Copy the **Value** from Lettr and paste it into the **Value** field in GoDaddy.
5. Leave **TTL** set to the default.
6. Click **Save**.
Omit your domain suffix from the Hostname when pasting into GoDaddy. For example, instead of `track.lettr-demo.com`, paste only `track`.
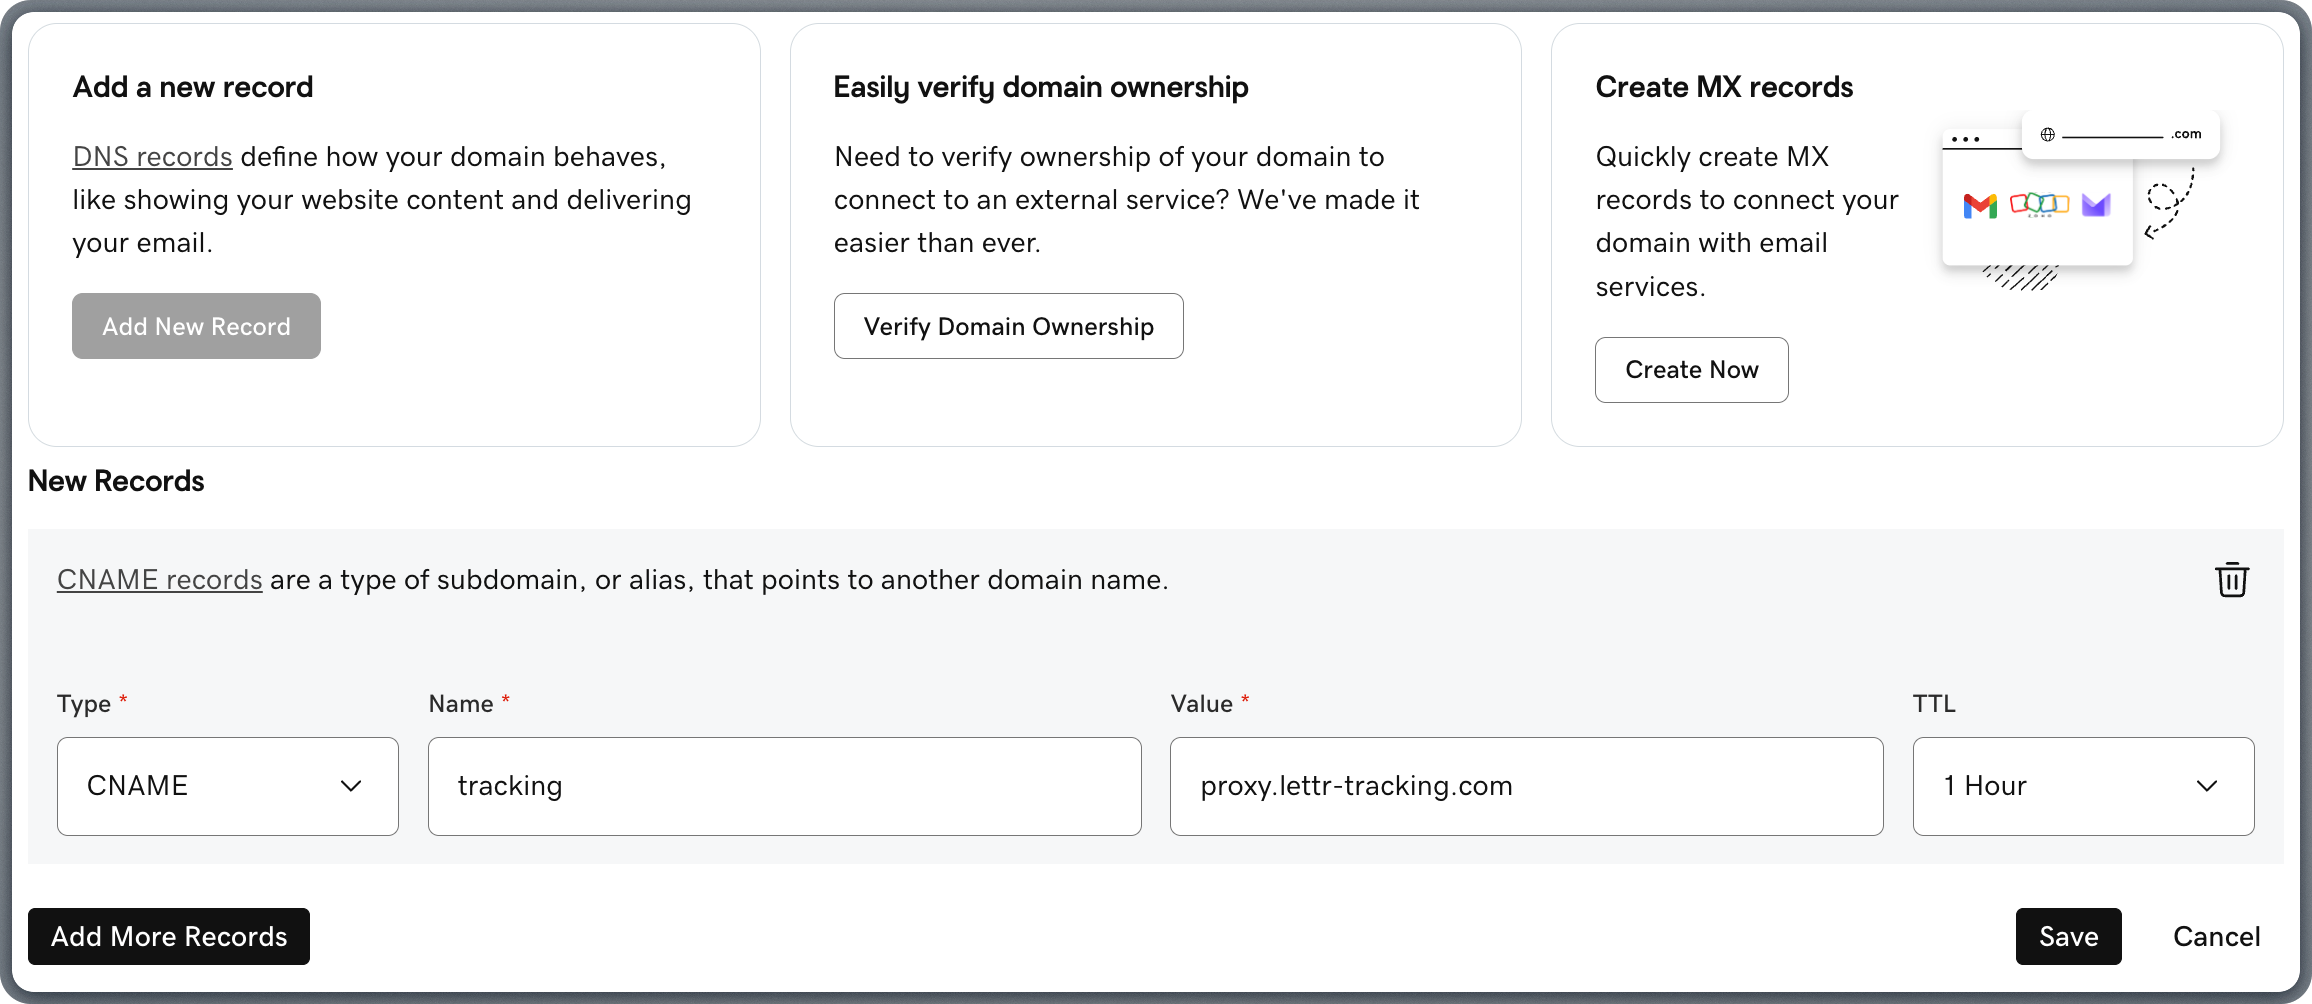
 ### Add Traffic CNAME Record
The Traffic CNAME record routes click and open tracking requests from your custom domain to Lettr's tracking servers.
Add the record in GoDaddy:
1. Click **Add New Record** on the DNS Management page.
2. Select **CNAME** from the **Type** dropdown.
3. Copy the **Hostname** from Lettr and paste it into the **Name** field in GoDaddy.
4. Copy the **Value** from Lettr and paste it into the **Value** field in GoDaddy.
5. Leave **TTL** set to the default.
6. Click **Save**.
Omit your domain suffix from the Hostname when pasting into GoDaddy. For example, instead of `track.lettr-demo.com`, paste only `track`.
### Add Traffic CNAME Record
The Traffic CNAME record routes click and open tracking requests from your custom domain to Lettr's tracking servers.
Add the record in GoDaddy:
1. Click **Add New Record** on the DNS Management page.
2. Select **CNAME** from the **Type** dropdown.
3. Copy the **Hostname** from Lettr and paste it into the **Name** field in GoDaddy.
4. Copy the **Value** from Lettr and paste it into the **Value** field in GoDaddy.
5. Leave **TTL** set to the default.
6. Click **Save**.
Omit your domain suffix from the Hostname when pasting into GoDaddy. For example, instead of `track.lettr-demo.com`, paste only `track`.
 ### Verify Your Tracking Domain
After adding both CNAME records, go back to Lettr and click **Verify DNS Records**.
***
## Storage Domain Setup
A storage domain lets you serve email assets (images, attachments) from your own custom domain instead of the default Lettr storage URL. This requires two TXT records for certificate validation and ownership verification, and a CNAME record for routing asset requests to Lettr's storage infrastructure.
### Add Storage Domain to Lettr
To create a Storage domain in Lettr:
1. Select **Domains** in the navigation panel
2. Select **Storage Domains**
3. Click **Create Storage Domain**
4. Enter your desired storage subdomain (e.g. `assets.company.com`)
5. Click **Create Domain**
Click on your new domain in the Storage Domains list.
This will display the TXT and CNAME records that need to be configured.
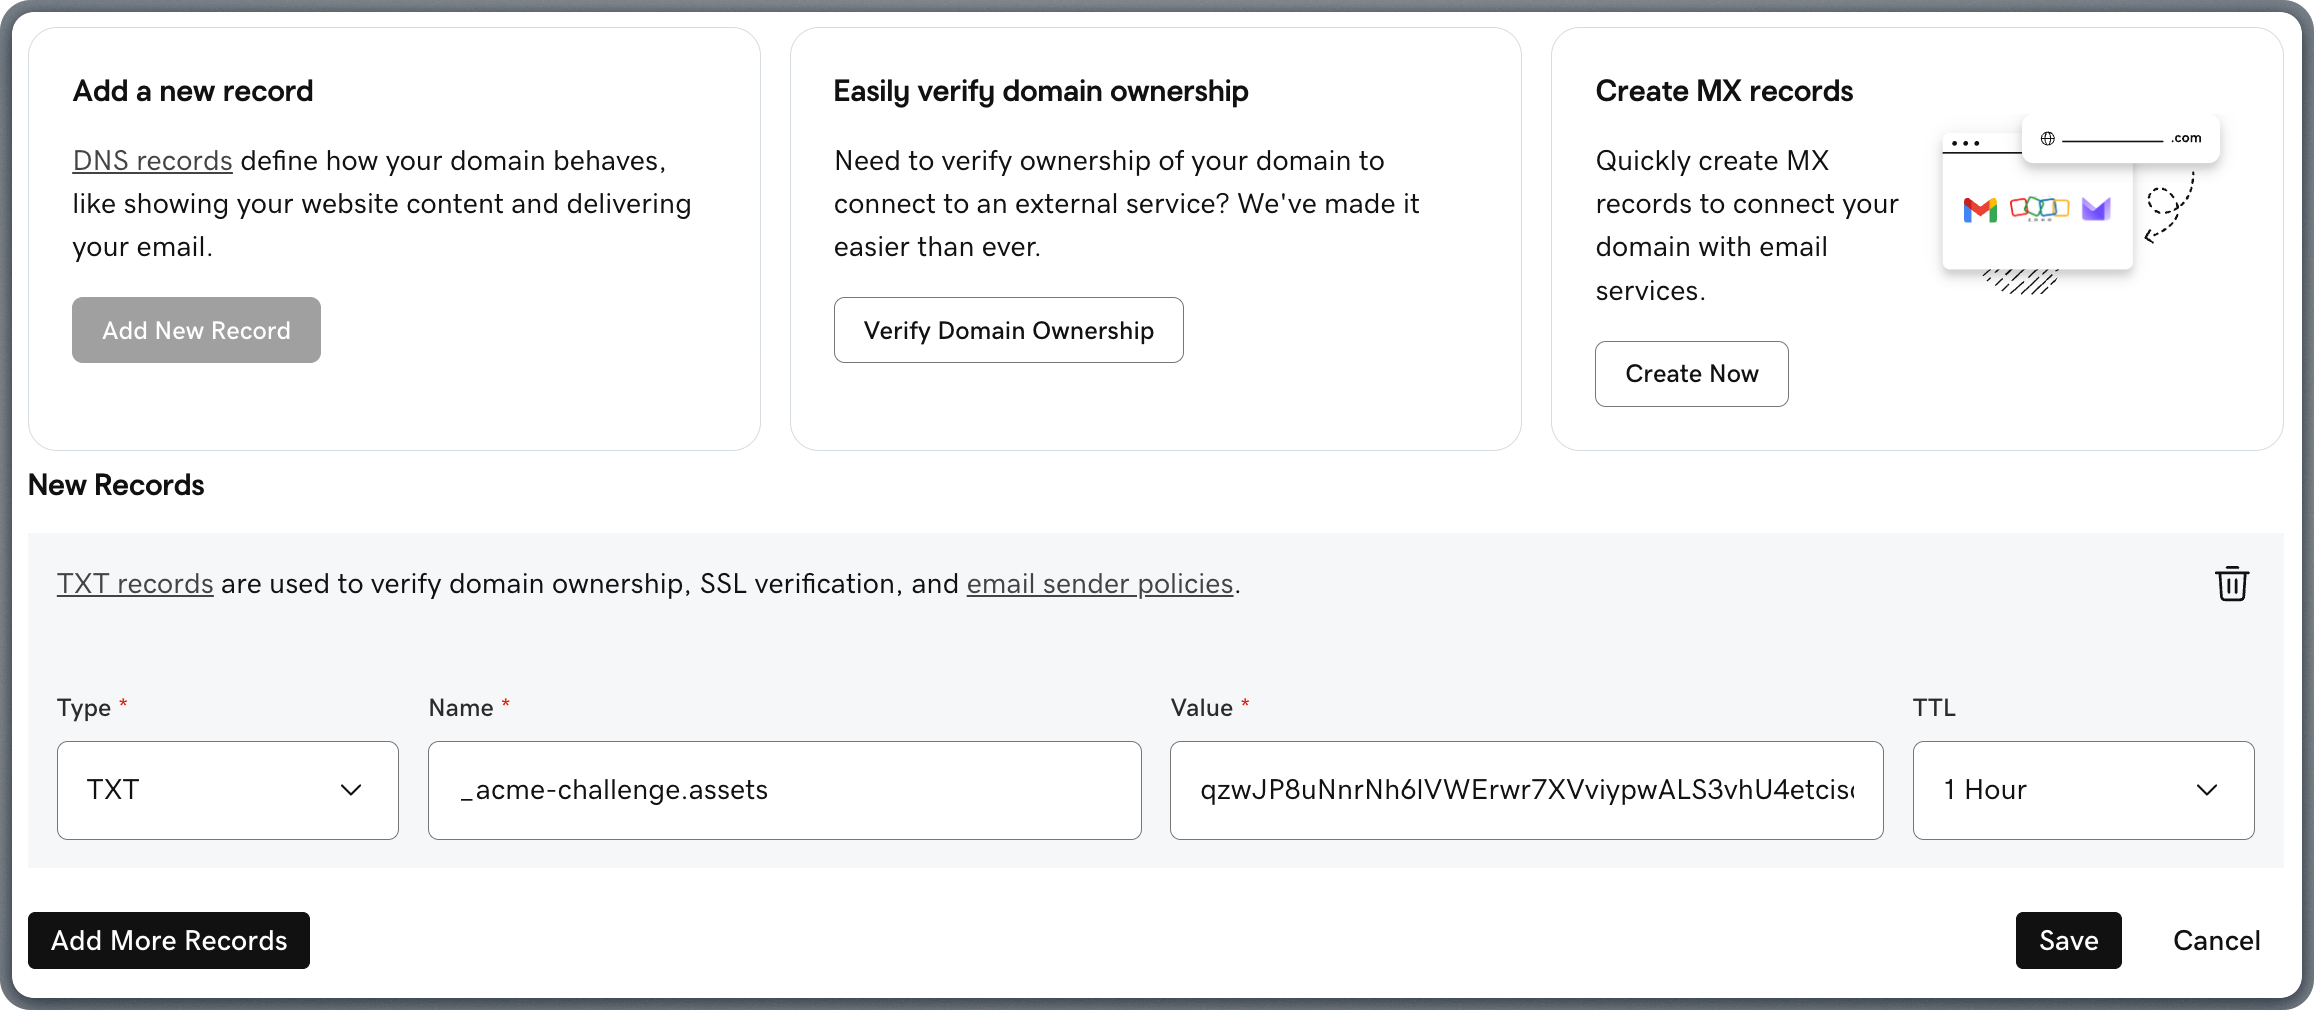
### Add TXT Record (Certificate Validation)
The Certificate Validation TXT record provisions an SSL certificate for your custom storage domain, enabling secure HTTPS delivery of email assets.
Add the record in GoDaddy:
1. Click **Add New Record** on the DNS Management page.
2. Select **TXT** from the **Type** dropdown.
3. Copy the **Hostname** from Lettr and paste it into the **Name** field in GoDaddy.
4. Copy the **Value** from Lettr and paste it into the **Value** field in GoDaddy.
5. Leave **TTL** set to the default.
6. Click **Save**.
Omit your domain suffix from the Hostname when pasting into GoDaddy, just as with the CNAME record above.
### Verify Your Tracking Domain
After adding both CNAME records, go back to Lettr and click **Verify DNS Records**.
***
## Storage Domain Setup
A storage domain lets you serve email assets (images, attachments) from your own custom domain instead of the default Lettr storage URL. This requires two TXT records for certificate validation and ownership verification, and a CNAME record for routing asset requests to Lettr's storage infrastructure.
### Add Storage Domain to Lettr
To create a Storage domain in Lettr:
1. Select **Domains** in the navigation panel
2. Select **Storage Domains**
3. Click **Create Storage Domain**
4. Enter your desired storage subdomain (e.g. `assets.company.com`)
5. Click **Create Domain**
Click on your new domain in the Storage Domains list.
This will display the TXT and CNAME records that need to be configured.
### Add TXT Record (Certificate Validation)
The Certificate Validation TXT record provisions an SSL certificate for your custom storage domain, enabling secure HTTPS delivery of email assets.
Add the record in GoDaddy:
1. Click **Add New Record** on the DNS Management page.
2. Select **TXT** from the **Type** dropdown.
3. Copy the **Hostname** from Lettr and paste it into the **Name** field in GoDaddy.
4. Copy the **Value** from Lettr and paste it into the **Value** field in GoDaddy.
5. Leave **TTL** set to the default.
6. Click **Save**.
Omit your domain suffix from the Hostname when pasting into GoDaddy, just as with the CNAME record above.
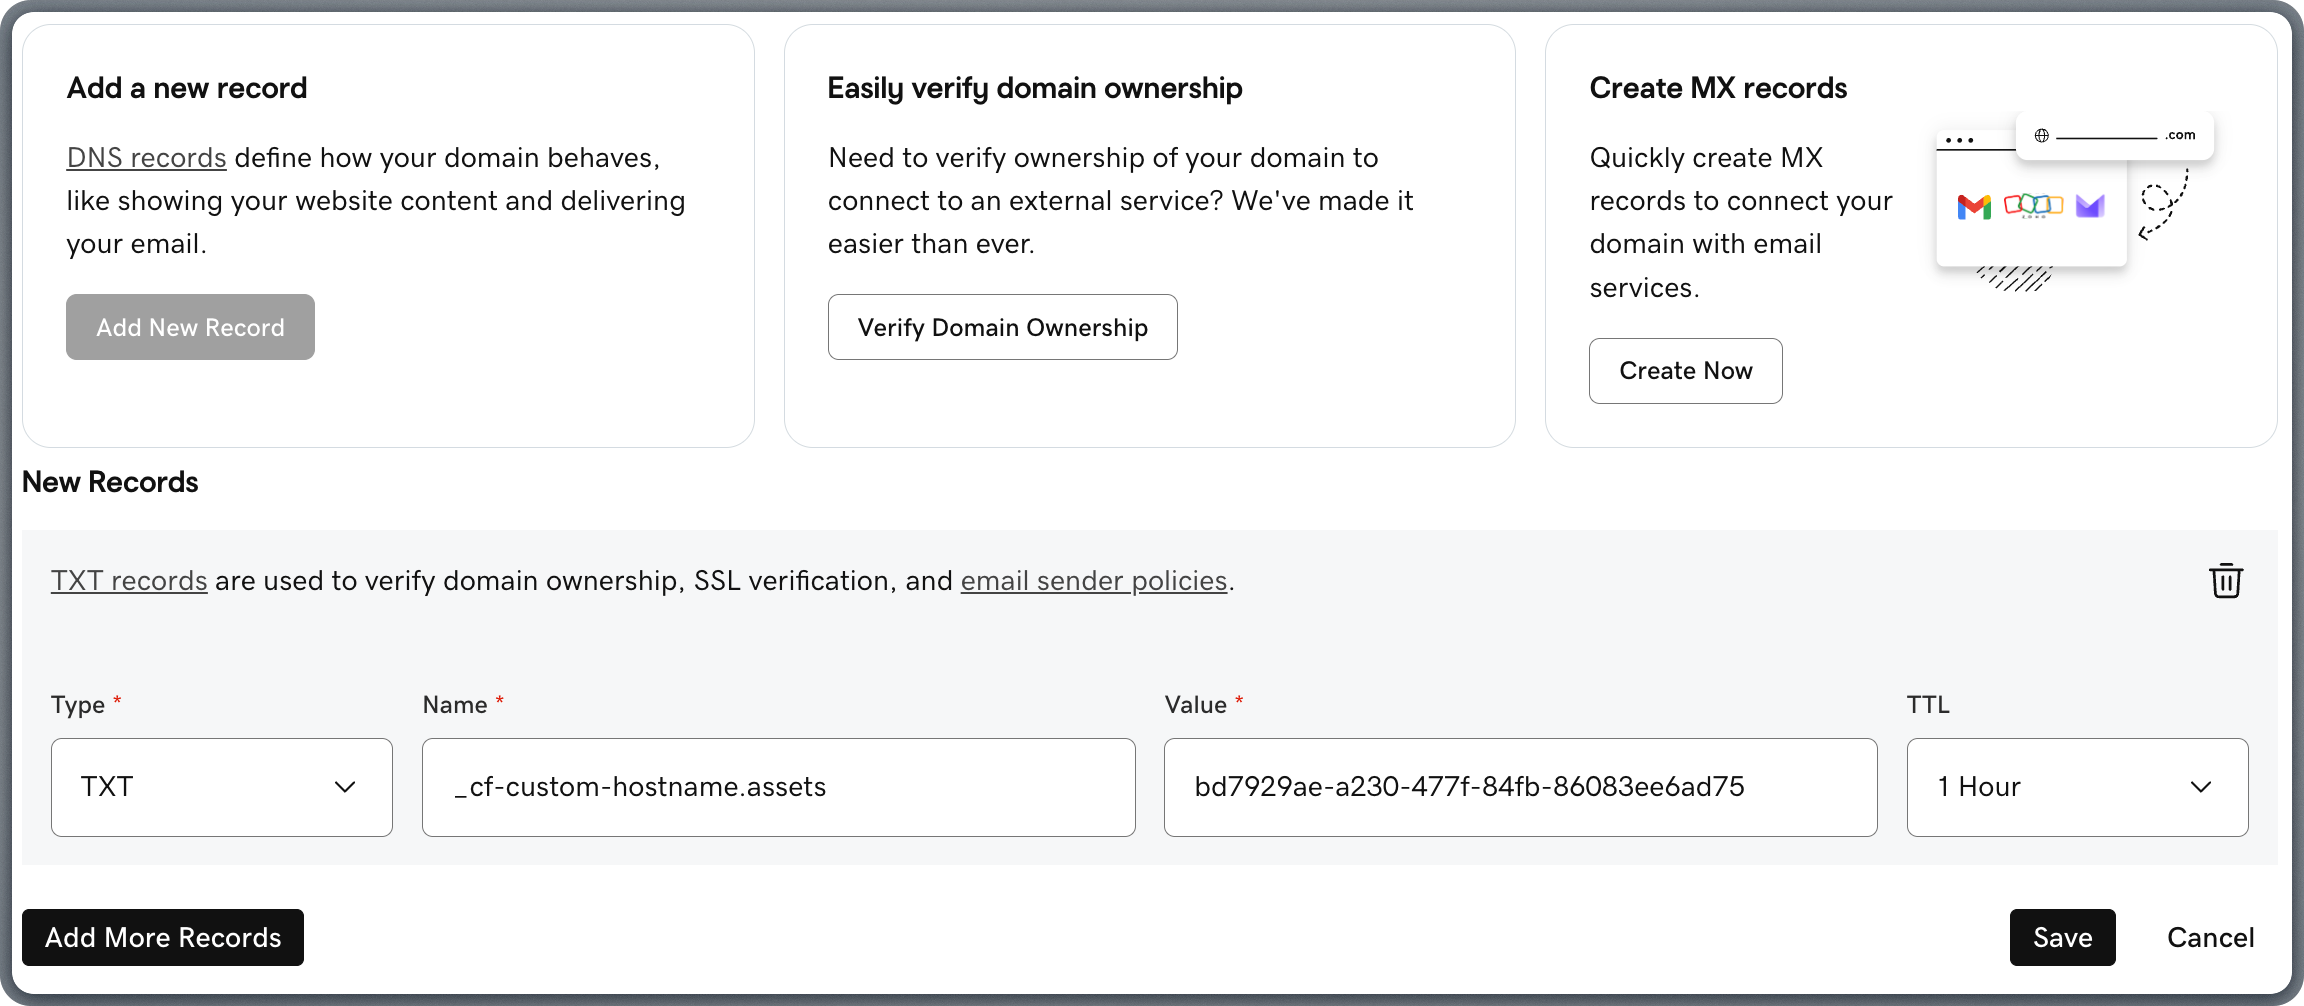
 ### Add TXT Record (Hostname Pre-validation)
The Hostname Pre-validation TXT record verifies ownership of the storage domain before Lettr provisions a custom hostname for it.
Add the record in GoDaddy:
1. Click **Add New Record** on the DNS Management page.
2. Select **TXT** from the **Type** dropdown.
3. Copy the **Hostname** from Lettr and paste it into the **Name** field in GoDaddy.
4. Copy the **Value** from Lettr and paste it into the **Value** field in GoDaddy.
5. Leave **TTL** set to the default.
6. Click **Save**.
Omit your domain suffix from the Hostname when pasting into GoDaddy, just as with the CNAME record above.
### Add TXT Record (Hostname Pre-validation)
The Hostname Pre-validation TXT record verifies ownership of the storage domain before Lettr provisions a custom hostname for it.
Add the record in GoDaddy:
1. Click **Add New Record** on the DNS Management page.
2. Select **TXT** from the **Type** dropdown.
3. Copy the **Hostname** from Lettr and paste it into the **Name** field in GoDaddy.
4. Copy the **Value** from Lettr and paste it into the **Value** field in GoDaddy.
5. Leave **TTL** set to the default.
6. Click **Save**.
Omit your domain suffix from the Hostname when pasting into GoDaddy, just as with the CNAME record above.
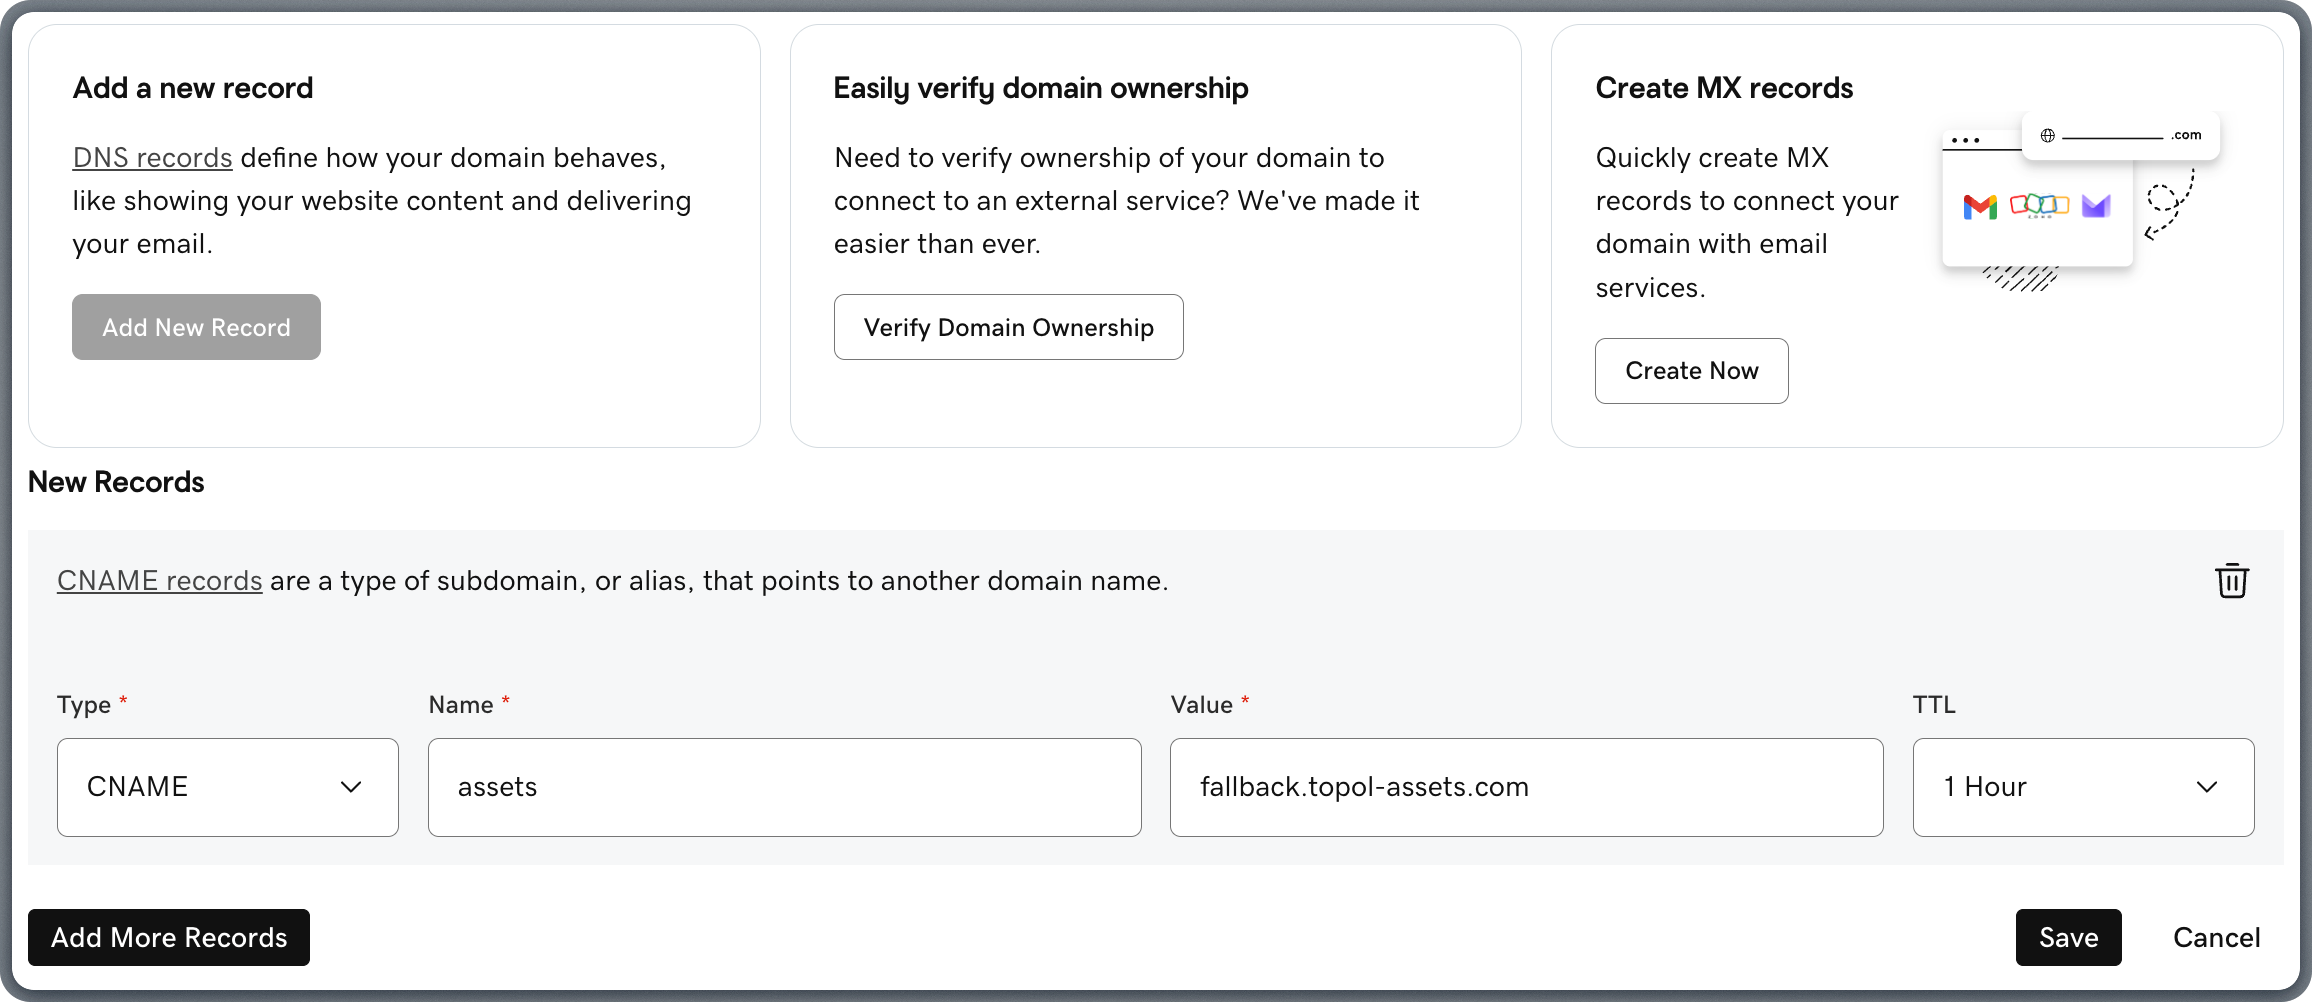
 ### Add CNAME Record (Domain Routing)
The Domain Routing CNAME record routes asset requests from your custom domain to Lettr's storage infrastructure.
Add the record in GoDaddy:
1. Click **Add New Record** on the DNS Management page.
2. Select **CNAME** from the **Type** dropdown.
3. Copy the **Hostname** from Lettr and paste it into the **Name** field in GoDaddy.
4. Copy the **Value** from Lettr and paste it into the **Value** field in GoDaddy.
5. Leave **TTL** set to the default.
6. Click **Save**.
Omit your domain suffix from the Hostname when pasting into GoDaddy. For example, instead of `assets.lettr-demo.com`, paste only `assets`.
### Add CNAME Record (Domain Routing)
The Domain Routing CNAME record routes asset requests from your custom domain to Lettr's storage infrastructure.
Add the record in GoDaddy:
1. Click **Add New Record** on the DNS Management page.
2. Select **CNAME** from the **Type** dropdown.
3. Copy the **Hostname** from Lettr and paste it into the **Name** field in GoDaddy.
4. Copy the **Value** from Lettr and paste it into the **Value** field in GoDaddy.
5. Leave **TTL** set to the default.
6. Click **Save**.
Omit your domain suffix from the Hostname when pasting into GoDaddy. For example, instead of `assets.lettr-demo.com`, paste only `assets`.
 ### Verify Your Storage Domain
After adding all three records, go back to Lettr and click **Verify DNS Records**.
***
## Troubleshooting
GoDaddy automatically appends your domain to the record name. If you paste the full hostname (e.g. `mailing.lettr-demo.com`), the resulting record will be `mailing.lettr-demo.com.lettr-demo.com`, which will fail verification.
Always paste only the subdomain portion (e.g. `mailing`, `scph0126._domainkey.mailing`, `_dmarc.mailing`).
GoDaddy often includes default MX records pointing to its own mail servers (e.g. `mailstore1.secureserver.net`). If these remain alongside the Lettr MX records, mail delivery may be unpredictable. If you are using a subdomain for inbound email (e.g. `inbound.company.com`), the default MX records on the root domain will not conflict. If you are using the root domain, delete the default GoDaddy MX records before adding the Lettr records.
GoDaddy has a 1024-character limit for individual TXT record values in some configurations. DKIM values can exceed this limit. If GoDaddy truncates the value or shows an error when saving, try the following:
* Split the value into two quoted strings separated by a space (e.g. `"first-half" "second-half"`). GoDaddy may concatenate them automatically.
* If splitting does not work, contact GoDaddy support to increase the TXT record value limit for your domain.
If GoDaddy truncates your DKIM TXT value, DKIM verification will fail. Always confirm the full value was saved by editing the record after creation.
If verification fails after adding records, check the following:
* **Wait at least 30 minutes** before your first verification attempt. Most records propagate within 1–2 hours.
* **Confirm the records exist** using command-line tools:
```bash theme={null}
# Check CNAME record
dig CNAME mailing.yourdomain.com +short
# Check DKIM record
dig TXT scph0126._domainkey.mailing.yourdomain.com +short
# Check DMARC record
dig TXT _dmarc.mailing.yourdomain.com +short
# Check MX records (inbound)
dig MX inbound.yourdomain.com +short
# Check tracking domain CNAME
dig CNAME track.yourdomain.com +short
# Check storage domain CNAME
dig CNAME assets.yourdomain.com +short
```
* **Use a web tool** like [dnschecker.org](https://dnschecker.org) to verify propagation across multiple DNS servers worldwide.
A common mistake is selecting the wrong type in GoDaddy's Type dropdown:
| Record | Correct Type |
| ------------------------------- | ------------ |
| Sending verification | CNAME |
| DKIM | TXT |
| DMARC | TXT |
| Inbound mail | MX |
| Tracking SSL certificate | CNAME |
| Tracking traffic | CNAME |
| Storage certificate validation | TXT |
| Storage hostname pre-validation | TXT |
| Storage domain routing | CNAME |
The DKIM TXT value is a long string. After saving the record in GoDaddy, click the pencil icon to edit the record and confirm the full value was stored. If it appears truncated, see the TXT Record Character Limit section above.
If your domain has GoDaddy's domain forwarding or parking enabled, it may add extra DNS records (such as A records or CNAME records for `@`) that interfere with your Lettr configuration. Disable domain forwarding and parking in GoDaddy's domain settings before adding Lettr DNS records.
If your domain is registered with GoDaddy but you have previously changed the nameservers to another provider, your DNS records in GoDaddy will not resolve. You can check this with:
```bash theme={null}
dig NS yourdomain.com +short
```
The output should include GoDaddy nameservers (e.g. `ns51.domaincontrol.com`, `ns52.domaincontrol.com`). If it shows a different provider's nameservers, either update them back to GoDaddy or add the Lettr DNS records at your current DNS provider instead.
If your DNS records are correctly configured (confirmed with `dig` or dnschecker.org) and verification still fails after 48 hours, contact Lettr support at **[support@lettr.com](mailto:support@lettr.com)** or through the in-app chat. Include your domain name and the output of the `dig` commands above.
***
## Related Topics
Learn about sending domain setup, SPF, DKIM, and DMARC.
Configure MX records to receive emails with Lettr.
Set up a custom tracking domain for click and open tracking.
Serve email assets from your own custom domain.
Understand domain types and how they work in Lettr.
Troubleshoot common DNS configuration and propagation issues.
### Verify Your Storage Domain
After adding all three records, go back to Lettr and click **Verify DNS Records**.
***
## Troubleshooting
GoDaddy automatically appends your domain to the record name. If you paste the full hostname (e.g. `mailing.lettr-demo.com`), the resulting record will be `mailing.lettr-demo.com.lettr-demo.com`, which will fail verification.
Always paste only the subdomain portion (e.g. `mailing`, `scph0126._domainkey.mailing`, `_dmarc.mailing`).
GoDaddy often includes default MX records pointing to its own mail servers (e.g. `mailstore1.secureserver.net`). If these remain alongside the Lettr MX records, mail delivery may be unpredictable. If you are using a subdomain for inbound email (e.g. `inbound.company.com`), the default MX records on the root domain will not conflict. If you are using the root domain, delete the default GoDaddy MX records before adding the Lettr records.
GoDaddy has a 1024-character limit for individual TXT record values in some configurations. DKIM values can exceed this limit. If GoDaddy truncates the value or shows an error when saving, try the following:
* Split the value into two quoted strings separated by a space (e.g. `"first-half" "second-half"`). GoDaddy may concatenate them automatically.
* If splitting does not work, contact GoDaddy support to increase the TXT record value limit for your domain.
If GoDaddy truncates your DKIM TXT value, DKIM verification will fail. Always confirm the full value was saved by editing the record after creation.
If verification fails after adding records, check the following:
* **Wait at least 30 minutes** before your first verification attempt. Most records propagate within 1–2 hours.
* **Confirm the records exist** using command-line tools:
```bash theme={null}
# Check CNAME record
dig CNAME mailing.yourdomain.com +short
# Check DKIM record
dig TXT scph0126._domainkey.mailing.yourdomain.com +short
# Check DMARC record
dig TXT _dmarc.mailing.yourdomain.com +short
# Check MX records (inbound)
dig MX inbound.yourdomain.com +short
# Check tracking domain CNAME
dig CNAME track.yourdomain.com +short
# Check storage domain CNAME
dig CNAME assets.yourdomain.com +short
```
* **Use a web tool** like [dnschecker.org](https://dnschecker.org) to verify propagation across multiple DNS servers worldwide.
A common mistake is selecting the wrong type in GoDaddy's Type dropdown:
| Record | Correct Type |
| ------------------------------- | ------------ |
| Sending verification | CNAME |
| DKIM | TXT |
| DMARC | TXT |
| Inbound mail | MX |
| Tracking SSL certificate | CNAME |
| Tracking traffic | CNAME |
| Storage certificate validation | TXT |
| Storage hostname pre-validation | TXT |
| Storage domain routing | CNAME |
The DKIM TXT value is a long string. After saving the record in GoDaddy, click the pencil icon to edit the record and confirm the full value was stored. If it appears truncated, see the TXT Record Character Limit section above.
If your domain has GoDaddy's domain forwarding or parking enabled, it may add extra DNS records (such as A records or CNAME records for `@`) that interfere with your Lettr configuration. Disable domain forwarding and parking in GoDaddy's domain settings before adding Lettr DNS records.
If your domain is registered with GoDaddy but you have previously changed the nameservers to another provider, your DNS records in GoDaddy will not resolve. You can check this with:
```bash theme={null}
dig NS yourdomain.com +short
```
The output should include GoDaddy nameservers (e.g. `ns51.domaincontrol.com`, `ns52.domaincontrol.com`). If it shows a different provider's nameservers, either update them back to GoDaddy or add the Lettr DNS records at your current DNS provider instead.
If your DNS records are correctly configured (confirmed with `dig` or dnschecker.org) and verification still fails after 48 hours, contact Lettr support at **[support@lettr.com](mailto:support@lettr.com)** or through the in-app chat. Include your domain name and the output of the `dig` commands above.
***
## Related Topics
Learn about sending domain setup, SPF, DKIM, and DMARC.
Configure MX records to receive emails with Lettr.
Set up a custom tracking domain for click and open tracking.
Serve email assets from your own custom domain.
Understand domain types and how they work in Lettr.
Troubleshoot common DNS configuration and propagation issues.